Positioning & FloatingS2C Home « Positioning & Floating
CSS allows us to position elements in several ways using the float and position CSS properties. In this lesson we explore these two properties, along with the other CSS properties we use in conjunction with them, to position our elements exactly where we want them.
Positional CSS Properties
position
Allows us to specify a box position for an element.
top, right, bottom and left
Specifies a top, right, bottom and left distance from the edge of the containing element, or page respectively.
clip
Specify the displayable dimensions, of a visible, absolutely positioned element.
z-index
Specify a stack order along the z-axis for positioned elements.
Floating CSS Properties
float
Allows us to move an element to the left or right edge of its containing element.
clear
Allows us to position an element under floated elements.
Viewing Positional Properties
Lets see some examples of using the float and position CSS properties, along with the properties used with them.
Open up the file with Notepad we created and tested in Lesson 6: Specificity (the cascade).
You saved the file to your computer in the C:\_CSSIntermediate folder as lesson_6_csspage.html
Copy and paste the following code into the reopened file, overwriting the existing text.
<!DOCTYPE html>
<!-- Our HTML/CSS for Positioning follows -->
<html  lang="en">
<head>
<title>Intermediate CSS - Lesson 7 - Positioning</title>

<style type="text/css">

.div1 {
  margin: 10px;
  padding: 10px;
  border: 1px solid black;
}
/* Absolute Positioning (no containing block) */
#img1 {
  position: absolute;
  right: 30px;
  top: 30px;
  border: 2px solid red;
}
/* Set Relative Positioning */
#div2 {
  margin: 10px;
  padding: 10px;
  border: 1px solid black;
  position: relative;
  color: fuchsia;
}
/* Absolute Positioning (inside a containing block)
   with a negative z-index and clipping */
#img2 {
  position: absolute;
  bottom: -20px;
  left: 20px;
  z-index: -1;
  clip: rect(0px, 75px, 75px, 0px);
  border: 3px solid green;
}
/* Fixed Positioning */
#img3 {
  position: fixed;
  left: 20px;
  z-index: -2;
  clip: rect(0px, 55px, 55px, 0px);
  bottom: -20px;
  border: 3px solid blue;
}
/* Float left */
.img5 {
  float: left;
  border: 3px solid fuchsia;
}
/* Float right */
#img6 {
  float: right;
  border: 3px solid yellow;
}
/* Clear header and images */
.clear1 {
  clear: both;
}

</style>

</head>
<body>
<h1>CSS Positional Properties</h1>
<h2>Absolute Positioning (no containing block)</h2>
<div class="div1">
<p>Look at the RED BORDERED image position within the HTML flow.
<img id="img1" src="https://server2client.com/images/beefalepiesmall.jpg"
    alt="Beef and Ale Pie"></p>
</div>
<h2>Absolute Positioning (inside a containing block)</h2>
<div id="div2">
<p>Look at the GREEN BORDERED image position within the HTML flow.
<img id="img2" src="https://server2client.com/images/beefalepiesmall.jpg"
    alt="Beef and Ale Pie"></p>
</div>
<h2>Fixed Positioning</h2>
<div class="div1">
<p>Look at the BLUE BORDERED image position within the HTML flow.
<img id="img3" src="https://server2client.com/images/beefalepiesmall.jpg"
    alt="Beef and Ale Pie"></p>
</div>
<h2>Float an image left with no clearance</h2>
<div class="div1">
<p>
<img class="img5" src="https://server2client.com/images/beefalepiesmall.jpg"
    alt="Beef and Ale Pie">
Floating an image to the left within a div. Notice how the text wraps
to the right of the image.
</p>
</div>
<h2 class="clear1">Float left and Right with clearance on both</h2>
<div class="div1">
<img class="img5" src="https://server2client.com/images/beefalepiesmall.jpg"
    alt="Beef and Ale Pie">
<img id="img6" src="https://server2client.com/images/beefalepiesmall.jpg"
    alt="Beef and Ale Pie">
<p class="clear1">
Floating 2 images to left and right within a div. Notice how the text clears
the images.
</p>
</div>
</body>
</html>
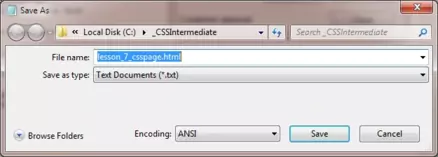
Save the file in the C:\_CSSIntermediate folder as lesson_7_csspage.html and close the Notepad.

Viewing Our Saved File
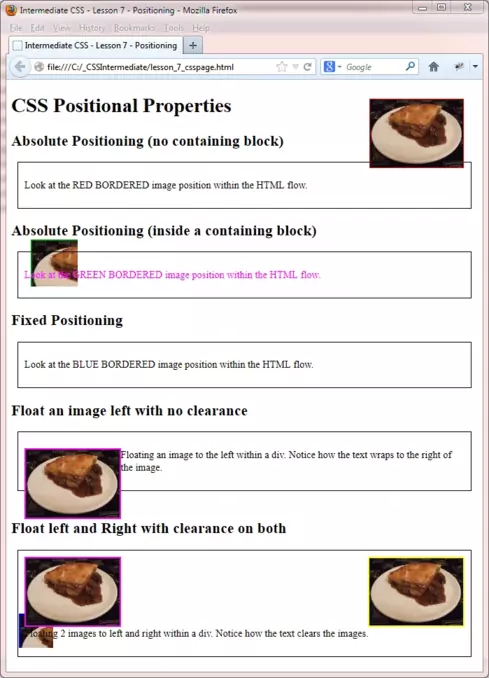
From the C:\_CSSIntermediate folder, double click on the saved file and it will appear in your default web browser and look something like the following images. We have used two screenshots here to show the fixed positioning and how it works
When you cut and paste the code, adjust the screen size to see the effects of the positioning.

Reviewing The Code
The blue text below matches the first comment for each style above, so you can see what is applied and where.
/* Absolute Positioning (no containing block) */
Ok, let's start with the first image shown in the screenshot
with the red border. This image has absolute positioning and has no containing block so will be placed relative to the screen.
/* Absolute Positioning (inside a containing block)
The second image with the green border also has absolute
positioning, but is positioned within a relatively positioned <div> block. Therefore this image is placed
absolutely, relative to the <div> block. This image has been clipped and has a negative
z-index which means its placed behind the text and borders.
/* Fixed Positioning */
The clipped image in the screenshots with the blue border has been fixed in position as
shown from the two screenshots above the image also has a negative z-index which means its placed behind the text
and borders.
/* Float left */
The image in the screenshots with the fuchsia border has been floated to the left. The text has no
clearance and so wraps the text to the right.
/* Float right */
The image in the screenshots with the yellow border has been floated to the right.
/* Clear header and images */
The header and paragraph with the style applied to this class have the
clear property set to the value both and so clear the images above them.
Lesson 7 Complete
Take some time getting to grips with the concept of positioning, and how relative positioning can be very useful, when used with absolute positioning. Adjust the screen and see how the fixed position element stays in place as the screen is moved and how the text for the floated items moves and wraps.
Related Tutorials
CSS intermediate Tutorials- Lesson 8 - Display
CSS Advanced Tutorials- Lesson 6 - Layout
What's Next?
In the next tutorial we look at some display properties that allow us to decide if, when and how we display elements.
CSS Reference
| Positional Properties | Float Properties |
|---|---|
| The position CSS Property | The float CSS Property |
| The top CSS Property | The clear CSS Property |
| The right CSS Property | |
| The bottom CSS Property | |
| The left CSS Property | |
| The clip CSS Property | |
| The z-index CSS Property |