Deployment & TestingS2C Home « Deployment & Testing
In this final lesson of the case study we deploy all the components we have created in the previous lessons from our development environment to the webapps folder within our installation of Tomcat.
After this we can run the bstrader web application within Tomcat and test the various components therein.
Tomcat DeploymentTop
The first thing we need to do is create our deployment file structure in Tomcat so we can move across all the components we have created in the previous lessons.
Go to your Tomcat installation which in my case is:
C:\apache-tomcat-6.0.37\webapps\
Within the webapps folder create a folder for our web application called bstrader
Copy the html files from the C:\_ServletsJSP_Case_Study\bstrader\view\ directory into the bstrader folder.
Within the bstrader folder create css and WEB-INF folders.
Copy the C:\_ServletsJSP_Case_Study\bstrader\classes directory and contents into the WEB-INF folder.
Copy the C:\_ServletsJSP_Case_Study\bstrader\lib directory and contents into the WEB-INF folder.
Copy the web.xml file from the C:\_ServletsJSP_Case_Study\bstrader\dd directory into the bstrader\WEB-INF folder.
Copy the main.css file from the C:\_ServletsJSP_Case_Study\bstrader\view\ directory into the bstrader\css folder.
Copy the C:\_ServletsJSP_Case_Study\bstrader\view\jsp directory and contents into the WEB-INF folder.
After creating these folders and copying the files from development your Tomcat directory structure within the webapps\bstrader folder should look something like the following screenshot:
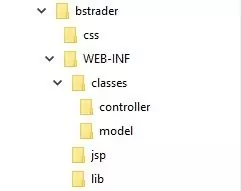
Once done our directory sturcture should tie in nicely with the diagram from the Our First Servlet - Tomcat Deployment Environment section of the site. The only difference is that we are going to put the JSP folder containing all the dynamic web pages we created in our design into the WEB-INF folder.
This is a more modern approach to the MVC paradigm and is often referred to as MVC-2. The advantage of this deployment is that our dynamic JSP pages will now be secure within the WEB-INF folder when we deploy them and cannot be altered.
Testing OverviewTop
The boot sale trader web application is a non-trivial project and involves quite a lot of areas that need testing. Due to space within each lesson the testing of the web application in this lesson may not be exhaustive and there are areas where more testing could be done. I will leave this for users of the case study to investigate and explore :)
For the purposes of this lesson the testing can be split into various areas as outlined below:-
- Stock Management
- Add / Modify / Delete stock item(s).
- Produce an inventory report of all stock.
- Produce a stock reorder report for items that are equal or less than a pre-specified stock level for that item.
- Produce a sales report of stock sold.
- Produce an out of stock report.
- Boot Sale Management
- Add / Modify / Delete boot sale location(s)
- Add / Modify / Delete boot sale diary(s)
- Website Marketing
- Display information on relevant boot sales which are attended by the trader.
- Display a boot sale diary giving information on future boot sales which are to be attended by the trader and on what dates.
- Display a product search page that will allow visitors to search products by product category.
- Display a best sellers page with pictures of stock being sold at upcoming boot sales and customer feedback.
- Allow a visitor to register on the website with an email address. The visitor can then be mailed at regular intervals with products being sold at upcoming boot sales and a diary of which boot sales locations the trader will be at and on which dates.
- Allow a registered user on the website to leave feedback on products they have bought .
- Trader Marketing
- Produce a customer report.
- Mass mail customer reports to all registered users of the website.
Before we get started let's fire up Tomcat so we can run the bootsale trader web application locally.
Open a command prompt and change the directory to the location of our Tomcat bin directory and then type in startup (Windows 7) or startup.sh (Linux/Unix/OSX).
Press Enter and the Tomcat server should open up in a new window.
You can also start up Tomcat by double-clicking the startup batch file within your Tomcat /bin folder.
With Tomcat up and running type the following into your web browser address bar and press enter:
http://localhost:8080/bstrader/traderfacilities
The web browser should be directed to the trader_signin.html page for entry of a username and password. Successful authentication can be achieved by typing in a username of kevin and a password of bootsale123.
Stock ManagementTop
Once you have successfully logged onto and entered the trader facilities page we can test the following stock management functions :-
- Add / Modify / Delete stock item(s).
- Produce an inventory report of all stock.
- Produce a stock reorder report for items that are equal or less than a pre-specified stock level for that item.
- Produce a sales report of stock sold.
- Produce an out of stock report.
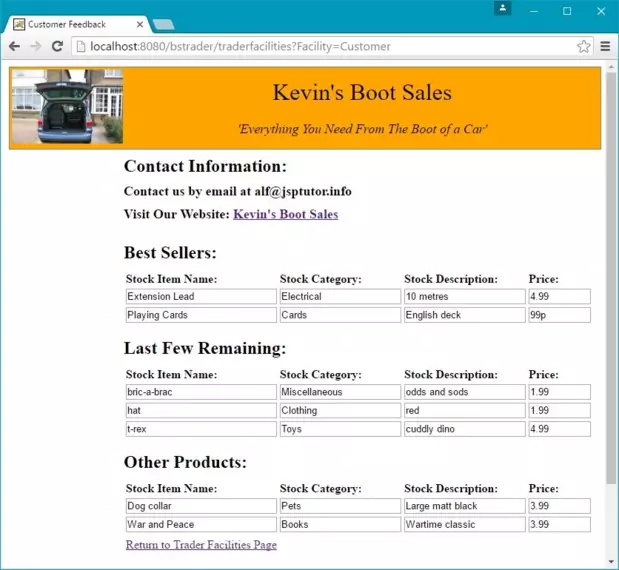
The first thing to do is add some stock items and the following screenshot of the delete stock item page shows the stock items I have created. I have made sure to create some stock items that trigger entries on the stock reorder and out of stock reports and that also creates Last Few Remaining and Other Products entries within the customer report. You can copy these entries when creating your own stock items if you want to follow my test flow.
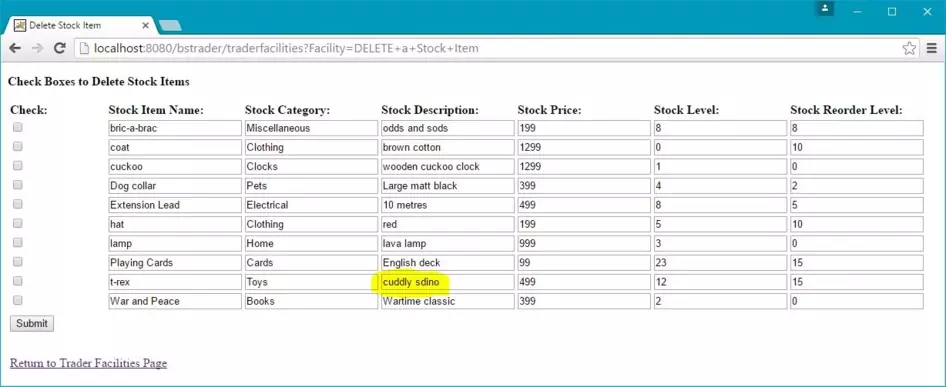
To create entries within the sales report and Best Seller entries within the customer report we need to modify stock item records to add stock sold at last bootsale and for this we will add amounts to the Extension Lead and Playing Cards stock items. There is also a typo for the t-rex stock description entry which we can correct to also test stock item selection and modification.
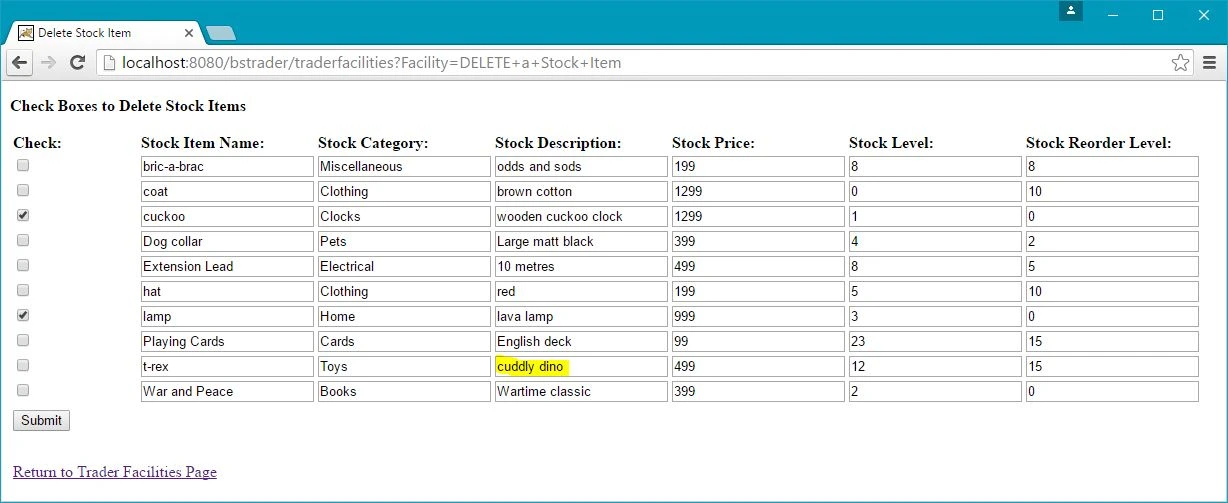
Lastly we need to test deletion of stock items and for this we will delete the cuckoo and lamp stock item entries.
The following screenshot shows the delete stock item page prior to deletion of the cuckoo and lamp stock item entries and after correction of the typo for the t-rex stock description entry.
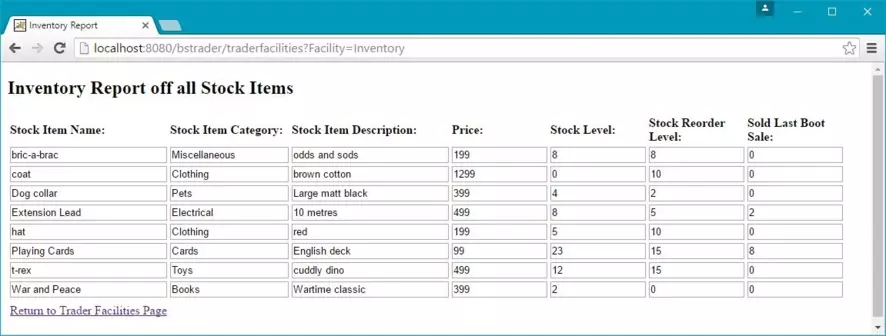
The following screenshot shows the Inventory Report off all Stock Items after deletion of the cuckoo and lamp stock item entries. It also shows the amounts of stock sold last boot sale we added to the Extension Lead and Playing Cards stock items.
The following screenshot shows the Stock Reorder Report.
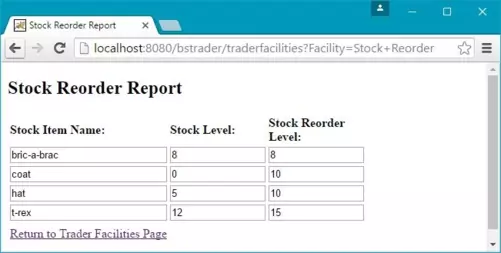
The following screenshot shows the Sales Report.
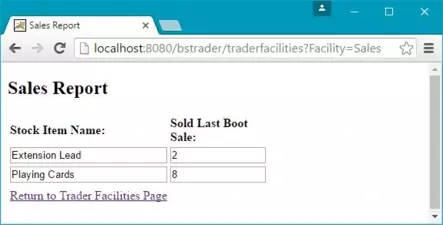
The following screenshot shows the Stock Reorder Report.
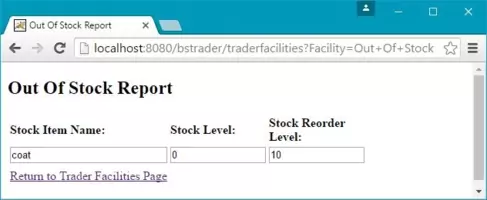
The following screenshot shows the Customer Report.
Boot Sale ManagementTop
With the stock management testing completed we can now test the following boot sale management functions :-
- Add / Modify / Delete boot sale location(s)
- Add / Modify / Delete boot sale diary(s)
The first thing to do is add some boot sale locations and the following screenshot of the boot sale location page shows the boot sale locations I have created. You can copy these entries when creating your own boot sale locations if you want to follow my test flow.

There are a few typos for the katies bootsale boot sale location entry which we can correct to also test boot sale location selection and modification.
Lastly we need to test deletion of boot sale locations and for this we will delete the berties bootsale boot sale location entry.
The following screenshot shows the delete boot sale locations page prior to deletion of the berties bootsale boot sale location entry and after correction of the typos for the katies bootsale boot sale location entry.

We can now add some boot sale diary entries and the following screenshot of the boot sale diary page shows the boot sale diary entries I have created. Now we have entries in locations and diaries this will also create ?? entries within the customer report. You can copy these entries when creating your own boot sale locations if you want to follow my test flow.
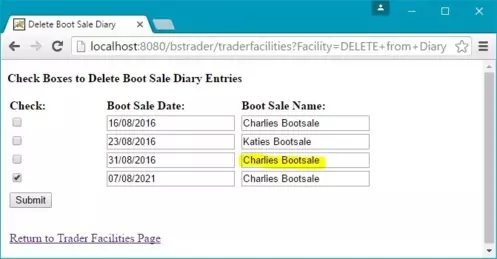
We will modify change the diary entry for 31/08/2016 and change the boot sale name entry to also test boot sale diary selection and modification.
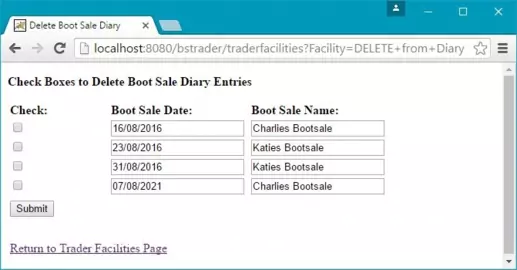
Lastly we need to test deletion of boot sale diary entry and for this we will delete the 07/08/2021 boot sale diary entry.
The following screenshot shows the delete boot sale diary page prior to deletion of the 07/08/2021 bootsale diary entry and after changing the boot sale name diary entry for 31/08/2016.
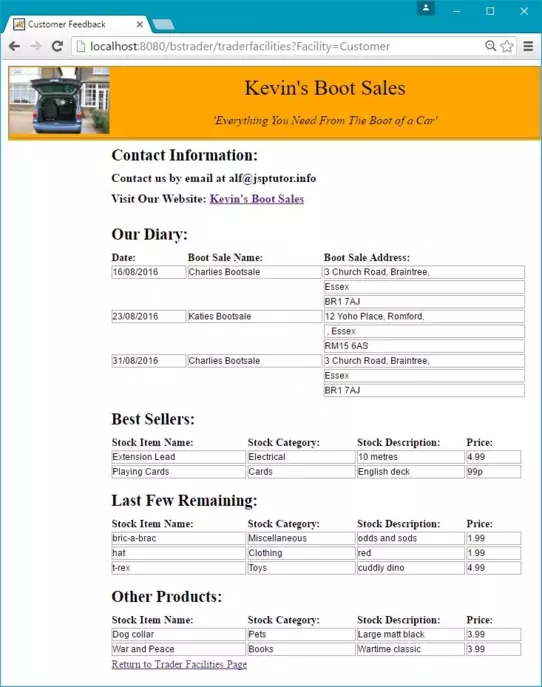
The following screenshot shows the Customer Report after the addition and deletion of boot sale locations and boot sale diary entries.
Website MarketingTop
The website marketing aspect of the site are the pages that visitors to the website can look at and interact with. We achieve this by doing the following :-
- Display information on relevant boot sales which are attended by the trader.
- Display a boot sale diary giving information on future boot sales which are to be attended by the trader and on what dates.
- Display a product search page that will allow visitors to search products by product category.
- Display a best sellers page with pictures of stock being sold at upcoming boot sales and customer feedback.
- Allow a visitor to register on the website with an email address. The visitor can then be mailed at regular intervals with products being sold at upcoming boot sales and a diary of which boot sales locations the trader will be at and on which dates.
- Allow a registered user on the website to leave feedback on products they have bought .
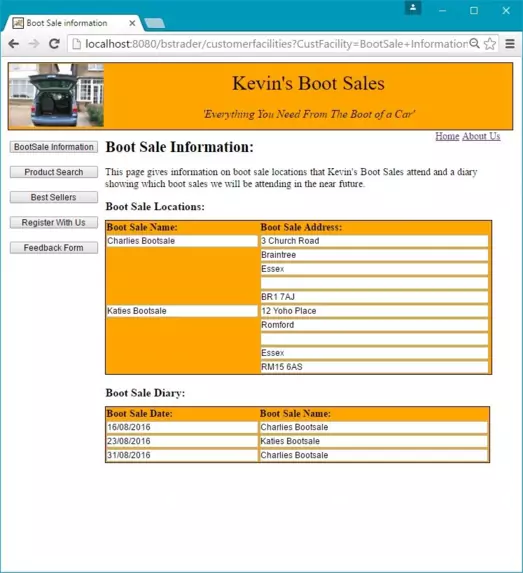
Information about boot sale names and addresses attended and the dates on which the trader attends these boot sales can be be found by any visitor who clicks on the BootSale Information button. This page gives details of boot sale locations and boot sale diary entries that were input by the trader in the trader facilities side of the site.
The following screenshot shows the Boot Sale Information page displaying boot sale locations and boot sale diary entries.
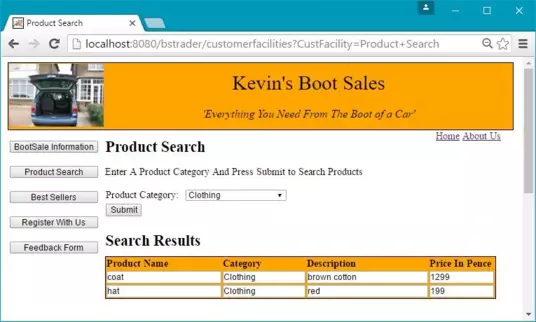
We need to allow visitors to the site a way of searching through our stock to find what they are looking for easily. This can be achieved through the Product Search page.
The following screenshot shows the Product Search page displaying stock items for Product Category clothing.
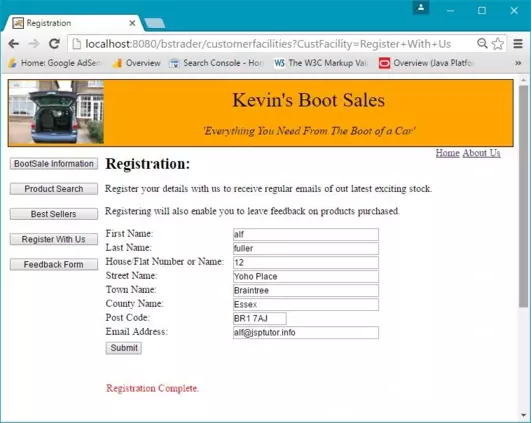
We need to allow visitors to register on the website with an email address. The visitor can then be mailed at regular intervals with a diary of which boot sales locations the trader will be at and on which dates along with product information.
The following screenshot shows the Registration page with registration details entered along with a valid email address.
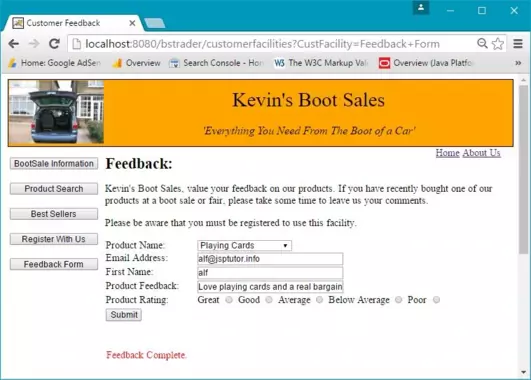
Now we have entered a valid user we can use this email to leave feedback on a product.
The following screenshot shows the Feedback page with the feedback entered for a registered user.
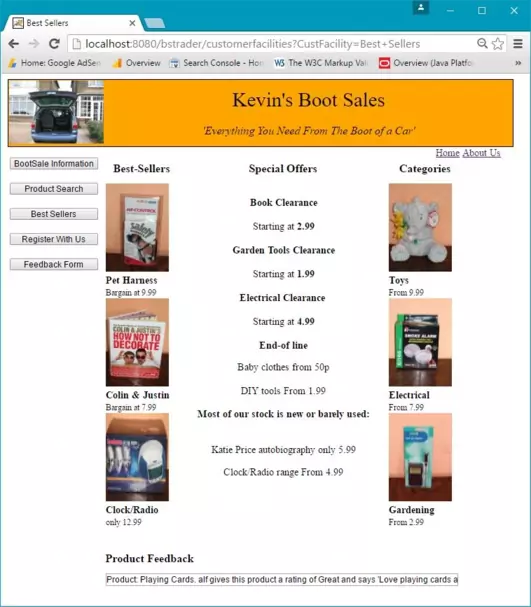
The final thing we need to check for website marketing is that the feedback entered for a product is displayed on the Best Sellers page.
The following screenshot shows the Best Sellers page with the feedback entered for a registered user.
Trader MarketingTop
The last thing we need to test is Trader Marketing of our website which entails sending a Customer Rport of boot sale information and our product rangeand to all registered users.
- Produce a customer report.
- Mass mail customer reports to all registered users of the website.
We have already seen screenshots of the Customer Rport produced so I want repeat that here.
Let's now test our Mass Email by sending an email to our registered user.
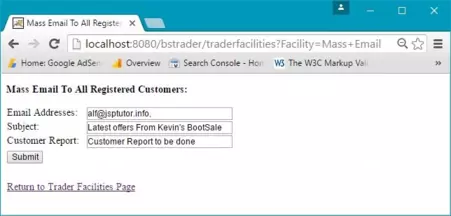
The following screenshot shows the submission of the Mass Email page with an email being sent to our registered user. This page is activated via the Mass Email button of the Trader Facilities page.
The system should report on the success of mailing to registered users. The following scriptless JSP code shows how to do this :-
Mass Email Result Screenshot
The following screenshot shows what the Mass Email page looks like:-

Lesson 10 Complete
In this lesson we deployed and tested the boot sale web application.
What's Next?
That's it for the case study and I hope you learn as much from reading it as I did from writing it.