Thread BasicsS2C Home « Thread Basics
In our first lesson of this section we look at multithreading and how to run parts of a program concurrently by subclassing the Thread class. Before we get into the lesson we need
to understand the terminology used throughout this section. We all multitask in our everyday lives, whether with each other, or as individuals in the things we do. We can analogize our everyday lives to the way computers deal with multitasking:
- The way we interact with each other is akin to a computer running different programs that may, or may not, interact with each other, such as running the JVM while playing a CD. As far as the computer is concerned these are separate entities that can be processed at the same time. Such entities do not share memory and data and are processed independently. Whether this is achieved through multiple processors of a CPU or by a scheduler, it is known as process-based multitasking. This type of multitasking is programmed into the hardware of our CPUs or our operating systems; so unless we are working on a bespoke operating system this type of multitasking doesn't really concern us as programmers.
- The way we multitask as individuals is like a computer running a single program and running different tasks within the program at the same time, such as reading from and writing to a file. Each of these processes can be run in its own thread of execution. A thread is the smallest unit of programmed instructions that can be managed independently by an operating systems scheduler. It is generally the case that a thread is contained within a single process and as such shares the memory and data of that process. This type of multitasking is known as thread-based multitasking and is what concerns us as programmers.
Whether multitasking is process-based or thread-based the common factor is that things are running at the same time or concurrently. When we talk about concurrency in this section we are referring to two or more threads of execution running simultaneously, although the same terminology can be applied to concurrent processes. You can think of each thread as separate stacks that operate independently of each other. Whether this is on a single procesor, where the underlying operating system shedules the threads to run, so they appear to be running in tandem, or on multiple processors where the threads are actually running in tandem, as far as we are concerned the threads are running concurrently.
Whenever we start up the JVM a thread is created, that usually calls the main() method of the invoking class. This initial thread is a non-daemon thread, also known as
a user thread. When we create our own threads, these can be user or daemon threads. So what's the difference? Well daemon threads are background threads that are subordinate
to the thread that created them. When the creating thread dies, so do any daemon threads created by it. Every thread we create takes on the characteristics of the thread
used to create it, so user threads beget user threads and daemon threads beget daemon threads. Created threads are also given a priority, which is initially the same as
the thread used in its creation. We can of course override the default characteristics of thread creation using methods of the Thread class and we will look at examples of setting the
type of thread in this lesson and cover priorites in the Thread Priorities lesson.
The JVM will continue executing threads until either of the following happens:
- All user threads have died in one of the following ways:
- By returning from the call to the
run()method. - By throwing an exception that has propagated beyond the
run()method.
- By returning from the call to the
- The
exit()method of theRuntimeclass has been called and the security manager has allowed theexitoperation to occur.
Thread StatesTop
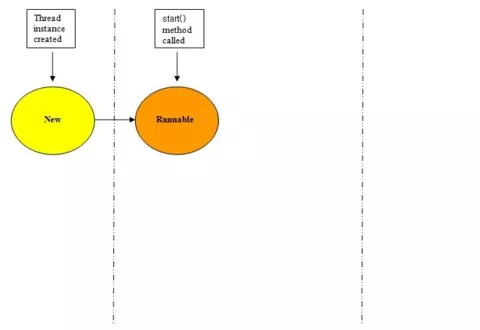
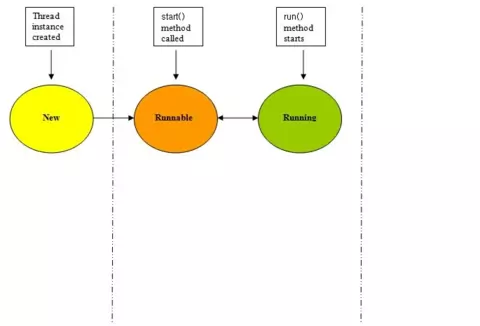
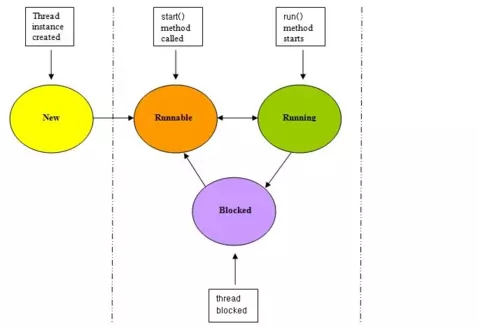
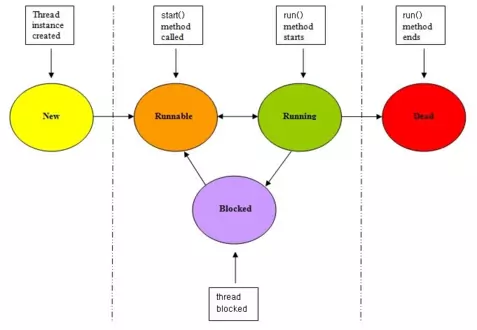
Before we look at some of the methods of the Thread class and do some coding, it's worth spending a little time talking about the differing states a thread can exist in and how a thread
can transition between the varying states. To make understanding easier we will use a slideshow as we go through the life of a thread; just press the button below to step through each slide.

In this slide we have created a new Thread object, which is just like any other object.
Thread Methods OverviewTop
The table below shows the declarations of the methods of the Thread class used in this lesson:
| Method Declaration | Description |
|---|---|
public void interrupt() | Interrupt specified thread. |
public final boolean isAlive() | Test if this thread is alive. |
public final boolean isDaemon() | Test if this is a daemon thread. |
public final String getName() | Obtains and returns the name of the thread. |
public void run() | If this thread was constructed using a subclass of the Thread class this method does nothing and should be overridden in the subclass.If this thread was constructed using a separate Runnable run object, then that Runnable object's run() method is called. |
public final void setDaemon(boolean on) | Marks this thread as a daemon thread if on set to true, or a user thread when on set to false. |
public static void sleep(long millis) | Causes the currently executing thread to sleep and temporarily stop execution, for the specified number of milliseconds. |
public void start() | The JVM calls the run() method of this thread, so it can begin execution. |
We will go through the methods mentioned above in much greater detail as we go through this lesson. Use the links in the table above to go to the code example where the method is first used.
Java DocumentationTop
As mentioned in the other sections Java comes with very rich documentation. The following link will take you to the online version of documentation for the JavaTM 2 Platform Standard Edition 5.0 API Specification.
Take a look at the documentation for the Thread class which you can find by scrolling down the lower left pane and clicking on Thread. You will go back to this documentation time and time again so if
you haven't done so already I suggest adding this link to your browser's favourites toolbar for fast access.
Creating A Folder For Our Concurrency Source Files
As this is a new section we will create a folder for our Concurrency files, in Windows this would be:
double click My Computer icon
double click C:\ drive (or whatever your local drive is)
right click the mouse in the window
from the drop down menu Select New
click the Folder option and call the folder _Concurrency and press enter.
Creating A Single ThreadTop
There are two ways of creating a thread in Java:
- By declaring a subclass of the
Threadclass where the subclass we create should override therun()method of theThreadclass and is the subject of this lesson. - By declaring a class that implements the
Runnableinterface and is the subject of the next lesson.
We will keep it simple to begin with, so lets start by creating a single thread from a subclass of the Thread class:
/*
  Create a single thread
*/
public class TestSingleThread extends Thread {
    // Constructor for new thread
    TestSingleThread (String name) {
        super(name);
    }

    // Override run() method of Thread to execute a new thread
    public void run() {
        System.out.println("The thread named: " + getName() + " is starting.");
        System.out.println("Is this a daemon thread? " + isDaemon());
        System.out.println("The thread named: " + getName() + " is ending.");
    }

    public static void main(String[] args) {
        System.out.println("Main user thread has started.");
        // Create a new thread
        TestSingleThread th = new TestSingleThread("Thread1");
        // Power up the thread via the start() method
        th.start();
        System.out.println("Main user thread has ended.");
    }
}
Save, compile and run the TestSingleThread class in directory c:\_Concurrency in the usual way.

The first thing we do in the TestSingleThread class is extend the Thread class. Our constructor makes a call to super for the appropriate constructor and we
also override the run() method from the Thread class which does nothing. In our main() method we create a new instance of TestSingleThread class and then
call the start() method on this object, which causes our override run() method to be invoked. We don't call the run() method explicitly as this would just call the
run() method as normal, in the same thread as the program that invokes it. Our override of the run() method, outputs a few messages showing the thread name and
a test to see if this is a daemon thread. Our thread is a user thread as it was created from the main() method, which is a user thread. As we didn't explicitly make it a
daemon thread it was run using the characteristics of the thread that created it.
A thing to remember here is that because the thread we created is a user thread it doesn't die with the main() method and continues processing until either its run() method
returns or the JVM shuts down.
Creating Multiple ThreadsTop
Ok, we have seen how to create a single thread using a subclass of the Thread class. It is now time to look at creating multiple threads within a program using a subclass of the Thread class:
/*
  Create multiple threads
*/
public class TestMultipleThreads extends Thread {
    // Constructor for new thread
    TestMultipleThreads (String name) {
        super(name);
    }

    // Override run() method of Thread to execute a new thread
    public void run() {
        System.out.println("The thread named: " + getName() + " is starting.");
        System.out.println("Is " + getName() + " a daemon thread? " + isDaemon());
        System.out.println("The thread named: " + getName() + " is ending.");
    }

    public static void main(String[] args) {
        System.out.println("Main user thread has started.");
        // Create a new thread
        TestMultipleThreads th1 = new TestMultipleThreads("Thread1");
        TestMultipleThreads th2 = new TestMultipleThreads("Thread2");
        TestMultipleThreads th3 = new TestMultipleThreads("Thread3");
        // Power up the threads via the start() method
        th1.start();
        th2.setDaemon(true);
        th2.start();
        th3.start();
        System.out.println("Main user thread has ended.");
    }
}
Save, compile and run the TestMultipleThread class in directory c:\_Concurrency in the usual way.
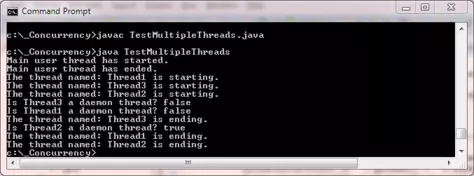
As with all the examples in this section where we use multiple threads, the output you get may vary from our screenshots as we have limited control over the order in which the threads are run.
The first thing we do in the TestMultipleThread class is extend the Thread class. Our constructor makes a call to super for the appropriate constructor and we
also override the run() method from the Thread class which does nothing. In our main() method we create three new instances of the TestMultipleThread
class and then call the start() method on these objects, which causes our override run() method to be invoked. Our override of the run() method, outputs a few
messages showing the thread name and a test to see if this is a daemon thread. We use the setDaemon() method on th2 to make this thread a daemon thread. The other threads
are created from the main() method, which is a user thread. As we didn't explicitly make these threads into daemon threads they are run using the characteristics of the
thread that created it.
As with the previous code example, the threads we created continue processing until either their run() methods return, or the JVM shuts down.
Interrupting A ThreadTop
In our previous examples we have mentioned the fact that user threads we create don't die with the main() method and even daemon threads continue processing until their run()
method ends. The overridden run() methods in our examples showed this by displaying thread output after the main() method ended. In this part of the lesson we will
highlight this with an infinite loop and then illustrate how we can interrupt a thread using the interrupt() method. For now you can stop the infinite loop by using Ctrl+C:
/*
  Create multiple threads to show how a thread continues after main() pops off the stack
*/
public class InterruptThreads extends Thread {

    // Constructor for new thread
    InterruptThreads (String name) {
        super(name);
    }

    // Override run() method of Thread to execute a new thread
    public void run() {
        System.out.println("The thread named: " + getName() + " is starting run().");
        // Keep running these threads till CTRL+C is pressed
        try {
            while (true) {
                System.out.println(getName() + " still alive? " + isAlive());
                sleep(1000);
            }
        } catch (InterruptedException ex) {
            System.out.println(ex);
        }
        System.out.println("The thread named: " + getName() + " is ending run().");
    }

    public static void main(String[] args) {
        System.out.println("Main user thread has started.");
        // Create a new thread
        InterruptThreads th1 = new InterruptThreads("Thread1");
        InterruptThreads th2 = new InterruptThreads("Thread2");
        InterruptThreads th3 = new InterruptThreads("Thread3");
        // Call run() method for threads
        th1.start();
        th2.setDaemon(true);
        th2.start();
        th3.setDaemon(true);
        th3.start();
        System.out.println("Main user thread has ended.");
    }
}
Save, compile and run the InterruptThreads class in directory c:\_Concurrency in the usual way.
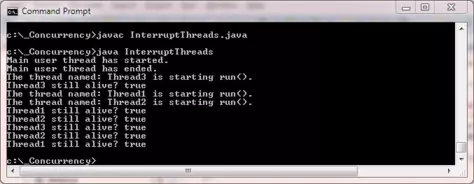
As with our other examples we use the InterruptThreads class to extend the Thread class. Our constructor makes a call to super for the appropriate constructor and
we also override the run() method from the Thread class which does nothing. In our main() method we create three new instances of the InterruptThreads
class and then call the start() method on these objects, which causes our override run() method to be invoked. Our override of the run() method, outputs a few
messages showing the thread name and then puts each thread into an infite loop, displaying some output and then putting each thread to sleep (ceases execution) for at least one second. The messages
will continue printing output to the console for our three threads until we use CTRL+C to stop the JVM running.
It's worth going into more detail here about the sleep() method as you will use this a lot when you start doing your own multithreading activities. The sleep() method is overloaded
but both versions of the method do the same thing, just with various precisions of time. The sleep() method guarantess that the currently executing thread ceases execution for at least the specified
amount of time. The example above sleeps the currently executing thread for at least a second; for that second the thread that was slept goes into a blocked state and will not become
runnable again until the specified period of time has elapsed. In this way we can sleep threads for small amounts of time knowing that other waiting threads will get a piece of the processor action.
The interrupt() MethodTop
We can automate the above example by using the interrupt() method of the Thread class. The following code is the same as above apart from the use of the interrupt() method:
/*
  Create multiple threads to show how a thread continues after main() pops off the stack
*/
public class InterruptThreads extends Thread {

    // Constructor for new thread
    InterruptThreads (String name) {
        super(name);
    }

    // Override run() method of Thread to execute a new thread
    public void run() {
        System.out.println("The thread named: " + getName() + " is starting run().");
        // Keep running these threads till CTRL+C is pressed
        try {
            while (true) {
                System.out.println(getName() + " still alive? " + isAlive());
                sleep(1000);
            }
        } catch (InterruptedException ex) {
            System.out.println(getName() + ": " + ex);
        }
        System.out.println("The thread named: " + getName() + " is ending run().");
    }

    public static void main(String[] args) {
        System.out.println("Main user thread has started.");
        // Create a new thread
        InterruptThreads th1 = new InterruptThreads("Thread1");
        InterruptThreads th2 = new InterruptThreads("Thread2");
        InterruptThreads th3 = new InterruptThreads("Thread3");
        // Call run() method for threads
        th1.start();
        th2.setDaemon(true);
        th2.start();
        th3.setDaemon(true);
        th3.start();
        // Interrupt our threads
        th1.interrupt();
        th2.interrupt();
        th3.interrupt();
        System.out.println("Main user thread has ended.");
    }
}
Save, compile and run the InterruptThreads class in directory c:\_Concurrency in the usual way.
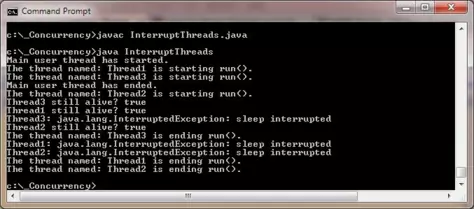
As with our other examples we use the InterruptThreads class to extend the Thread class. Our constructor makes a call to super for the appropriate constructor and
we also override the run() method from the Thread class which does nothing. In our main() method we create three new instances of the InterruptThreads
class and then call the start() method on these objects, which causes our override run() method to be invoked. Our override of the run() method, outputs a few
messages showing the thread name and then puts each thread into an infite loop, displaying some output and then putting each thread to sleep (ceases execution) for at least one second. Whilst this
is happening, back in the main() section we are calling the interrupt() method of the Thread class on each of the threads we created. As you can see from the
screenshot this produces an InterruptedException on sleeping threads. We catch the exception, display a message for each caught thread and the program terminates.
The interrupt() method doesn't actually stop a thread from running, but sets a flag in the thread that indicates that an interrupt has been requested. The flag must be checked
in the run() method for its effect to have any impact. In our example, we use the sleep() method, in which we have to specify a try block that checks to see if this thread
has been interrupted, which it has and then throws the InterruptedException for this thread.
Lesson 1 Complete
In our first lesson of this section we looked at multithreading and how to run parts of a program concurrently by subclassing the Thread class.
What's Next?
The second way of running parts of a program concurrently is by declaring a class that implements the Runnable interface and is the subject of the next lesson.
