Introduction to JSPS2C Home « Introduction to JSP
In this section we look at using JavaServer Pages (JSPs) and will be covering the 2.1 release. You need to have an understanding of Java and Servlets to get the most from these lessons, so if you're completely new to Java I suggest going to the Java section of the site and doing the lessons there first. If you're new to Servlets you would be better doing the lessons in the Sevlets section of the site first.
The following link will take you to the download page for the final release specification for the jsp release which you can download and read at your leisure, JSR-245 specification.
For us to use JSPs we need a Java SDK; details of downloading and installing this are given in the Introduction to Servlets lesson and a Servlet/JSP compliant web container to host our JSPs on; details of downloading and installing this are given in the Getting Tomcat lesson. The following table shows the correalation between the JSP, Servlets, Tomcat and Java versions used in these lessons:
| JSP | Servlets | Tomcat Version | Minimum Java Version |
|---|---|---|---|
| 2.1 | 2.5 | 6.0.x | 5 |
Firstly lets define what a JSP is and what it's used for. JSPs like Servlets give us the ability to serve dynamic web content to users from a Servlet/JSP compliant container such as Tomcat, within our web server and are generally used with the HTTP protocol. There are several advantages to using JSPs as the View component (presentation layer) of the Model-View-Controller Pattern we discussed in the Java EE5 & Servlets lesson:
- We saw in the Servlets section of the site how arduous it was to write even the simplest web page using Servlets. with JSPs we do not have to enclose all our HTML tags within Java Strings.
- Any changes made to hardcoded HTML tags or text within a Servlet require recompilation and redeployment, with JSPs we do not have to compile, recompile or redeploy our source code.
- JSPs can be invoked directly from a browser without any need to set up entries in the Deployment Descriptor (DD) which we have to do when using Servlets.
All this sounds great but JSPs are not a replacement for Servlets, in fact 'under the hood' JSPs are translated into Servlets by the container, the details of which we will go into in the JSP Lifecycle lesson. Think of the two technologies as accompaniments to each other, where we use JSPs for our View and Java and Servlets for the Model and Controller; in fact all modern web applications that use the technologies will have a mixture of each.
JSP APITop
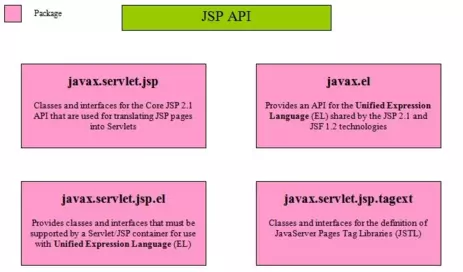
Before we write our very first JSP lets take a quick look at the JSP API which consists of four packages as illustrated in the diagram below:

- We will investigate the interfaces and classes within the
javax.servlet.jsppackage as we work through the rest of this section. - We will look at some of the interfaces and classes within the
javax.elpackage within the Expression Language 2.1 section. - We will inspect interfaces and classes in the
javax.servlet.jsp.tagextpackage in the JavaServer Pages Standard Tag Libraries 1.2 section.
Our First JSPTop
To see how easy it is to write a JSP instead of a servlet we will write a very simple JSP that just outputs a message.
Folder SetupTop
The first thing we are going to do in our setup is to make a base folder called _JSP in the root directory of our hard drive which we can put all web applications for this section into.
Lets create a folder for the JSPs for this section, in Windows this would be:
double click My Computer icon
double click C:\ drive (or whatever your local drive is)
right click the mouse in the window
from the drop down menu select New
click the Folder option and call the folder _JSP and press enter.
Within the _JSP folder we will create separate folders for each web application we use and our first web application will be called firstjsp
Within the firstjsp folder we will create separate folders to hold our DD and JSPs.
So after creating these folders your directory structure should look something like the following screenshot:

Coding first.jspTop
Our first very simple JSP is coded below and looks just like a HTML page.
<!DOCTYPE html>
<html>
  <head><title>Our First JSP</title></head>
  <body>
    <p>We just wrote our first JSP!</p>
  </body>
</html>
Saving first.jsp
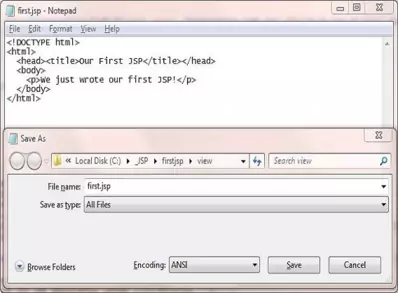
Ok, with Notepad or a similar text editor cut and paste the above HTML.
Click file from the toolbar and then click the save option.
In the Save in: tab at the top make sure you are pointing to the C:\_JSP\firstjsp\view folder.
In the File name: text area type first.jsp and then click the Save button and close the Notepad.
Change the Save as type: option to All Files as we don't want to end up with a .txt extension and then click the Save button and close the Notepad.

Tomcat DeploymentTop
Go to your Tomcat installation which in my case is:
C:\apache-tomcat-6.0.37\webapps\
Within the webapps folder create a folder for our web application called firstjsp
Copy the first.jsp file from our development environment into the firstjsp folder.
Create an empty WEB-INF folder within the firstjsp folder.
After creating the empty WEB-INF folder and copying the first.jsp file from development your Tomcat directory structure within the webapps\firstjsp folder should look something like the following screenshot:

Testing Our JSPTop
Open a command prompt and change the directory to the location of our Tomcat bin directory and then type in startup (Windows 7) or startup.sh (Linux/Unix/OSX).
Press Enter and the Tomcat server should open up in a new window.
You can also start up Tomcat by double-clicking the startup batch file within your Tomcat /bin folder.
With Tomcat up and running type the following into your web browser address bar and press enter:
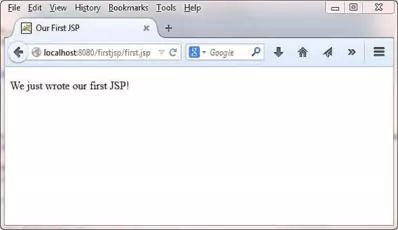
http://localhost:8080/firstjsp/first.jsp
The web browser should be directed to the first.jsp JSP within Tomcat, execute and produce a screen that looks like the following:

As you can see this is a lot easier than coding a Servlet to see the same page in a web browser. We will go into the mechanics of how this is achieved by the container over the next few lessons.
Hiding A JSPTop
There may be occasions when we don't want a JSP to be directly accessed via a URL and in these cases the mechanics are very similar to what we do with Servlets. In these cases we would need to create a DD and
place the JSP within the WEB-INF folder so it is hidden from direct access. To access the JSP we use the top-level <servlet> element
and use the <jsp-file> sub-level element instead of the <servlet-class> sub-level element.
Coding DD For Hidden JSPTop
The DD below shows how we could access a hidden JSP.
<?xml version="1.0" encoding="UTF-8"?>
<web-app xsi:schemaLocation="http://java.sun.com/xml/ns/javaee
                             http://java.sun.com/xml/ns/javaee/web-app_2_5.xsd"
         xmlns:xsi="http://www.w3.org/2001/XMLSchema-instance"
         xmlns="http://java.sun.com/xml/ns/javaee" version="2.5">
   <servlet>
      <servlet-name>Our First JSP</servlet-name>
      <jsp-file>/WEB-INF/jsp/first.jsp</jsp-file>
   </servlet>
   <servlet-mapping>
      <servlet-name>Our First JSP</servlet-name>
      <url-pattern>/hiddenjsp</url-pattern>
   </servlet-mapping>
</web-app>
The <jsp-file> sub-level element defines a JSP file rather than a servlet to be invoked and is used for JSP files whose URL we want to keep hidden from users. The only difference here is that we need to use the fully qualified path from the application root to access the JSP, the rest of the mechanics are the same as when using Servlets.
Tomcat DeploymentTop
Go to your Tomcat installation and go back to the firstjsp folder which in my case is:
C:\apache-tomcat-6.0.37\webapps\hiddenjsp\
Copy and save the web.xml file above into the WEB-INF folder.
Within the WEB-INF folder create a folder for our hidden jsp called jsp and move the first.jsp file into it
After creating these folders and moving the first.jsp file your Tomcat directory structure within the webapps\firstjsp folder should look something like the following screenshot:

Testing Our Hidden JSPTop
Open a command prompt and change the directory to the location of our Tomcat bin directory and then type in startup (Windows 7) or startup.sh (Linux/Unix/OSX).
Press Enter and the Tomcat server should open up in a new window.
You can also start up Tomcat by double-clicking the startup batch file within your Tomcat /bin folder.
With Tomcat up and running type the following into your web browser address bar and press enter:
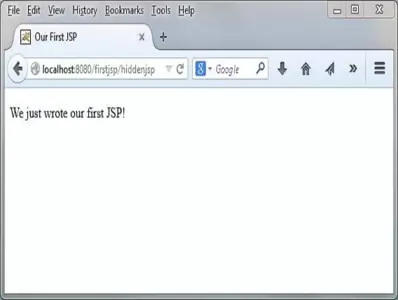
http://localhost:8080/firstjsp/hiddenjsp
The web browser should be directed to the first.jsp JSP within Tomcat, execute and produce a screen that looks like the following:

It's the same JSP but now it's hidden from users unless they know how to get to it.
Lesson 1 Complete
In our first lesson on jsp we talked about the advantages of using JSPs for our View and wrote a very simple JSP page and then used the same JSP but hidden in the WEB-INF folder.
What's Next?
In the next lesson we make a much deeper inspection of JSPs by looking at the JSP lifecycle.