Creating Our Own ExceptionsS2C Home « Creating Our Own Exceptions
In this lesson we learn how to create our own exceptions and use them in our code. Java has a plethora of libraries, which provide a host of exceptions that cover a high percentage of the exceptions that a newly created API might require. Whenever creating a bespoke API, it's better to use exceptions from existing Java libraries where possible. There are several compelling reasons for this, including reusability, familiarity and less to learn for a user of the API. Of course a situation may arise, where we need a totally new exception and Java allows us to create our very own exceptions when required.
Creating A Checked ExceptionTop
The following code is an example of a new exception that inherits from the Exception class and as such is a checked exception:
/*
  A Bespoke Checked Exception class
*/
class AllergyException extends Exception {
    String name;
    String food;

    AllergyException(String name, String food) {
        this.name = name;
        this.food = food;
    }

    public String toString() {
        return name + " has a " + food + " allergy.";
    }
}
Save and compile and the AllergyException class in directory c:\_FlowControl in the usual way. Now we need to write a test class to make sure our besoke exception works as intended.
/*
  Test AllergyException class
*/
public class TestAllergyException {
    public static void main(String[] args) {
        /*
          Populate some arrays and use for testing
        */
        String name[] = { "bill", "Fred", "Ned", "Ted", "Jed" };
        String food[] = { "", "Peanuts", "", "Sprouts" };

        for(int i=0; i<name.length; i++) {
            try {
                if(food[i] == "") {
                    System.out.println(name[i] + " has no food allergies.");
                } else {
                    throw new AllergyException(name[i], food[i]);
                }
            }
            catch (ArrayIndexOutOfBoundsException ex) {
                System.out.println("No index for allergy table." + ex);
            }
            catch (AllergyException ex) {
                System.out.println(ex);
            }
        }
    }
}
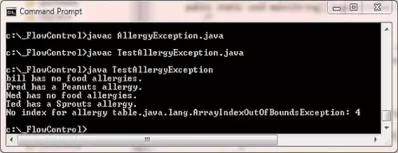
Save, compile and run the TestAllergyException test class in directory c:\_FlowControl in the usual way.

The above screenshot shows the output of running the TestAllergyException class. We throw our new AllergyException exception every time we find a food in the food[] array.
The AllergyException and ArrayIndexOutOfBoundsException exceptions are then caught and an appropriate message output. In the case of our new AllergyException exception this is whatever
we put into our override of the Object toString() method.
Creating An Unchecked ExceptionTop
The following code is an example of a new exception that inherits from the RuntimeException class and as such is an unchecked exception:
/*
  A Bespoke Runtime Exception class
*/
class NutAllergyException extends RuntimeException {
    String name;
    String food;

    NutAllergyException(String name, String food) {
        this.name = name;
        this.food = food;
    }

    public String toString() {
        return name + " has a " + food + " allergy.";
    }
}
Save and compile and the NutAllergyException class in directory c:\_FlowControl in the usual way. Now we need to write a test class to make sure our besoke exception works as intended.
/*
  Test NutAllergyException class
*/
public class TestNutAllergyException {
    public static void main(String[] args) {
        /*
          Populate some arrays and use for testing
        */
        String name[] = { "bill", "Fred", "Ned", "Ted", "Jed" };
        String food[] = { "Peanuts", "", "", "pecan", "walnut" };

        for(int i=0; i<name.length; i++) {
            try {
                if(food[i] == "") {
                    System.out.println(name[i] + " has no nut allergies.");
                } else {
                    throw new NutAllergyException(name[i], food[i]);
                }
            }
            catch (NutAllergyException ex) {
                System.out.println(ex);
            }
        }
    }
}
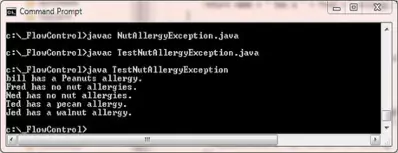
Save, compile and run the TestNutAllergyException test class in directory c:\_FlowControl in the usual way.

The above screenshot shows the output of running the TestNutAllergyException class. We throw our new NutAllergyException exception every time we find a nut in the food[] array.
The NutAllergyException is then caught and an appropriate message output, which is whatever we put into our override of the Object toString() method.
Lesson 4 Complete
In this lesson we learnt how to create our own exceptions and use them in our code.
What's Next?
In the next lesson we learn about the Assertion mechanism and how to write and then enable any assertion code within our programs.