Tomcat For EclipseS2C Home « Tomcat For Eclipse
In the first two lessons of the section we downloaded, installed and started the Tomcat source distribution file for use in the Servlets and jsp lessons. We completed these lessons using Java commands within a command prompt window so we could see how Java worked 'under the hood'. This is a great way to really understand how for example we get our source files to compile and how to point to different Jar files we need via the classpath.
In the real world Integrated Development Environments (IDEs) are in common usage for developing code and automate a lot the implementation details for us. This helps make us more productive and now we know what is going on 'under the hood' is not something that will seem to happen magically, we will know it is just automated for us by the IDE.
One of the most popular IDEs that we can use to make development of our Java applications easier is the Eclipse IDE which is free to use. You can find details of how to download the Eclipse by followig the link download the Eclipse IDE. In this lesson we will be looking at how to download Tomcat for use as a project within the Eclipse IDE. This will allow us to set breakpoints and step through code as we are developing it in Tomcat so we can really see what is happening to our code within the Tomcat Servlet container.
To download the lastest Tomcat version, that contains the Eclipse .project and .classpath files required to make an Eclipse project, we first need to download the Apache Ant build tool
and the Subversion source control tool, details of downloading both pieces of software follow:
Getting Apache AntTop
Apache Ant is a build Automation tool that was originally developed by James Duncan Davison for building Tomcat. The Ant tool became so popular as a build method it was made independent of Tomcat, given its
own project by the Apache Software Foundation and is now used to build a wide variety of applications. The download page for the current release of Apache Ant can be found at this link
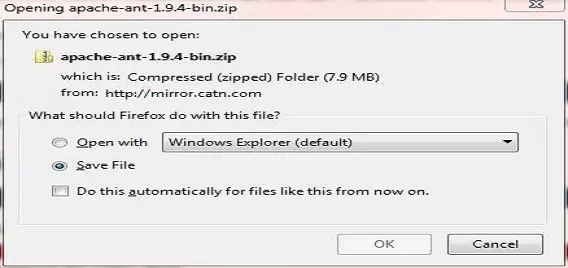
Apache Ant project - Binary Distributions. As I am using Windows I downloaded the binary distribution with the zip extension, so just pick the file you
require for your own system. The following screenshot shows the Windows version for Apache Ant at the time of writing this lesson:
Verifying Apache AntTop
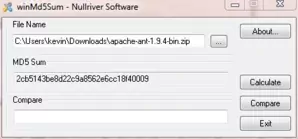
With Apache Ant downloaded we now need to verify our downloaded file. We are going to do this using an MD5 check summing utility. The following link Freeware Windows MD5 checksumming utility will allow us to get an MD5 utility so just click on the download for it on the page. On Windows 7, once the file is downloaded run the executable to install the software. Run the software and point it to wherever your download for Apache Ant is and you will get a screenshot something like the following:
Go back to the Apache Ant project - Binary Distributions page and click on the MD5 link next to the download you chose for Apache Ant. From the link that
appears cut and paste the MD5 checksum into the Compare panel of the MD5 utility and press the Compare button and hopefully you will see a screenshot similar to the following:
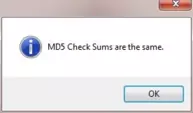
Although this method of verification is not cast iron, by getting the screenshot above we will assume security has been met and the file is valid. We can now extract the file to a location of our choice. On my
Windows7 system I unpacked the zip file to my c:\ drive.
Setting Apache Ant ClasspathTop
Now we have Apache Ant installed we need to add add the classpath for where the Apache Ant build tool executable resides. First lets open a command line prompt and type in ant. Below is a screenshot of what happens when we do this on my Windows7 system.

The ant command lies within the bin directory of the filepath where Apache Ant was installed which in my case is C:\apache-ant-1.9.4 and so we need to add this classpath to our environment variables. Below is a screenshot of how this is achieved on my Windows7 system and of course other OS will vary. But for Windows From Control Panel, select System >> Advanced System Settings and at the bottom of the window select Environment Variables. Add a classpath entry to the Path environment variable for when we want to use the ant command. To do this Edit system variable "Path" and add C:\apache-ant-1.9.4\bin\ (or whatever you selected as your filepath for the ant build tool) to the end seperating this classpath from the last with a semi-colon.
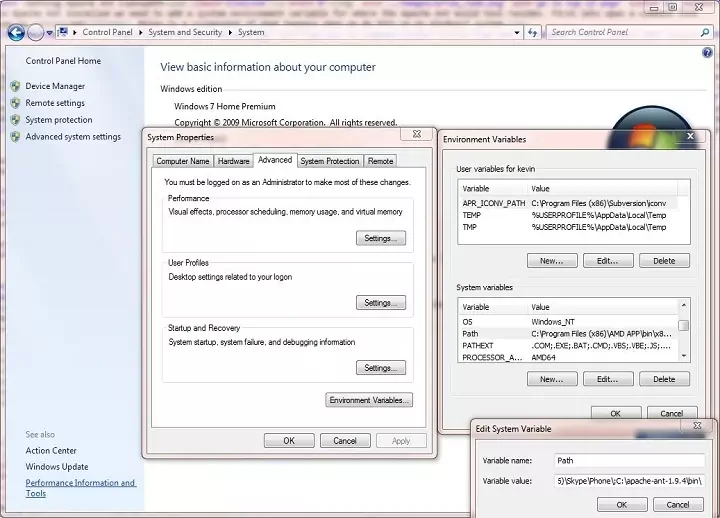
We also need to add a new system variable with the variable name of ANT_HOME and add C:\apache-ant-1.9.4 (or whatever you selected as your filepath for the ant directory)
as the variable value. Below is a screenshot of what happens when we the above steps on my Windows7 system and reboot the pc. As you can see the ant command is now recognized.

Getting SubversionTop
Subversion is a software version control tool developed by Karl Fogel and his team at CoolabNet, Inc. to replace CVS and has since become the standard version control mechanism used by the Apache Software Foundation.
The download page at ASF for the current release of Subversion can be found at this link Subversion - Apache Subversion Binary Packages. As I am using
Windows 64 I scrolled to the bottow and selected the sliksvn link, so just pick the file you require for your own system and follow the link. The following screenshot shows the Windows version of
Subversion I downloaded at the time of writing this lesson:
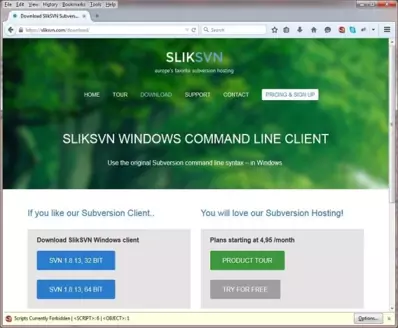
On my system once the file was downloaded I ran the windows installer for Slik-Subversion-1.8.13-x64 and just used the defaults and restarted my system. Using this particular software version the
classpath entry was added automatically, but follow the instructions below or similar for your system if this is not done by the software provider.
Setting Subversion ClasspathTop
Now we have Subversion installed we need to add a classpath (if this wasn't done automatically) for where the Subversion executable resides. First lets open a command line prompt and type in svn --version. Below is a screenshot of what happens when we do this on my Windows7 system.

The svn command lies within the bin directory of the filepath where Subversion was installed which in my case is C:\Program Files\SlikSvn and so we need to add this classpath to our environment variables. Below is a screenshot of how this is achieved on my Windows7 system and of course other OS will vary. But for Windows From Control Panel, select System >> Advanced System Settings and at the bottom of the window select Environment Variables. Add a classpath entry to the Path environment variable for when we want to use the svn command. To do this Edit system variable "Path" and add C:\Program Files\SlikSvn\bin (or whatever you selected as your filepath for Subversion) to the end seperating this classpath from the last with a semi-colon.
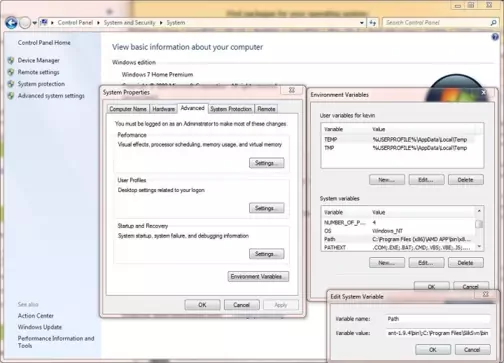
Below is a screenshot of what happens when we the above steps on my Windows7 system and reboot the pc. As you can see the svn --version command is now recognized.
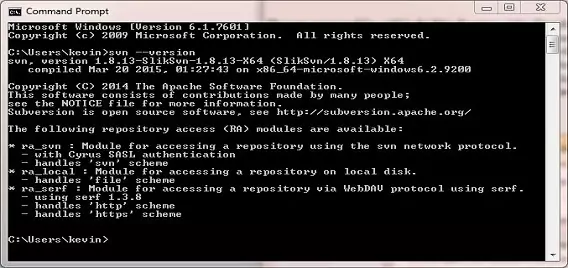
Getting Tomcat SourceTop
We now have the tools required to download the latest Tomcat source code from the Subversion repository at the ASF. To checkout the source we need to create a directory for the source to go into. The following
screenshot is on my Window7 system and I create the tomcat directory from the c:\ drive and then go to c:\tomcat.

Ok, within c:\tomcat directory, or whatever directory you created, type the following to download the most up-to-date version of the source 'trunk' for Tomcat.
svn checkout http://svn.apache.org/repos/asf/tomcat/tc6.0.x/trunk/
After typing this in you will see a lot of files being moved to your folder and at the end you should see a checked out revision as in the following screenshot:

Now we have the trunk we are ready to build Tomcat, so go to the trunk directory for your installation which in my case is C:\tomcat\trunk and type in ant download, as shown in the following scrrenshot:

This will target a number of binaries required for the build and you should end up with a successful build as shown in the following screenshot:

The artifacts will be downloaded to the folder that is identified by the base.path property that resides in the Ant build.properties.default file which by default is
usr/share/java. You can of course change this to a directory of your choice. The following screenshot shows the artifacts downloaded to my c:/usr/share/java directory.

Building TomcatTop
The final thing we need to do is build Tomcat and to do this we run the deploy target as shown in the following screenshot:

After running the deploy target we should get a successful build as shown in the following scrrenshot:

To make sure everything is working fine lets start up Tomcat from the C:\tomcat\trunk\output\build\bin diretory. The following screenshot shows Tomcat being started using the startup command:

This final screenshot shows Tomcat started and running in a separate window:

Lesson 3 Complete
We have downloaded the Ant build tool and the Subversion software version control tool and then used these tools to get the latest Tomcat build, deployed and run it.
What's Next?
That's it for the Tomcat lessons, in the next section we look at Getting Tomcat.