PackagesS2C Home « Packages
The rest of this section is about parts of the Java API, which unlike java.lang, are not implicitly imported into our programs. Before we look at these parts of the java API, we need to take a closer look
at how Java stores predefined classes into namespaces, which Java calls packages, and how we can import these packages into our programs.
In Java we can keep libraries of related classes together using a package and this is in essence what the Java language is, a collection of packaged libraries. There are two major benefits to the package approach adopted by Java.
- A package provides the apparatus for us to group related classes together under the same umbrella.
- All the example classes we have written on the site thus far, have all used the default namespace. This is fine for small simple classes where we are trying to teach a topic. Imagine a large system with hundreds of classes. We need a way to uniquely identify the classes and Java doesn't allow us to have two top-level classes with the same name, within the same namespace. By using packaging we can partition the namespace to alleviate naming conflicts.
- Within any reasonable sized system we will have classes that relate to different aspects of said system, such as the Model View Controller paradigm. Packaging allows us to separate concerns into areas such as a Model subpackage, a View subpackage and so on. This makes the whole development process easier and more manageable.
- A package is part of the Java mechanism we use to enforce Encapsulation.
- By not marking members within a package with an access modifier, we are saying that these members are package-private and can only be accessed from within this package.
- By marking members with the
protectedaccess modifier, we are saying that these members can only be accessed from within this package or from a subclass outside the package.
Using the package KeywordTop
Every class written in Java exists within a package. When no package statements are present within a class, such as all the example classes we have written on the site thus far, then the default package is used.
The default package has no name and is the reason we have been happily coding away without ever having to worry about packages. When we want to create a package for our files we do so using the package statement.
The following table shows usage of a single package statement and an example of a multiple hierarchy package statement.
| Package Form | Example | Description |
|---|---|---|
Single package | ||
package pkg; | package A; | This file is part of package A. |
Multiple package hierarchy | ||
package pkg.subPkg1.subPkg2...subPkgN; | package A.B.C; | This file is part of Package C, which is a subpackage of B, which is a subpackage of A. |
Java uses the underlying file system to manage packages, where each class within a package must be stored in a directory name that exactly matches the package name. Like all identifiers in Java, packages are case sensitive, so you need to be aware of this when naming your directories and packages.
Creating A Second Folder For Our API Contents Source Files
Because we are doing a lesson on packages we need another folder to highlight some of the topics covered in this lesson:
double click My Computer icon
double click C:\ drive (or whatever your local drive is)
right click the mouse in the window
from the drop down menu Select New
click the Folder option and call the folder _APIContents2 and press enter.
To illustrate the points covered in this lesson so far, we will write class and a test class that use different packages:
/*
  Our package statement is the first entry in a source file
*/
package _APIContents;

class ATestPackage {
    String firstName;
    String lastName;

    ATestPackage(String firstName, String lastName) {
        this.firstName = firstName;
        this.lastName = lastName;
        printName(firstName, lastName);
    }

    private void printName(String firstName, String lastName) {
        System.out.println("First name of: " + firstName);
        System.out.println("Last name of: " + lastName);
    }
}
Save and compile the ATestPackage class in directory c:\_APIContents in the usual way. Now we need to write a test class to make sure the ATestPackage class works as
intended.
/*
  Test the ATestPackage class
*/
package _APIContents2;

public class TestATestPackage {
    public static void main(String[] args) {
        _APIContents.ATestPackage a  = new _APIContents.ATestPackage("bim", "bam");
    }
}
A point to note about the above code thats slightly different from what we have seen before is that we have to qualify the TestATestPackage class with the _APIContents package it resides in
to use it. Save and compile the TestATestPackage test class in directory c:\_APIContents2 in the usual way (remember to change to the c:\_APIContents2 directory!).

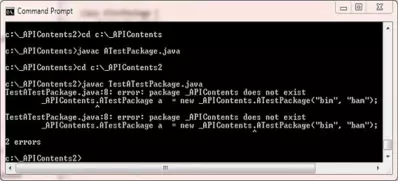
The above screenshot shows the output of compiling the TestATestPackage class. The compiler is saying the _APIContents package doesn't exist, but we know it does as we just created the folder for it.
As mentioned above packages need to replicate the underlying file system exactly which in our case they do. But how does Java know where to look for the _APIContents package?? Well by default, the Java
compiler will look for packages it needs in subdirectories of the current working directory. In our case when we try to compile the TestATestPackage class we are in the c:\_APIContents2
directory. So the Java compiler looks in any subdirectories it can find for the _APIContents package. There aren't any so the compiler throws an error. We could have course set a classpath for this package
as discussed in Setting A Classpath For The Java Compiler and it would have found the package.
We can use the -classpath option, (shorthand version is -cp), to tell the compiler where to find any dependencies we need to compile our TestATestPackage test class. So lets see an example
of doing just this. Save and compile the TestATestPackage test class in directory c:\_APIContents2 using the following command:
javac -cp c:\ TestATestPackage.java
What the above command is saying is compile the TestATestPackage class and look for any dependencies in subdirectories of c:\

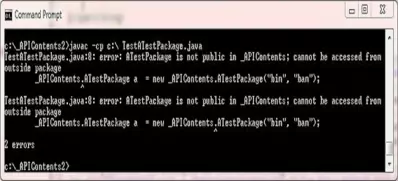
The above screenshot shows the output of compiling the TestATestPackage class. The compiler can now find the APIContents package but won't allow us access to the ATestPackage class
and contructor as these have no access modifier, and so the ATestPackage class and its constructor are package-private. So we need
to make the ATestPackage class and its constructor public so we can access them from outside their package:
/*
  Our package statement is the first entry in a source file
*/
package _APIContents;

public class ATestPackage {
    String firstName;
    String lastName;

    public ATestPackage(String firstName, String lastName) {
        this.firstName = firstName;
        this.lastName = lastName;
        printName(firstName, lastName);
    }

    private void printName(String firstName, String lastName) {
        System.out.println("First name of: " + firstName);
        System.out.println("Last name of: " + lastName);
    }
}
Recode the ATestPackage class in directory c:\_APIContents, as above to include public modifers for the class and contructor, and then save and compile in the usual way.
Now we need to go back to the c:\_APIContents2 directory. Save and compile using the -cp option as above and this time we should get a clean compile. Now we can run the
TestATestPackage test class in the usual way.

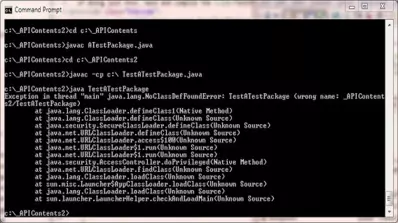
The above screenshot shows the output of running the TestATestPackage test class. This time we get a NoClassDefFoundError runtime exception as the java intepreter can't find our package/bitcode.
We also have to let the intepreter know where our package is and the following typed on the command line will do this:
java -cp c:\ _APIContents2.TestATestPackage
What the above command is saying is run the TestATestPackage class from package _APIContents2 which is within a subdirectory of the c:\ drive. Notice how we use dot notation
to qualify the TestATestPackage class within the _APIContents2 package, just as you would use it within a java class.

The above screenshot shows the output of running the TestATestPackage class. The intereter can now find the bitcode and runs and produces a couple of lines of output.
Using the import KeywordTop
In the preceding part of this lesson we saw how we had to qualify the TestATestPackage class with the _APIContents package it resides in to use it. Following is the line of code we used to do this
_APIContents.ATestPackage a = new _APIContents.ATestPackage("bim", "bam");
Having to qualify a class like this means more typing and it also makes the code harder to read. Luckily for us, Java allows us to import parts of a package, or even the whole package if required, and we do this using the
import keyword.
The following table shows how to import a single class from a package and all classes from a package using the import statement.
| Import Form | Example | Description |
|---|---|---|
Single class import | ||
import pkg.class; | import java.rmi.Remote; | Import the Remote class from java.rmi |
Multiple class import | ||
import pkg.subPkg1.subPkg2...subPkgN; | import java.rmi.*; | Import all java.rmi classes |
The following code amendments to the TestATestPackage class shows how we can use the import statement:
package _APIContents2;
/*
  here we import the ATestPackage class of the _APIContents package
*/
import _APIContents.ATestPackage;

public class TestATestPackage {
    public static void main(String[] args) {
        // We no longer need to qualify the ATestPackage class to use it
        ATestPackage a  = new ATestPackage("bim", "bam");
    }
}
Save, compile and run the TestATestPackage class using the following commands, as we did above:
javac -cp c:\ TestATestPackage.java
java -cp c:\ _APIContents2.TestATestPackage

The above screenshot shows the output of running the TestATestPackage class after using the import keyword. The results are the same as before with more readable code.
Although this is a simple example and you may not see the real benefits of using the import keyword, imagine you were using lots of different classes in you files and each had to be
qualified. Using the import keyword can really save you a lot of typing in this scenario and there is no performance hit when running your code, the compile will take a little longer, but won't
even be noticeable.
Static ImportsTop
With the introduction of java a new feature became available when using the import statement which is commonly known as static imports. When using the import keyword followed by
static we can import all the static members of a class or interface. This works in much the same way as non-static imports where the import means we don't have to qualify the member with package
and subpackage information.
The following table shows how to import a single static member from a package and all static members from a package using the import static statement.
| Import Static Form | Example | Description |
|---|---|---|
Single static member import | ||
import static pkg.staticMember; | import static java.lang.Math.acos; | Import the acos static member from java.lang.Math |
Multiple static member import | ||
import static pkg.allStaticMembers; | import static java.lang.Math.*; | Import all java.lang.Math static members |
The following A class shows how we can use the import static statement:
/*
  Our Static import statement for the Math acos Member
*/
import static java.lang.Math.acos;

public class A {
    public static void main(String[] args) {
        double d = acos(0.5);  // Here we just have to use acos because of the static import
        System.out.println("The arc cosine of 0.5 is " + d);
    }
}
Save, compile and run the A class in directory _APIContents in the usual way.

The above screenshot shows the output of running the A class after using the import static keywords. The results shows how we can use the unqualified static import of the java.lang.Math.acos member.
Lesson 3 Complete
We learnt how Java stores predefined classes into namespaces, which Java calls packages, and how we can import these packages into our programs.
What's Next?
It is now time to look at Java I/O in much more detail and we start three lessons on the subject with an overview of the various streams available in Java.