DialogsS2C Home « Dialogs
In our final lesson on Swing we look at dialogs and how and when to use them. So what exactly is a dialog? Well a dialog is a window that is displayed within the context of a parent window. Dialogs are often used
to display some information, show messages to the user or prompt the user for input. Within Swing we use the JDialog class to create dialog windows where we can display components to prompt our users
to undertake certain actions.
We have a couple of choices when creating our dialogs, these variations being non-modal and modal dialogs. Non-modal dialogs do not restrict usage of other parts of an application before being actioned and so can be left open and switched in and out of focus while also using other parts of the application. When we use a modal dialog it restricts usage of other parts of an application (except for any windows created with the dialog as their owner) until it is actioned which is generally done by clicking a component within its window. If the modal dialog requires user input then this is usually validated by pressing an OK button component or aborting the dialog data entry using a Cancel button component; both of these actions close the dialog window and return focus back to the application.
So when we want to display informational messages to our users that don't impact the rest of an application or don't require further actioning we can use a non-modal dialog. When we require something to be actioned before proceeding with an application, such as validation of user input, then a modal dialog should be the dialog of choice.
Dialogs like frames are hidden on creation and remain so until made visible using the setVisible() method. Other methods of interest in the class are the setModal() method which can be
used to switch between non-modal and modal types, the setTitle() method which allows us to set the title and the setResizable() method which we can use to allow or stop our users from
resizing the dialog.
There are a lot of options available when creating our dialogs and we can specify either a frame or dialog as the parent of this dialog or no parent when using the default no-args constructor in which case a shared hidden frame is used. The table below shows the different constructors available and what sort of dialog is instantiated.
| Constructor | Description | Modal Type |
|---|---|---|
JDialog() | The default no-args constructor where no parent is specifed and a shared hidden frame is used. | Non-modal |
JDialog(Frame parent) | Choose between a frame and a dialog parent. | Non-modal |
JDialog(Frame parent, String title) | Choose between a frame and dialog parent and add a title. | Non-modal |
JDialog(Frame parent, Boolean modal) | Choose between a frame and dialog parent and set modal type using modal. | Non-modal - modal set to falseModal - modal set to true |
JDialog(Frame parent, String title, | Choose between a frame and a dialog parent, add a title and set modal type using modal. | Non-modal - modal set to falseModal - modal set to true |
JDialog(Frame parent, String title, | Choose between a frame and a dialog parent, add a title, set modal type using modal and set graphic configuration using GraphicConfiguraion. | Non-modal - modal set to falseModal - modal set to true |
Non-modal DialogsTop
Non-modal dialogs do not restrict usage of other parts of an application before being actioned and so can be left open and switched in and out of focus while also using other parts of the application. We can create non-modal dialogs without any parameters or as specified in the constructor table above.
In the following example we create a frame with a button and attach a listener to the button. When the button is clicked we call an inner class to create and display a non-modal dialog window using the default no-args constructor where no parent is specifed and a shared hidden frame is used.
import javax.swing.JFrame;  // An interactive window
import javax.swing.JDialog; // An interactive dialog window
import javax.swing.JButton; // An interactive button
import javax.swing.JPanel;  // A panel
import javax.swing.JLabel;  // A label
import java.awt.*;          // AWT
import java.awt.event.*;    // AWT event package

public class OurActionListener implements ActionListener {
    JButton btn;

    public static void main (String[] args) {
        OurActionListener oal = new OurActionListener();
        oal.start();
    }
    public void start() {
        JFrame jf = new JFrame("Using the ActionListener Interface");
        // Create a JButton using our instance variable
        btn = new JButton("I will open a dialog window when clicked!");
        // Register the JButton with our OurActionListener object
        btn.addActionListener(this);
        // Add JButton to frame, set size and display it
        jf.add(btn);
        jf.setBounds(0, 0, 568, 218);
        jf.setDefaultCloseOperation(JFrame.EXIT_ON_CLOSE);
        jf.setVisible(true);
    }
    // Implement the only method from the ActionListener Interface
    public void actionPerformed(ActionEvent e) {
        if(e.getSource() == btn) {
            //Create a no-args constructor JDialog
            OurNonModalDialog onmd = new OurNonModalDialog();
        }
    }
    // Inner class where we create our dialog window
    class OurNonModalDialog extends JDialog implements ActionListener {
        OurNonModalDialog() {
            // Create a description pane
            JPanel descPanel = new JPanel();
            descPanel.add(new JLabel("Non-modal Dialog"));
            this.add(descPanel);
            // Create a button pane
            JPanel buttonPanel = new JPanel();
            JButton btn2 = new JButton("OK");
            btn2.addActionListener(this);
            buttonPanel.add(btn2);
            this.add(buttonPanel, BorderLayout.SOUTH);
            setDefaultCloseOperation(DISPOSE_ON_CLOSE);
            pack();
            setVisible(true);
        }
        // Implement the only method from the ActionListener Interface
        public void actionPerformed(ActionEvent e) {
            setVisible(false);
            dispose();
        }
    }
}
The following screenshot shows the results of compiling and running the OurActionListener class and pressing the button. We implement the ActionListener on our OurActionListener
top level class. We create an instance of OurActionListener and call the start() method with this object. We then create a frame and and a button and register the button with the invoking
object (this), which is our OurActionListener object called oal. We then set up our frame and implement the only method within the ActionListener interface
which is actionPerformed(ActionEvent e). Every time we press the button this method is invoked and within the method we create an instance of the inner class OurNonModalDialog. Within
this inner class we create a non-modal dialog window with an OK button. When we press this or exit the window the dialog is closed and disposed of. Becuase of the non-modal nature of the dialog box it is
possible to create multiple dialog windows and to focus in and out of them or the frame.

Here is another example of a non-modal dialog window using the constructor that takes a parent frame and a title. This time we have the non-modal dialog as a separate class so you can see another way of creating
the dialog window. Firstly here is our non-modal dialog class OurNonModalDialog.
import javax.swing.JFrame;  // An interactive window (our parent frame)
import javax.swing.JDialog; // An interactive dialog window
import javax.swing.JButton; // An interactive button
import javax.swing.JPanel;  // A panel
import javax.swing.JLabel;  // A label
import java.awt.*;          // AWT
import java.awt.event.*;    // AWT event package

public class OurNonModalDialog extends JDialog implements ActionListener {
    public OurNonModalDialog(JFrame parent, String title) {
        // Get parent frame and title
        super(parent, title);
        // Set dialog within parent frame if one exists
        if(parent != null) {
            Dimension parentFrameSize = parent.getSize();
            Point p = parent.getLocation();
            setLocation(p.x+parentFrameSize.width/2, p.y+parentFrameSize.height/2);
        }
        // Create a description pane
        JPanel descPanel = new JPanel();
        descPanel.add(new JLabel("Non-modal Dialog created using parent and title"));
        this.add(descPanel);
        // Create a button pane
        JPanel buttonPanel = new JPanel();
        JButton btn = new JButton("OK");
        btn.addActionListener(this);
        buttonPanel.add(btn);
        this.add(buttonPanel, BorderLayout.SOUTH);
        setDefaultCloseOperation(DISPOSE_ON_CLOSE);
        pack();
        setVisible(true);
    }
    // Implement the only method from the ActionListener Interface
    public void actionPerformed(ActionEvent e) {
        setVisible(false);
        dispose();
    }
}
Here is the OurParentFrame class where we create a frame and call the OurNonModalDialog class.
import javax.swing.JFrame;  // An interactive window
import javax.swing.JButton; // An interactive button
import java.awt.event.*;    // AWT event package

public class OurParentFrame implements ActionListener {
    JFrame jf;
    JButton btn;

    public static void main (String[] args) {
        OurParentFrame opf = new OurParentFrame();
        opf.start();
    }
    public void start() {
        jf = new JFrame("Creating a non-modal dialog with a parent and title");
        // Create a JButton using our instance variable
        btn = new JButton("I will open a dialog window when clicked!");
        // Register the JButton with our OurActionListener object
        btn.addActionListener(this);
        // Add JButton to frame, set size and display it
        jf.add(btn);
        jf.setBounds(300, 200, 568, 218);
        jf.setDefaultCloseOperation(JFrame.EXIT_ON_CLOSE);
        jf.setVisible(true);
    }
    // Implement the only method from the ActionListener Interface
    public void actionPerformed(ActionEvent e) {
        if(e.getSource() == btn) {
            //Create a no-args constructor JDialog
            OurNonModalDialog onmd = new OurNonModalDialog(jf, "non-modal title");
        }
    }
}
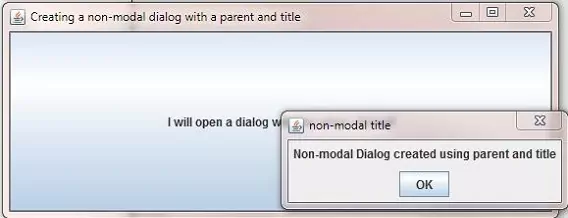
The following screenshot shows the results of compiling the OurNonModalDialog and OurParentFrame classes and running the OurParentFrame class and pressing the button. We
implement the ActionListener on our OurParentFrame top level class. We create an instance of OurParentFrame and call the start() method with this object. We
then create a frame and and a button and register the button with the invoking object (this), which is our OurParentFrame object called opf. We then set up our frame and
implement the only method within the ActionListener interface which is actionPerformed(ActionEvent e). Every time we press the button this method is invoked and within the method we
create an instance of the OurNonModalDialog class passing the frame and a title. Within OurNonModalDialog we create a non-modal dialog window with an OK button using coordinates from
the parent frame to set its position. When we press OK or exit the window the dialog is closed and disposed of. Because of the non-modal nature of the dialog box it is possible to create multiple
dialog windows and to focus in and out of them or the frame.

Modal DialogsTop
Modal dialogs restrict usage of other parts of an application until actioned (except for any windows created with the dialog as their owner) which is generally done by clicking a component within the dialog window. If the modal dialog requires user input then this is usually validated by pressing an OK button component or aborting the dialog data entry using a Cancel button component; both of these actions close the dialog window and return focus back to the application.
Modal dialogs are set on construction by setting the Boolean within the constructor to true. If the Boolean within the constructor is not set to true on
instantiation then it defaults to a false value and we end up with a non-modal dialog. We can switch between modal and non-modal dialog modes by using the setModal() method and setting the parameter accordingly.
Here is an example of a modal dialog window using the constructor that takes a parent frame, title and Boolean and uses a separate class for the dialog window. Firstly here is our modal dialog class OurModalDialog.
import javax.swing.JFrame;  // An interactive window (our parent frame)
import javax.swing.JDialog; // An interactive dialog window
import javax.swing.JButton; // An interactive button
import javax.swing.JPanel;  // A panel
import javax.swing.JLabel;  // A label
import java.awt.*;          // AWT
import java.awt.event.*;    // AWT event package

public class OurModalDialog extends JDialog implements ActionListener {
    public OurModalDialog(JFrame parent, String title, Boolean modal) {
        // Get parent frame, title and modal
        super(parent, title);
        // Set dialog within parent frame if one exists
        if(parent != null) {
            Dimension parentFrameSize = parent.getSize();
            Point p = parent.getLocation();
            setLocation(p.x+parentFrameSize.width/2, p.y+parentFrameSize.height/2);
        }
        // Create a description pane
        JPanel descPanel = new JPanel();
        descPanel.add(new JLabel("Modal Dialog created using parent, title and modal type"));
        this.add(descPanel);
        // Create a button pane
        JPanel buttonPanel = new JPanel();
        JButton btn = new JButton("OK");
        btn.addActionListener(this);
        buttonPanel.add(btn);
        this.add(buttonPanel, BorderLayout.SOUTH);
        setDefaultCloseOperation(DISPOSE_ON_CLOSE);
        pack();
        setVisible(true);
    }
    // Implement the only method from the ActionListener Interface
    public void actionPerformed(ActionEvent e) {
        setVisible(false);
        dispose();
    }
}
Here is the OurParentFrame class where we create a frame and call the OurModalDialog class.
import javax.swing.JFrame;  // An interactive window
import javax.swing.JButton; // An interactive button
import java.awt.event.*;    // AWT event package

public class OurParentFrame implements ActionListener {
    JFrame jf;
    JButton btn;

    public static void main (String[] args) {
        OurParentFrame opf = new OurParentFrame();
        opf.start();
    }
    public void start() {
        jf = new JFrame("Creating a modal dialog with a parent and title");
        // Create a JButton using our instance variable
        btn = new JButton("I will open a modal dialog window when clicked!");
        // Register the JButton with our OurActionListener object
        btn.addActionListener(this);
        // Add JButton to frame, set size and display it
        jf.add(btn);
        jf.setBounds(300, 200, 568, 218);
        jf.setDefaultCloseOperation(JFrame.EXIT_ON_CLOSE);
        jf.setVisible(true);
    }
    // Implement the only method from the ActionListener Interface
    public void actionPerformed(ActionEvent e) {
        if(e.getSource() == btn) {
            //Create a no-args constructor JDialog
            OurModalDialog omd = new OurModalDialog(jf, "modal title", true);
        }
    }
}
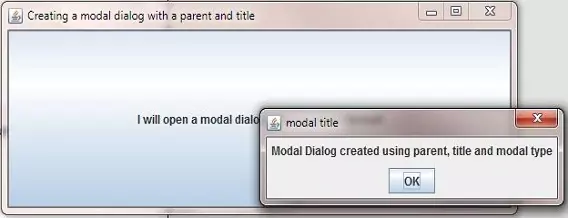
The following screenshot shows the results of compiling the OurModalDialog and OurParentFrame classes and running the OurParentFrame class and pressing the button. We
implement the ActionListener on our OurParentFrame top level class. We create an instance of OurParentFrame and call the start() method with this object. We
then create a frame and and a button and register the button with the invoking object (this), which is our OurParentFrame object called opf. We then set up our frame and
implement the only method within the ActionListener interface which is actionPerformed(ActionEvent e). Every time we press the button this method is invoked and within the method we
create an instance of the OurModalDialog class passing the frame, title and true. Within OurModalDialog we create a modal dialog window with an OK button using coordinates from
the parent frame to set its position. When we press OK or exit the window the dialog is closed and disposed of. Because of the modal nature of the dialog box it is not possible to lose focus on the dialog
box until it is actioned and closed.

JOptionPane DialogsTop
Creating dialogs using the javax.swing.JDialog class can be laborious and time consuming but luckily for us as programmers we have another option. The javax.swing.JOptionPane class is an
easier way to create pop up modal dialogs. Although there are a lot of static methods within the JOptionPane class for creating modal dialogs, which at may at first seem daunting, nearly all
uses of the JOptionPane class boil down to one-line calls to one of the static showxxxDialog() methods listed in the table below. The parameters are consistent across all the
methods used and so are displayed in one column showing the most common parameter combination types and order of parameters followed by information on the individual parameters.
| Method | Description | Common Parameter Combinations & Descriptions |
|---|---|---|
showConfirmDialog() | Confirm response required | showxxxDialog(Component parentComponent, Object message)
parentComponent - Defines Component parent of this dialog box and also used for dialog positioning. This parameter can also have the value null, and if so a default
Frame is used as the parent, and the dialog is centered on the screen, dependant upon the Look and Feel in use. message - Descriptive
message to be placed in the dialog box which is of type Object although this is generally a String or String constant. The actual interpretation of this parameter depends on its type:
Object[] - Array of objects interpreted as a series of messages (one per object) arranged in a vertical stack. Component - Displayed in the dialog.Icon -
Wrapped in a JLabel and displayed in the dialog.Anything else is converted to a String by calling its toString method and wrapped in a JLabel and displayed.
title - Title for the dialog box.initialValue - Default selection (input value).optionType - Defines option buttons that appear at
bottom of dialog box, preset values are: DEFAULT_OPTION, YES_NO_OPTION, YES_NO_CANCEL_OPTION and OK_CANCEL_OPTION. You can provide your own option buttons using
the options parameter. messageType - Defines the style of the message, values are ERROR_MESSAGE, INFORMATION_MESSAGE, WARNING_MESSAGE,
QUESTION_MESSAGE, and PLAIN_MESSAGE.options - More detailed description of set of option buttons that appear at the bottom of the dialog box which is usually
an array of Strings but the actual interpretation of this parameter depends on its type:Component - Added to the button row directly.Icon - A JButton is created with this as
its labelAnything else is converted to a String by calling its toString method and wrapped in a JLabel to label its JButtonicon -
Decorative icon to be placed in the dialog box - default value for this is determined by the messageType parameter. |
showInputDialog() | User input required | |
showMessageDialog() | User message displayed | |
showOptionDialog() | Combination of above |
So there is a lot of information in the above table to digest, lets see some examples of dialog creation using the JOptionPane class. In this first example we create a confirmation response request
dialog using the showMessageDialog() method.
import javax.swing.JFrame;      // An interactive window
import javax.swing.JButton;     // An interactive button
import javax.swing.JOptionPane; // An option pane
import java.awt.*;              // AWT
import java.awt.event.*;        // AWT event package

public class OurMessageDialog {

    public static void main (String[] args) {
        OurMessageDialog omd = new OurMessageDialog();
        omd.start();
    }
    public void start() {
        JFrame jf = new JFrame("Using the JOptionPane class with showMessageDialog()");
        // Create a JButton using our instance variable
        JButton btn = new JButton("I will open a dialog window when clicked!");
        // Register the JButton with our OurActionListener object
        btn.addActionListener(new ActionListener() {
            public void actionPerformed(ActionEvent e) {
                //Create a JOptionPane with a message
                JOptionPane.showMessageDialog(btn, "A simple message dialog.",
                "A plain message", JOptionPane.PLAIN_MESSAGE);
            }
        });
        // Add JButton to frame, set size and display it
        jf.add(btn);
        jf.setBounds(0, 0, 568, 218);
        jf.setDefaultCloseOperation(JFrame.EXIT_ON_CLOSE);
        jf.setVisible(true);
    }
}
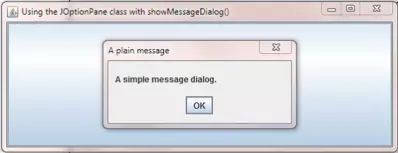
The following screenshot shows the results of compiling and running the OurMessageDialog class and pressing the button. Firstly we create an instance of OurMessageDialog and call the
start() method with this object. We then set up our frame and add a button to it. This time we do an on the fly implementation of the ActionListener interface; for more information
on this see the Argument Implementer Inner Class example within the OO Concepts section. Because of the
modal nature of the dialog box it is not possible to lose focus on the dialog box until it is actioned and closed.

In our second example of dialog creation using the JOptionPane class we create an input request dialog using the showInputDialog() method.
import javax.swing.JFrame;      // An interactive window
import javax.swing.JButton;     // An interactive button
import javax.swing.JOptionPane; // An option pane
import java.awt.*;              // AWT
import java.awt.event.*;        // AWT event package

public class OurInputDialog implements ActionListener {
    JButton btn;

    public static void main (String[] args) {
        OurInputDialog oid = new OurInputDialog();
        oid.start();
    }
    public void start() {
        JFrame jf = new JFrame("Using the JOptionPane class with showInputDialog()");
        // Create a JButton using our instance variable
        btn = new JButton("I will open an input dialog window when clicked!");
        // Register the JButton with our OurActionListener object
        btn.addActionListener(this);
        // Add JButton to frame, set size and display it
        jf.add(btn);
        jf.setBounds(0, 0, 568, 218);
        jf.setDefaultCloseOperation(JFrame.EXIT_ON_CLOSE);
        jf.setVisible(true);
    }
    // Implement the only method from the ActionListener Interface
    public void actionPerformed(ActionEvent e) {
        if(e.getSource() == btn) {
            // Display dialog box for number entry that
            boolean exitLoop = false;
            String validateNumber = "";
            while (!exitLoop) {
                validateNumber = (String) JOptionPane.showInputDialog(btn,
                       "Please enter 4 digit number > 0",
                        "Your number", JOptionPane.PLAIN_MESSAGE,
                        null, null, "");
                // null indicates user pressed cancel or exited window
                if (validateNumber == null) {
                    break;
                // validate user entry
                } else if (validNumber(validateNumber)) {
                    exitLoop = true;
                } else {
                    // text was invalid
                    JOptionPane.showMessageDialog(btn,
                    "Invalid number entered. Please try again");
                }
            }
            if (exitLoop) {
                System.out.println("Number " + validateNumber + " was entered!");
            }
        }
    }
    // Validate number entered in dialog box
    private boolean validNumber(String validateNumber) {
        int num;
        try {
            num = Integer.parseInt(validateNumber);
        } catch (NumberFormatException e) {
            return false;
        }
        if (num < 1) {
            return false;
        } else if (validateNumber.length() == 4) {
            return true;
        } else {
            return false;
        }
    }
}
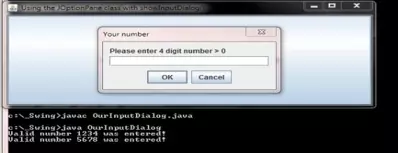
The following screenshot shows the results of compiling and running the OurInputDialog class, pressing the button and entering some valid input. Firstly we create an instance of OurInputDialog
and call the start() method with this object. We then set up our frame and add a button to it and implement the only method within the ActionListener interface which is
actionPerformed(ActionEvent e). Within this method we check that the source of the passed event was our button named btn and then create a showInputDialog() dialog box.
Within this dialog we accept entry of a string and validate the input to make sure a four digit number greater than zero has been entered. If the input is valid we send a message to the console otherwise
we open a showMessageDialog() dialog box showing an informational message. When we press OK or exit the window the dialog is closed and disposed of. Because of the modal nature of the
dialog box it is not possible to lose focus on the dialog box until it is actioned and closed.

Lesson 7 Complete
In this lesson we looked at dialogs which are windows that are displayed within the context of a parent window.
What's Next?
In our final lesson of the section we look at Remote Method invocation which is more commonly known as RMI and how to use it.