RMIS2C Home « RMI
In our final lesson of the section we look at Remote Method Invocation (RMI) and how we can use it to access methods remotely. But what do we mean by the last sentence? In the previous sections of the site whenever we talk about The Heap, we are referring to the area of memory within the JVM on our local machines where our objects are created. This has been fine for our code snippets so far but what if we want to invoke a method on an object that is held on another machine's JVM and Heap. How do we network to that machine and access the remote method? Luckily for us the developers of Java thought about such a scenario and came up with RMI to resolve it. RMI allows us to pass either primitives or objects that implement the serializable interface across a network to be used as arguments or return values on a remote method. To really grasp how RMI does its stuff we will also need an understanding of Serialization and how it works so we will look at this first.
SerializationTop
When we send information across a network the transfer protocol will compact the data into a format suitable for transferrence over the network. Within Java we use the serialization mechanism to compact the
data for transferral. Serialization breaks down objects for sending over the network into their type which is written as header information and the object state of the non-static/transient members of the class
written as a value. This process is achieved by converting the object into a serial stream of bytes, hence the term serialization. At the other end of the network the header information is used to reconstruct
the object type which can throw a ClassNotFoundException if the class cannot be located. After instantiation the values of the class member transferred are used to repopulate object state.
To make use of serialization we need to implement the java.io.Serializable interface in any class we want serialized. There are no methods to implement within the java.io.Serializable
interface as it is a marker interface, which is an interface that identifies classes that use it as being of a certain type, in this case serializable.
Before we talk more about serialization lets look at a code example that covers what we have discussed so far.
import java.io.*; // Package for Serializable interface and streams

public class SimpleSerialization implements Serializable {
    private static int classVar = 101;  // Will not be serialized
    private transient int number1 = 33; // Will not be serialized
    private int number2 = 22;
    private String str = "I am a string.";

    public static void main (String[] args) {
        SimpleSerialization ss = new SimpleSerialization();
        // Create or connect to a file and write object to appropriate output stream
        try {
            FileOutputStream fos = new FileOutputStream("simple.ser");
            ObjectOutputStream oos = new ObjectOutputStream(fos);
            // Write serialized object to the stream
            oos.writeObject(ss);
            System.out.println(oos);
            oos.close();
        } catch (Exception e) {
            System.out.println("There was a problem with serialization");
        }
    }
}
The following screenshot shows the results of compiling and running the SimpleSerialization class. We implement Serializable which is a marker interface and so there
are no methods to implement. We create an instance of SimpleSerialization and then chain an ObjectOutputStream to a FileOutputStream as we want to serialize the
SimpleSerialization object and the ObjectOutputStream stream is the best for this. It should be noted that any fields marked as static or transient do not get
serialized and passed as part of the serialized object's state.

The above example is fairly straighforward but what happens when part of the object we are serializing is a reference to another object which also has class members that are non-static and non-transient? Well the entire object graph is serialized. If the object we are serializing has references to other objects these also get serialized, and if those objects have references to other objects they will also get serialized and so on. We don't have to code for this scenario as the JVM works it all out and serializes what's required to complete the object's graph; so on deserialization we get our objects back with proper object state.
Following is a code example showing this in action, we will make use of the Cat class we used in earlier lessons to illustrate the points above.
public class Cat {
   String name, color;
   int age;
}
Here is another class where we do some serialization which includes some Cat objects.
import java.io.*; // Package for Serializable interface and streams

public class MoreSerialization implements Serializable {
    private static int classVar = 101;  // Will not be serialized
    private transient int number1 = 33; // Will not be serialized
    private int number2 = 22;
    private String str = "I am a string.";
    private Cat cat1 = new Cat();

    public static void main (String[] args) {
        MoreSerialization ms = new MoreSerialization();
        // Create or connect to a file and write object to appropriate output stream
        try {
            FileOutputStream fos = new FileOutputStream("simple.ser");
            ObjectOutputStream oos = new ObjectOutputStream(fos);
            // Write serialized object to the stream
            oos.writeObject(ms);
            System.out.println(oos);
            oos.close();
        } catch (Exception e) {
            System.out.println("There was a problem with serialization: " + e);
        }
    }
}
The following screenshot shows the results of compiling the Cat and MoreSerialization classes and running the MoreSerialization class. We get a NotSerializableException
exception and here's the catch, although the JVM automatically builds an object graph which includes any other objects associated with the state of the object we are serializing, those objects must
themselves implement the Serializable interface so they too can be serialized.
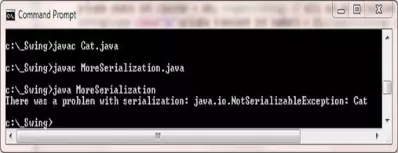
So we need to implement the Serializable interface in the Cat class:
import java.io.*; // Package for Serializable interface

public class Cat implements Serializable {
   String name, color;
   int age;
}
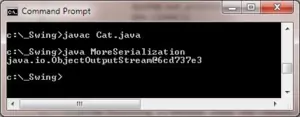
The following screenshot shows the results of recompiling the Cat class and running the MoreSerialization class again. This time everything works fine.
RMI OverviewTop
Now we have had an overview of the serialization mechanism it's time to look at RMI. As mentioned at the start of the lesson, in previous sections of the site whenever we talk about
The Heap, we are referring to the area of memory within the JVM on our local machines where our objects are created. RMI allows us to
invoke a method on an object that is held on another machine's JVM and Heap. With RMI we can pass either primitives which are passed as
copies of their values or objects which are serialized. The transfer protocol used to pass data across the network depends on whether we are doing Java-to-Java communication in which case we use
RMI-JRMP, between Java and Common Object Request Broker Architecture (CORBA) where we would use Java-IDL, or from Java to a legacy application where we would use the Java-RMI-IIOP
protocol. For the case study we will be using a Java-to-Java solution and so we will focus on the RMI-JRMP transfer protocol here.
We can think of RMI as allowing an object on a user's computer (located on the client heap) to access a remote object (located on the server heap), over the network. This is achieved by a stub on the client machine communicating with a stub on the server machine. Before we delve deeper into RMI lets look at a diagram covering the topics raised so far.
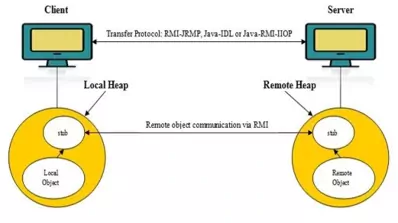
RMI HierarchyTop
So how does RMI achieve communication between objects over the network? There a number of steps in the dialog and to better understand the processes involved we will first look at an overview of the RMI class hierarchy for the classes and interfaces we are interested in for the case study.
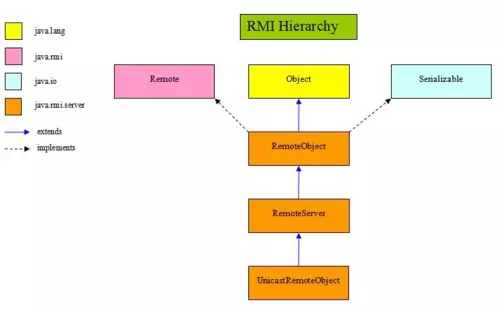
| Class | Description |
|---|---|
Remote | The Remote interface identifies interfaces whose methods may be invoked from a non-local virtual machine. |
Serializable | The Serializable interface is implemented for classes that need to be serialized and deserialized. |
RemoteObject | Implements the Object behavior for remote objects by providing remote semantics for the hashCode, equals, and toString methods. |
RemoteServer | Abstract class that provides a framework for the functions needed to create and export remote objects. |
UnicastRemoteObject | Export a remote object using JRMP and acquire a stub that communicates with the remote object. |
Creating A Remote ServiceTop
Ok now we have a general background on RMI lets go into more details of creating a remote service. We can break down the creation of a remote service where we communicate locally with remote objects into a number of steps:
- Create a remote interface that extends the
java.rmi.Remoteinterface and includes any methods we want our clients to call remotely. - Implement our remote interface methods
- Run RMIC on the remote implementation.
- Start the remote registry.
- Start the remote service.
We will now go through each step in the process writing the interfaces and classes required as we go.
Create A Remote InterfaceTop
The first step in the process is very straightforward as all we need to do is create an interface for the methods we require for our remote service. Below is code showing how we do this.
import java.rmi.Remote; // Our Remote marker interface
import java.rmi.RemoteException; // An exception we need

public interface RemoteService extends Remote {
    public String remoteMethod() throws RemoteException;
}
The following screenshot shows the results of compiling the RemoteService class. We extend the Remote marker interface and then add any methods needed for our remote service. In this
case we are just adding the remoteMethod() which throws a RemoteException exception.

Implement The Remote InterfaceTop
This is the real workhorse on the remote service side where we implement our remote interface, its methods and extend the UnicastRemoteObject for communicating with the remote object.
import java.rmi.Naming; // Remote object reference storage and retrieval
import java.rmi.Remote; // Remote interface
import java.rmi.RemoteException; // Remote exception
import java.rmi.server.UnicastRemoteObject; // Remote object communication

public class RemoteServiceImpl extends UnicastRemoteObject
        implements RemoteService {

    // Constructor
    public RemoteServiceImpl() throws RemoteException { }

    // The implemented remote method we will call
    public String remoteMethod() throws RemoteException {
        return "We communicated with the remote server method!!";
    }

    // Create a remote object and bind it to the RMI registry
    public static void main (String[] args) {
        try {
            RemoteService service = new RemoteServiceImpl();
            Naming.rebind("rmi://localhost:1099/RemoteMethod", service);
        } catch(Exception e) {
            System.out.println("An exception occurred within the remote service. " + e);
        }
    }
}
The following screenshot shows the results of compiling the RemoteService class. We extend the Remote marker interface and then add any methods needed for our remote service. In this
case we are just implementing the remoteMethod() which throws a RemoteException exception although this doesnt have to be declared 1. Within the main() method we try to create a remote object and bind it to the RMI
registry using the java.rmi.Naming class, which is used for storing and obtaining references to remote objects in a remote object registry. The name we have used "RemoteMethod" is used on the
client side to access the Registry via the Naming.lookup() method.

1 Overridding rule as discussed in the Flow Control section when we look at Overridden Methods & Exceptions.
Run rmic on remote implementationTop
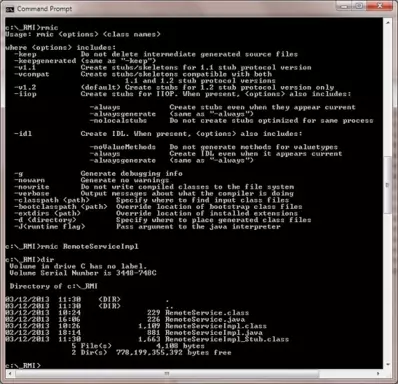
We use the rmic tool, which is located in the bin directory of your JDK installation, to create the stub class for our remote service implementation
class, which in our case is the RemoteServiceImpl class. The following screenshot shows the options available when using the rmic tool, running the rmic tool on the
RemoteServiceImpl class and the files located in the C:\_RMI directory after the rmic tool has run. Notice the file name of the new class created which is always a combination
of the remote service implementation class, in our case RemoteServiceImpl, suffixed with _Stub.
We do not need to use the rmic tool on the client side as these stubs are automatically created by the JVM from java onwards, although you can do this manually using rmic if
you are using a pre java version of Java on the server side, or some of your clients have earlier versions of Java.
Starting The Remote RegistryTop
This is a fairly strighforward step as we are starting the RMI registry maually, in the real world we would need to communicate with the RMI registry programmatically. The screenshot below shows the command to start the RMI registry.

Starting The Remote ServiceTop
Now we need to start the remote service implementation class, which in our case is the RemoteServiceImpl class. We will do this from another terminal so the registry keep running.
The following screenshot shows the results of running the RemoteServiceImpl class. The RMI server side is now all set up ready to communicate with clients via our remote object stub.

Creating A ClientTop
On the client side, each client needs to have a copy of the client code. Following is the code our clients require to access the remoteMethod() method on the server. We will do this from another
terminal so the registry and our remote server are kept running on the other two. We use the Naming.lookup() method to get our remote object stub on the registry, which returns an Object
object, hence the cast. We are using localhost as our URL and the same RemoteMethod name that we used to register our service. Using the returned registry information we call the
remoteMethod() method on the server and print the results.
As a point of interest we do not need to serialize the String object of the remoteMethod() method on the client or server side which gets passed across the network as, like many classes in the API, it is already serialized.
import java.rmi.Naming; // Remote object reference storage and retrieval

public class RemoteClient {

    public static void main (String[] args) {
        new RemoteClient().start();
    }

    public static void start() {
        try {
            // Look up our remote stub on RMI registry
            RemoteService service = (RemoteService) Naming.lookup("rmi://localhost/RemoteMethod");
            // Call remote method now we have a lookup
            String str = service.remoteMethod();
            System.out.println(str);
        } catch(Exception e) {
            System.out.println("An exception occurred within the client's remote service. " + e);
        }
    }
}
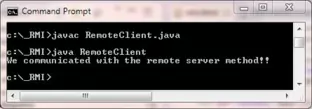
The following screenshot shows the results of compiling and running the RemoteClient class. As you can see we are getting the returned string from the remoteMethod() method held on
the server and printing it out on the client.
Lesson 8 Complete
In our final lesson of the section we looked at RMI and how we can use it to access methods remotely.
What's Next?
This concludes our look at java in the next section we look at Servlets.