Our First ServletS2C Home « Our First Servlet
In the last lesson we looked at the servlet lifecycle, from the loading and instantiation of a servlet to its eventual destruction. It's time to finally get our hands dirty and create our first servlet and look at the processes involved. This should really help nail down the servlet lifecycle and the order in which lifecycle methods are invoked.
We metioned in the Servlet Overview lesson that we can implement the javax.servlet.Servlet interface either directly, by writing a class that implements the javax.servlet.Servlet
interface, or indirectly by extending a class that implements the javax.servlet.Servlet interface. You will probably never have a requirement to implement javax.servlet.Servlet directly but
we will be doing it once here and the reason for this is three-fold:
- By implementing
javax.servlet.Servletdirectly we will need to override all the methods, this will allow us to output messages to the console very easily so we can see where we are in the servlet lifecycle. - Because we are not extending either the
javax.servlet.GenericServletorjavax.servlet.http.HttpServletabstract classes we have less ground to cover in our explanation and can spend more time focusing on the basics. - An example of implementing the
javax.servlet.Servletinterface directly is nice to see, in case you ever have a need to do this yourself.
Development SetupTop
How we set up our development environment is totally up to us but we can make life easier for ourselves when we come to deployment by mirroring some of the file structure of our container, which in our case is the
Tomcat deployment environment. There are several ways we can deploy into Tomcat such as editing the server.xml file in your YourTomcatRoot/conf directory. We could deploy using a Web Archive
(WAR) file, which is the recommended method and which we will look at in a later lesson. Another simple method, for development at least, is to just simply copy our application across to Tomcat manually, which is
the way we will deploy for the present.
Tomcat Deployment EnvironmentTop
The first thing to do is refresh ourselves with the Tomcat deployment environment which we are going to mirror as much as possible within our development environment.The following file structure shows the deployment environment and where appropriate those parts that are container and application specific.
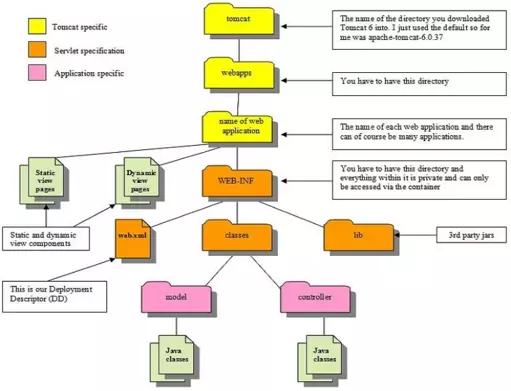
What we need to do is mirror parts of the above structure in our development to make the manual movement of entities easier and so we will look at a possible development structure next.
Development EnvironmentTop
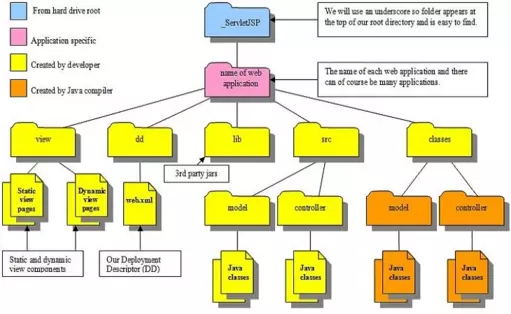
The following diagram is a suggestion for our development environment and the way we will set up our file structure for development on this site. We have separate top-level folders the first is for the view, where we
will put static HTML pages and dynamic JSP pages in furure lessons. We have another folder for our DD web.xml file and another for storage of JARs and WARs when we come to use them. We will create a src
folder for writing our Java source code and we will keep the model and controller code in different folders within this. The last folder we will create is the the classes folder; we don't need to create
any subfolders in this directory as when we compile our Java source files with the -d option, these are automatically created for us by the compiler.
Folder SetupTop
The first thing we are going to do in our setup is to make a base folder called _ServletsJSP in the root directory of our hard drive which we can put all web applications for this section into.
Lets create a folder for the servlets for this section, in Windows this would be:
double click My Computer icon
double click C:\ drive (or whatever your local drive is)
right click the mouse in the window
from the drop down menu select New
click the Folder option and call the folder _ServletsJSP and press enter.
Within the _ServletsJSP folder we will create separate folders for each web application we use and our first web application will be called hello
Within the hello folder we will create separate folders to hold our DD, source files and our compiled byte code and these will be called dd, src and classes. We
don't need view and lib folders for the early web applications and so we won't bother creating these until we need them.
Within the src folder create a subfolder called controller, we don't need a model folder for the early web applications either.
So after creating these folders your directory structure should look something like the following screenshot:

Coding The ServletTop
Ok we are now ready to code up our first servlet and as metioned at the start of the lesson, this one time only, we will write a class that implements the javax.servlet.Servlet interface directly. By
convention servlet classes are suffixed with Servlet so other developers can see this is a servlet.
Cut and paste the following code into your text editor and save it in the c:\_ServletsJSP\hello\src\controller directory.
package controller;
// I/O Imports
import java.io.IOException;
import java.io.PrintWriter;
// Servlet Imports
import javax.servlet.Servlet;
import javax.servlet.ServletConfig;
import javax.servlet.ServletException;
import javax.servlet.ServletRequest;
import javax.servlet.ServletResponse;

public class HelloServlet implements Servlet {

    private static final long serialVersionUID = 871964L;
    // We need this instance variable to access ServletConfig within a servlet
    private transient ServletConfig servletConfig;
    // We need to override all five Servlet methods
    @Override
    public void init(ServletConfig servletConfig) throws ServletException {
        System.out.println("Within init() method, assigning ServletConfig");
        this.servletConfig = servletConfig;
    }
    @Override
    public ServletConfig getServletConfig() {
        System.out.println("Within ServletConfig()");
        return servletConfig;
    }
    @Override
    public String getServletInfo() {
        System.out.println("Within getServletInfo()");
        return "controller.HelloServlet";
    }
    @Override
    public void service(ServletRequest request, ServletResponse response)
            throws ServletException, IOException {
        System.out.println("Within service() method");
        System.out.println("Servlet name is: " + servletConfig.getServletName());
        System.out.println("Servlet information is: " + getServletInfo());
        response.setContentType("text/html");
        PrintWriter writer = response.getWriter();
        writer.print("<html><head></head><body>Servlet information: " +
                servletConfig.getServletName() + "</body></html>");
    }
    @Override
    public void destroy() {
        System.out.println("We are in the destroy() method");
    }
}
As you can see from the above code there is nothing remarkable about a servlet, it looks very much like any other java class. All we are doing is honouring the servlet contract and implementing the interface
methods. We have to create an instance variable to store the ServletConfig object, if we want to access the ServletConfig object from within our servlet. Because we have to override the
getServletInfo() method it returns whatever we put into it rather than servlet information provided by the container. We also set a method of the ServletResponse object but we will defer
discussion of this until the Request & Response lesson. Also notice how we have written our HTML within a writer.print statement.
Compiling The ServletTop
Open your command line editor:
Change to directory c:\_ServletsJSP\hello\src\controller
Compile HelloServlet.java using the java compiler with the -cp and -d options as below, making sure you change apache-tomcat-6.0.37 to wherever you downloaded Tomcat to.
javac -cp c:\apache-tomcat-6.0.37\lib\servlet-api.jar -d ..\..\classes HelloServlet.java
Whenever we compile servlets the Java compiler knows nothing about the javax.servlet and javax.servlet.http packages as these are not part of the sdk. So we use the -cp
option to point to the servlet-api.jar which contains these packages.
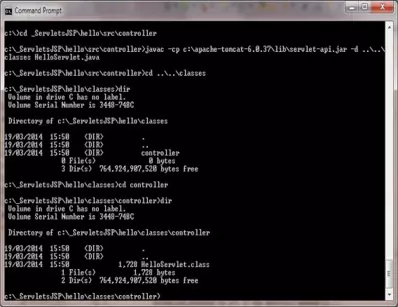
What we are saying with the -d option is that we want our compiled bytecode to go into the classes directory which is two directories above this directory. The following screenshot
shows the javac command and the contents of the classes directory after the compile. Because we have used a package (package controller;) at the top of the code the compiler has created this
directory within the classes directory. When we look in the controller directory we can see the compiled HelloServlet.class file.
The following screenshot shows that we get a clean compile and also the HelloServlet class now compiled into the classes\controller directory.
Coding Our First DDTop
With our servlet compiled into bytecode the last thing we need to code for our first servlet is the DD. We will keep it very simple for this first servlet and gradually introduce more DD elements as our servlets increase in complexity.
<?xml version="1.0" encoding="UTF-8"?>
<web-app xsi:schemaLocation="http://java.sun.com/xml/ns/javaee
                             http://java.sun.com/xml/ns/javaee/web-app_2_5.xsd"
         xmlns:xsi="http://www.w3.org/2001/XMLSchema-instance"
         xmlns="http://java.sun.com/xml/ns/javaee" version="2.5">
   <servlet>
      <servlet-name>Our First Servlet</servlet-name>
      <servlet-class>controller.HelloServlet</servlet-class>
   </servlet>
   <servlet-mapping>
      <servlet-name>Our First Servlet</servlet-name>
      <url-pattern>/hello</url-pattern>
   </servlet-mapping>
</web-app>
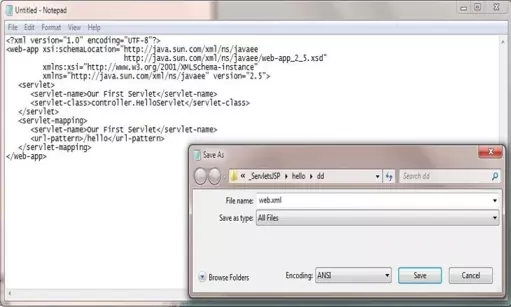
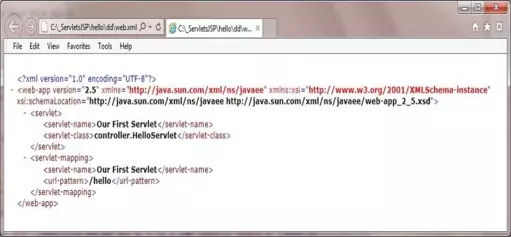
Open Notepad or whatever text editor you're using and cut and paste the above into it. The following screenshot shows how the file should look and how to save the file in Notepad, within the DD folder. Make sure
you don't save the file as a txt file as we don't want to end up with a file with a .txt extension, but with a .xml extension so its an xml document.
To check that your web.xml file works double click on it and you should see a screenshot similar to the following in your browser:
The <servlet> ElementTop
Ok lets look at the DD elements we have entered starting with the top-level <servlet> element which is used to describe and point to our servlet class. The <servlet> element contains several sub-level elements which themselves can contain sub-level elements. All of which are explained in detail in the DD Elements At A Glance quick reference so we won't go into them here. What we will explain are the sub-level elements within our DD above. The sub-level <servlet-name> and <servlet-class> elements are mandatory and can only appear once within the top-level <servlet> element.
The <servlet-name> sub-level element must come before the <servlet-class>
sub-level element. The value of the servlet name you give this element must be unique within the web application and be at least one character long. If you remember from the Tomcat Deploy Environment
diagram our servlets go into the WEB-INF directory and so are hidden from our users. The <servlet>
top-level element is used in conjunction with the <servlet-mapping> top-level element, which we look at below.
The <servlet-class> sub-level element defines the fully qualifed name of a Java Servlet class, delimited by dots for the packages our servlet is within. The value you give this class doesn't have to be unique within a web application.
The <servlet-mapping> ElementTop
The <servlet-mapping> element is used to map an incoming resource to a servlet and has two sub-level elements. The sub-level <servlet-name> element is mandatory, must come first and can only appear once within the <servlet-mapping> top-level element. The sub-level <url-pattern> element is also mandatory but can appear multiple times within the top-level <servlet-mapping> element.
The <servlet-name> sub-level element must come before any <url-pattern> sub-level elements. The value of the servlet name you give this element must be unique within the web application and be at least one character long. The <servlet-mapping> top-level element is used in conjunction with the <servlet> top-level element, which we looked at above, to allow controlled access to resources.
When a request comes in for a servlet the part of the address supplied by the client after the web application name, is used to match against <url-pattern>
sub-level elements within the DD. When one is found the <servlet-name> sub-level element of the
<servlet-mapping> top-level element is used to find the <servlet-name>
sub-level element within the top-level <servlet> element. From here we can get the location of the servlet via the
<servlet-class> sub-level element. This is how the mapping from the request to the servlet, which is hidden from public view in the WEB-INF directory is achieved.
A discussion on URL mapping takes place in the Servlets Glossary - URL Mapping section.
Tomcat DeploymentTop
The first thing we are going to do is go to the webapps directory of our Tomcat installation which in my case is:
C:\apache-tomcat-6.0.37\webapps\
Within the webapps folder create a folder for our web application called hello
Within the hello folder create the WEB-INF folder.
Copy the web.xml file and the classes directory and contents from our development environment into the WEB-INF folder.
After creating these folders and copying the files from development your Tomcat directory structure within the webapps\hello folder should look something like the following screenshot:

Starting Up TomcatTop
Open a command prompt and change the directory to the location of our Tomcat bin directory and then type in startup (Windows 7) or startup.sh (Linux/Unix/OSX).
Press Enter and the Tomcat server should open up in a new window as shown by the following screenshot:
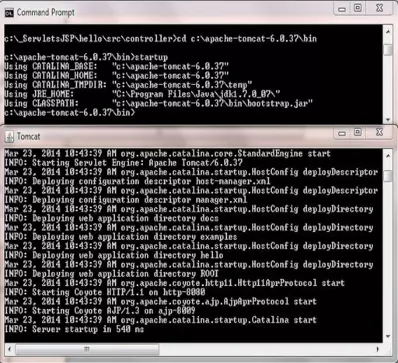
If you look closely at the screenshot you can see one of the web applications deployed is our hello web application.
You can also start up Tomcat by double-clicking the startup (Windows) batch file or startup.sh (Linux/Unix/OSX) execution shell, within your Tomcat /bin folder which you may find easier than typing the above in every time.
Testing Our ServletTop
With Tomcat up and running type the following into your web browser address bar and press enter:
http://localhost:8080/hello/hello
The web browser should be directed you the HelloServlet servlet class within Tomcat, execute and produce a screen that looks like the following:

The following screenshot shows the Tomcat console with System.out.println messages from our servlet at the bottom. Of course we dont see any message from the destroy() lifecycle method as the
servlet is still in service. As an exercise you could put some HTML in this method which will get processed on destruction to see this method getting invoked.

Lesson 6 Complete
In this lesson we wrote our first servlet and looked at the processes involved.
What's Next?
In the next lesson we take a much closer look at the ServletConfig and ServletContext objects that every servlet gets access to after initialistion.