The Servlet LifecycleS2C Home « The Servlet Lifecycle
In the last lesson we took a much closer look at servlets by looking at the anatomy of the javax.servlet.Servlet interface and the javax.servlet.GenericServlet and javax.servlet.http.HttpServlet
abstract classes. We touched on the fact that three of the methods of the javax.servlet.Servlet interface, init() service() and destroy() were lifecycle methods.
In this lesson we look at these methods in much greater detail as we look at the life of a servlet.
The Life Of A ServletTop
We can think of an object's lifecycle as the various stages that said object goes through during its existence. Because a servlet has to run within the boundaries of whatever web container we are using, there are additional factors involved with the lifecycle of a servlet object.
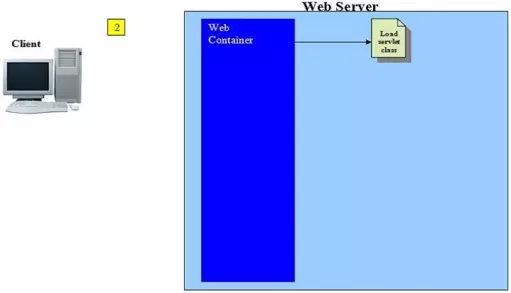
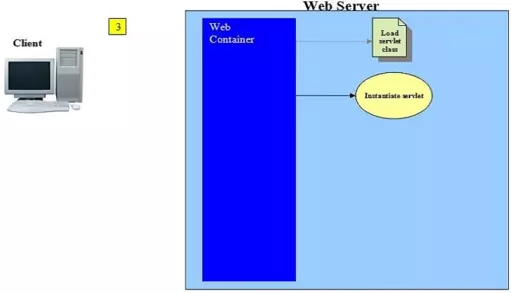
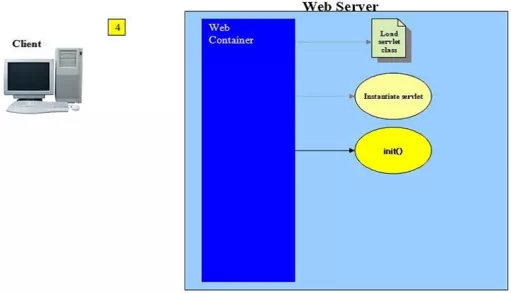
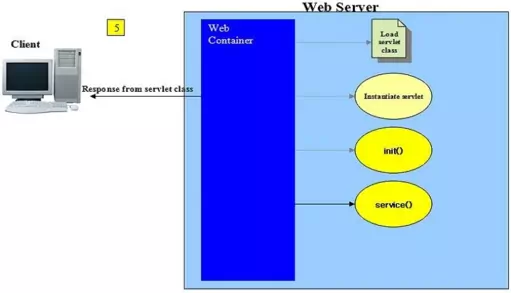
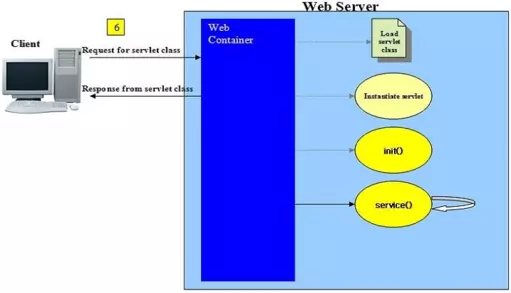
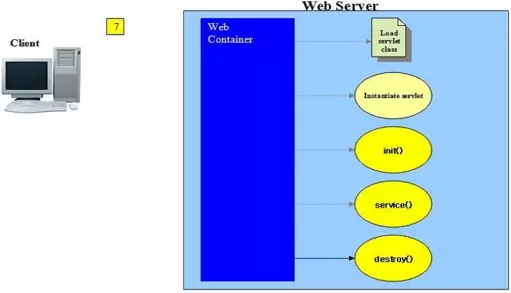
The following slideshow shows the various stages in the servlet lifecycle. Press the button below to step through the slideshow:
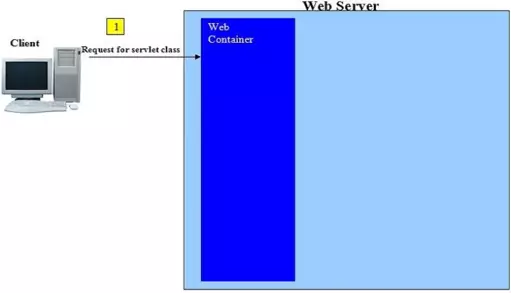
Our client has clicked on a link that points to a resource that is a servlet rather than a static HTML page, so the web server directs the HTTP request to our web container.
We will go into the different stages of the servlet lifecycle shown in the slideshow in much more detail and answer some other questions raised by it as we go through the rest of the lesson.
Class LoadingTop
A container can contain many web applications and each of these has a class loader that is used to search for and load classes from the /WEB-INF/classes/ directory and JAR files from
the /WEB-INF/lib/ directory. Having separate class loaders for each application allows servlets in different applications to have the same name but also means that servlets within one application can
only communicate with servlets in another application via the container interface.
Because the container finds a class it doesn't necessarily load it; the default behaviour is to lazily initialise servlets on first use or when the container deems it necessary. We can also set servlets to load on deployment or server restart, via the DD. This is achieved using the <load-on-startup> sub-level element of the top-level<servlet> element, an example of which is shown below.
<servlet>
   <servlet-name>myServlet</servlet-name>
   <servlet-class>test.Servlet</servlet-class>
   <load-on-startup>1</load-on-startup>
</servlet>
Don't worry too much about the DD elements shown above for now, suffice to say that any positive integer value placed in the <load-on-startup> sub-level element will ensure that a servlet is loaded on deployment or server restart. If you have several servlets in your web application you can also control the order in which servlets are loaded via the <load-on-startup> sub-level element. The servlets with the highest <load-on-startup> integer values get loaded first down to the lowest with a positive value.
InstantiationTop
Just like any other object our servlet has to be instantiated so it can be called by the container. The thing to remember here is that although we will, in the vast majority of cases, extend the HttpServlet
class when creating our own servlets the container isn't aware of any particular protocol being used and so must instantiate each servlet in a generic manner. This is achieved using the default no-args constructor
which is best left to the compiler to generate. If you absolutely must have a custom constructor for your servlet then you also need to explicitly code a no-args constructor so the container can instantiate your
servlet.
You cannot do any initialisation at this stage as our servlet doesn't exist in what we can think of as a servlet state until the no-args constructor has completed and the container makes it into a servlet object. Any attempts to initialise the servlet using other parts of the application will fail and is the reason why we have separate instantiation and intialisation steps.
InitialisationTop
We now have a fully fledged servlet object waiting to be initialized to its default state. Here is a good time to talk about what value we get from a normal object being transformed into a servlet object. Well
apart from the benefits we get from the container every servlet also gets access to two other objects, these being ServletConfig and ServletContext.
Each servlet gets one ServletConfig object and this is where we can put configuration information for deployment rather than in a constructor. We configure initialisation parameters for the ServletConfig
object via the DD. This is achieved using the <init-param> sub-level element of the top-level
<servlet> element, an example of which is shown below.
<servlet>
   <servlet-name>myServlet</servlet-name>
   <servlet-class>test.Servlet</servlet-class>
   <init-param>
      <param-name>email</param-name>
      <param-value>mailto:charlie@server2client.com</param-value>
   </init-param>
</servlet>
Once again don't worry too much about the DD elements shown above for now but a point of note is that we can have multiple entries of the <init-param> sub-element.
The ServletConfig object also allows us to access the other object we get with a servlet, the ServletContext object.
Each web application gets one ServletContext object and we can get information about the versions of the container and API being used from this object. We can also configure application wide
parameters for the ServletContext object via the DD. This is achieved using the <param-name> and <param-value> sub-level elements of the
<context-param> top-level element, an example of which is shown below.
<context-param>
   <param-name>disclaimer</param-name>
   <param-value>legaldoc.txt</param-value>
</context-param>
We will go into much more detail about the ServletConfig and ServletContext objects in the ServletConfig & ServletContext lesson, but a point of note is
that we can have multiple entries of the <context-param> element within the DD.
The init() Lifecycle MethodTop
The init() lifecycle method is the first of the three lifecycle methods associated with a servlet and is run only once during the life of a servlet. You can put initialisation code required by your
servlet that cannot be placed declaratively within the DD in this method, such as Java code for referencing and database connections.
If you are implementing the Servlet interface directly then you will have to override the init(ServletConfig config) method. If you are extending the GenericServlet class and need to
override init(), use the convenience no-args init() method for this purpose, rather than the init(ServletConfig config) method. The reasoning behind this is that the
init(ServletConfig config) method is always run first and stores a local copy of the ServletConfig object which can be retrieved later using the getServletConfig() method.
The init(ServletConfig config) method then delegates any further processing to the no-args init() method which is why you will want to override this method.
All init() methods can throw a ServletException or a subclass thereof and if this happens the container bypasses the other lifecycle methods and makes the servlet available for garbage collection.
Request ServicingTop
So our one time initialisation has completed and our servlet is now ready to process requests. When a request from a client comes in the service(ServletRequest req, ServletResponse resp) method is
invoked. If you are extending the Servlet class you will need to override this method in your implementation. If you are extending the GenericServlet class then a concrete implementation
is available for use and you will have to provide the protocol methods for whichever protocol you are using. For the majority of incoming requests what we are really interested in is the HTTP protocol and so our
servlets will be extending the HttpServlet class.
The service() Lifecycle MethodTop
The service() lifecycle method is the second of the three lifecycle methods associated with a servlet and is run every time a client requests a service. When we extend the HttpServlet class with our own
servlets we need to override one of the doXXX() methods, dependant upon the incoming HTTP method passed with the client request.
What happens is the generic service(ServletRequest req, ServletResponse resp) method dispatches the incoming request to the service(HttpServletRequest req, HttpServletResponse resp) HTTP
protocol specific method. This method will then delegate servicing to one of the HTTP doXXX() methods, dependant upon the incoming HTTP method passed with the client request. All our servlet needs to do
is override the doXXX() method with our business code to service the request from the client.
The following table should help clarify this and there are links back to each HTTP method if you need a refresher on what each does.
| HTTP Method | doXXX() Method | Description |
|---|---|---|
| DELETE | doDelete() | Called by server, via protected service() method to permit a servlet to handle a HTTP DELETE request. |
| GET | doGet() | Called by server, via protected service() method to permit a servlet to handle a HTTP GET request. |
| HEAD | doHead() | Receives a HTTP HEAD request from the protected service() method and handles the request. |
| OPTIONS | doOptions() | Called by server, via protected service() method to permit a servlet to handle HTTP OPTIONS request. |
| POST | doPost() | Called by server, via protected service() method to permit a servlet to handle a HTTP POST request. |
| PUT | doPut() | Called by server, via protected service() method to permit a servlet to handle a HTTP PUT request. |
| TRACE | doTrace() | Called by server, via protected service() method to permit a servlet to handle a HTTP TRACE request. |
You should always override at least one of the doDelete(), doGet(), doPost() or doGet() methods as failure to do so will result in a 400('Bad Request')
HTTP status code being returned from HTTP/1.0 and a 405('Method Not Allowed') HTTP status code being returned from HTTP/1.1.
All service() methods can throw a ServletException or a subclass thereof and if this happens and the exception is permanent the container returns a 404('Not Found') HTTP status
code and removes the servlet from service. If the exception is temporary the container returns a 503('Service Unavailable') HTTP status code and makes the servlet temporarily unavailable. After a
period of time the container will put the servlet back into service, making it available to service more requests. The service() methods can also throw an IOException as we are accessing
writers which can cause exceptions.
DestructionTop
The final phase of a servlets lifecycle is its destruction and can happen for a number of reasons including server shutdown and an application being undeployed. When such an event happens the container will call
the servlets destroy() method which gives us an opportunity to free resources and tidy up before the servlet is garbage collected.
The destroy() Lifecycle MethodTop
The destroy() lifecycle method is the last of the three lifecycle methods associated with a servlet and is run only once during the life of a servlet. This method is invoked by the container
when a servlet is going to be destroyed and gives us a chance to clean up and housekeep before the servlet is garbage collected. If you are extending the Servlet class you will need to override this
method in your implementation. If you are extending the GenericServlet class then a concrete implementation is available for use and if no housekeeping is required is prefectly adequate. Dependant upon
resources being used you may want to override this method in your own servlet code.
Lesson 5 Complete
In this lesson we looked at the servlet lifecycle, from the loading and instantiation of a servlet to its eventual destruction.
What's Next?
In the next lesson we write our first servlet and look at the processes involved.
