7: FundamentalsS2C Home « 7: Fundamentals
In this lesson we look at access modifiers and also investigate the package and import statements. We then look at the javac command we use to compile our Java programs and
the java command to run our programs. We finish the lesson with a look at JAR files and how to use them. After this we look at method parameters that are passed into methods as reference variables
and primitive variables and the effects that modification within the methods has on the variable type in question. We then examine the point at which an object becomes eligible for garbage collection, and determine
what is and is not guaranteed by the garbage collection system and how the behaviors of System.gc and finalization impact this. We fnish the lesson by looking at the various operators that are
available in Java and how to use them.
Lets take a look at the points outlined at the Oracle Website for this part of the certification.
- Section 7: Fundamentals
- Given a code example and a scenario, write code that uses the appropriate access modifiers, package declarations, and import statements to interact with (through access or inheritance) the code in the example.
- Given an example of a class and a command-line, determine the expected runtime behavior.
- Determine the effect upon object references and primitive values when they are passed into methods that perform assignments or other modifying operations on the parameters.
- Given a code example, recognize the point at which an object becomes eligible for garbage collection, and determine what is and is not guaranteed by the garbage collection system. Recognize the behaviors of System.gc and finalization.
- Given the fully-qualified name of a class that is deployed inside and/or outside a JAR file, construct the appropriate directory structure for that class. Given a code example and a classpath, determine whether the classpath will allow the code to compile successfully.
- Write code that correctly applies the appropriate operators including assignment operators (limited to: =, +=, -=), arithmetic operators (limited to: +, -, *, /, %, ++, --), relational operators (limited to: <, <=, >, >=, ==, !=), the instanceof operator, logical operators (limited to: &, |, ^, !, &&, ||), and the conditional operator ( ? : ), to produce a desired result. Write code that determines the equality of two objects or two primitives.
- Given a code example and a scenario, write code that uses the appropriate access modifiers, package declarations, and import statements to interact with (through access or inheritance) the code in the example.
Access ModifiersTop
The table below shows the four types of access available in Java from the most open (public) to the most restrictive (private). We can only explicitly apply the public access modifier
to our top-level classes (the classes we compile) but for members and constructors we can explicitly apply the protected and private access modifiers as well. We will
talk about packaging in the Packages lesson, but for now we are going to examine how to protect our class members from unwanted access and modification.
| Access modifier | Class | Member | Constructor | Description |
|---|---|---|---|---|
public | Yes | Yes | Yes | A top-level class may be declared with the public access modifier, and if it is the class is accessible to all other classes everywhere.A member may be declared with the public access modifier, and if it is the member is accessible to all other classes everywhere, assuming the class it resides in is accessible.A constructor may be declared with the public access modifier, and if it is the constructor is accessible to all other classes everywhere, assuming the class it resides in is accessible. |
protected | No | Yes | Yes | A member may be declared with the protected access modifier, and if so, is only accessible within its own package and also by a subclass of its class in other packages.
A constructor may be declared with the protected access modifier, and if so, it is only accessible to the package
the implementation is in.See the Packages lesson for more information on packaging. See the Inheritance Basics lesson for more information on subclassing. |
| no modifier package-private / (the default) | Yes | Yes | Yes | If a top-level class has no explicit access modifier, which is the default and is also known as package-private,
it is accessible only within its own package. If a member has no explicit access modifier it is only accessible within its own package. If a constructor has no explicit access modifier, it is only accessible to the package the implementation is in. See the Packages lesson for more information on packaging. |
private | No | Yes | Yes | A member may be declared with the private access modifier, and if it is the member is only accessible within its own class.A constructor may be declared with the private access modifier, and if it is the constructor can only be constructed from within its own class. |
See the OO Concepts - Encapsulation lesson for example usage and information on how we use getters and setters to enforce tight encapsulation.
PackagesTop
In Java we can keep libraries of related classes together using a package and this is in essence what the Java language is, a collection of packaged libraries.
- If a class is part of a package then the
packagestatement must be the first line of code in a source file.
There are two major benefits to the package approach adopted by Java.
- A package provides the apparatus for us to group related classes together under the same umbrella.
- We need a way to uniquely identify classes and Java doesn't allow us to have two top-level classes with the same name, within the same namespace. By using packaging we can partition the namespace to alleviate naming conflicts.
- Within any reasonable sized system we will have classes that relate to different aspects of said system, such as the Model View Controller paradigm. Packaging allows us to separate concerns into areas such as a Model subpackage, a View subpackage and so on. This makes the whole development process easier and more manageable.
- A package is part of the Java mechanism we use to enforce Encapsulation.
- By not marking members within a package with an access modifier, we are saying that these members are package-private and can only be accessed from within this package.
- By marking members with the
protectedaccess modifier, we are saying that these members can only be accessed from within this package or from a subclass outside the package.
The following table shows usage of a single package statement and an example of a multiple hierarchy package statement.
| Package Form | Example | Description |
|---|---|---|
Single package | ||
package pkg; | package A; | This file is part of package A. |
Multiple package hierarchy | ||
package pkg.subPkg1.subPkg2...subPkgN; | package A.B.C; | This file is part of Package C, which is a subpackage of B, which is a subpackage of A. |
ImportsTop
Java allows us to import parts of a package, or even the whole package if required for use in our code and we do this using the import keyword.
- If a class uses the
importkeyword to import parts or all of a package, then theimportkeyword must follow thepackagestatement if there is one, or must be the first line of code in a source file if there is nopackagestatement.
The following table shows how to import a single class from a package and all classes from a package using the import statement.
| Import Form | Example | Description |
|---|---|---|
Single class import | ||
import pkg.class; | import java.rmi.Remote; | Import the Remote class from java.rmi |
Multiple class import | ||
import pkg.subPkg1.subPkg2...subPkgN; | import java.rmi.*; | Import all java.rmi classes |
Static Imports
With the introduction of java a new feature became available when using the import statement which is commonly known as static imports. When using the import keyword followed by
static we can import all the static members of a class or interface.
The following table shows how to import a single static member from a package and all static members from a package using the import static statement.
| Import Static Form | Example | Description |
|---|---|---|
Single static member import | ||
import static pkg.staticMember; | import static java.lang.Math.acos; | Import the acos static member from java.lang.Math |
Multiple static member import | ||
import static pkg.allStaticMembers; | import static java.lang.Math.*; | Import all java.lang.Math static members |
The javac CommandTop
We have been using the javac command throughout the lessons to compile our Java programs and the java command to run our programs. Now it's time to take a closer look at compiling our
Java programs and some of the options available when doing this. Firstly lets take a look at a screenshot of the options available with the javac command:
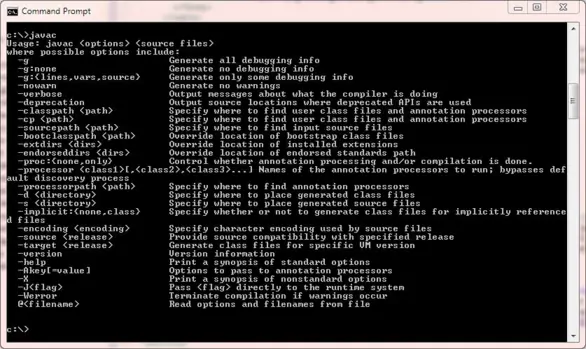
As you can see from the screenshot the javac command comes with a hefty list of options. Luckily for us we only need to know about the -classpath and -d options for
certification purposes.
Compiling Using the -d OptionTop
When we have used the javac command to compile our programs we have been putting the compiled bytecode (the *.class) files into the same directory as our source (the
*.java) files. Whilst this is fine for the trivial programs we use on the site to aid with learning; when we start creating projects of any size we want to keep source and compiled files in separate
directories. There are good reasons for doing this including the testing and deployment of our projects as well as maintainability and version control and to do this we compile using the -d option.
To see the -d option in action we will create a simple program and put it into a file structure we have created:
class A { }
The following screenshot shows a simple directory structure we have setup and placed the simple A class in:
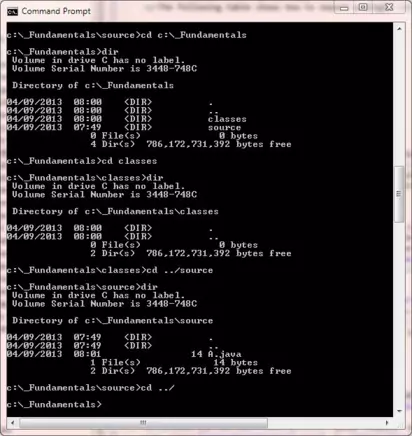
As you can see the class directory is empty and the source directory holds the A class source file. To show how the -d javac compiler option we will
compile the A class:
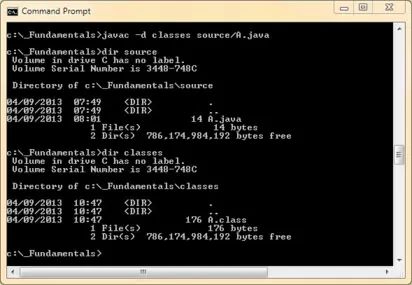
In the screenshot above we have compiled the simple program A with the -d javac compiler option as follows:
javac -d classes source/A.java
The -d option is followed by the directory where we want to put our *.class files and this directory must already exist or we get a compiler error. After this we set a relative url
path to the source file to be compiled, from the current directory. As you can see from the screenshot above we now have compiled bytecode in the classes directory.
Lets see how we can use a package within our programs and how this affects the compile using the -d option. Here we make a simple B class which is part of a package:
package info.javatutor;
class B { }
The following screenshot shows a simple directory structure corresponding to the package we have setup and placed the simple B class in:
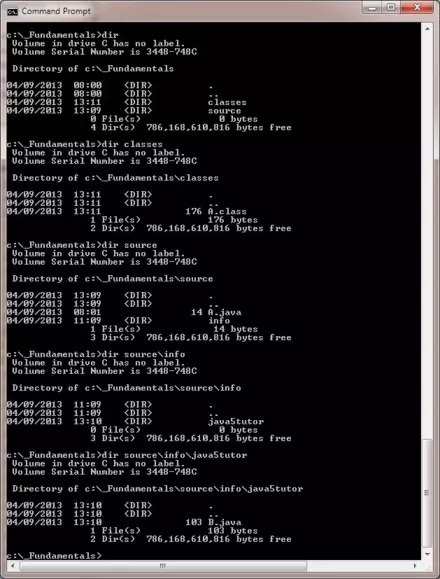
As you can see the source directory has info and javatutor subdirectories and the classes directory just hold the A class file we compiled
earlier. So lets compile the B class using the -d option as follows:
javac -d classes source/info/javatutor/B.java
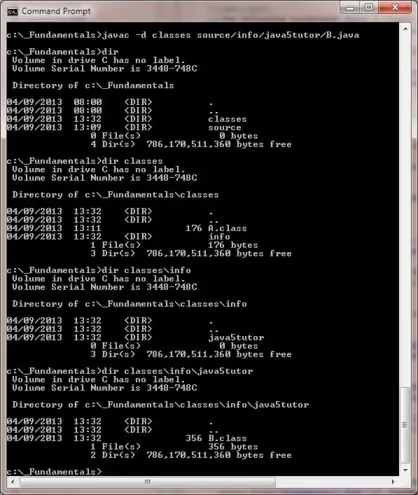
In the screenshot above we have compiled the Bclass with the -d javac compiler option and this has worked, and also created the info and javatutor
subdirectories within the classes directory for us.
The java CommandTop
We have been using the java command throughout the lessons to run our Java programs and saw some of the options available when running our programs when we looked at assertions
Flow Control - Using Assertions. Now it's time to take a closer look at running our Java programs and some of the options available when doing this. Firstly
lets take a look at a screenshot of the options available with the java command:
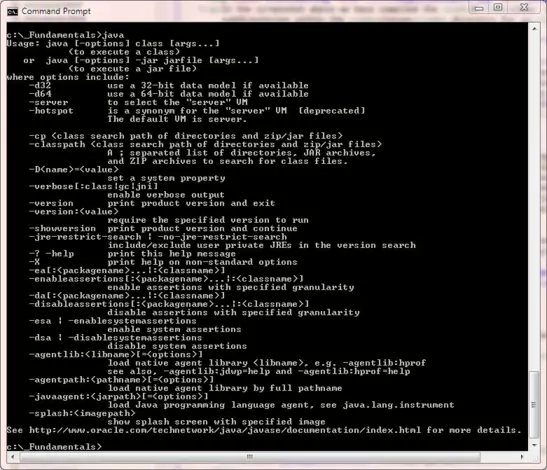
As you can see from the screenshot the java command comes with a hefty list of options. Luckily for us we only need to know about the -classpath options for certification purposes.
Running Using the -classpath OptionTop
We can run programs from anywhere on the file system using the -classpath option, so lets see an example of this. From the c:\_Fundamentals file I am in on Windows I want to run the
CastTest1.class file that is stored in the file system on my computer in directory c:\_Collections. Here is the command to do it:
java -classpath ..\_Collections; CastTest1

The screenshot above shows the results of running the c:\_Collections\CastTest1.class from the current directory, it works just fine. The ..\_Collections; can be split up as follows:
..\Go up one directory (use a forward slash in Linux)_Collectionslook in specified directory;delimit this command (use a colon in Linux)
When you use the -classpath option with the java command, you can also search in the current directory for a class file by putting a . (period) at the start of your search
pattern and before any delimiter as follows:
java -classpath .;..\_Collections; CastTest1
.search for class file in current directory;delimit this command (use a colon in Linux)..\Go up one directory (use a forward slash in Linux)_Collectionslook in specified directory;delimit this command (use a colon in Linux)
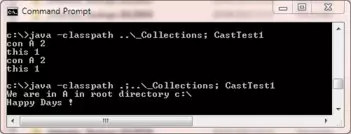
The screenshot above shows the results of running the CastTest1.class and also searching the current directory first. It should be noted that we have put copies of the CastTest.class
file and the A and B class files it runs, in the root directory of Windows with a different message to show how this works. Before we leave the -classpath option, there
is also a shorthand version of this command -cp which you may see used in the certification questions. So whenever you see the -classpath option you can use -cp and vice versa.
See HTML Intermediate - Lesson 5 - More Links for an explanation of absolute and relative paths.
Command Line ArgumentsTop
Every time we use the main() method we are including the String[] args parameter in its scope. Lets see how to use this parameter within a method with a code example:
/*
  Command Line Arguments
*/
public class UsingACommandLineArg {

    public static void main (String[] args) {
        System.out.println("Have a nice day, " + args[0]);
    }

}
The above program was saved, compiled and run using the command java UsingAParameter Kevin

As you can see from the screenshot above we run UsingACommandLineArg twice. The first time it falls over because we are tring to access an array index that doesn't exist. This of course could be
avoided by checking for an index entry first. In the second run we pass a parameter and print out a message. What we are doing here is extracting the first argument from the String array, arrays are zero-index
based. We then concatenate it to the end of a string to display on the console.
JAR FilesTop
We can bundle up applications we write for easy distribution and installation using WAR and JAR files. WAR is an acronym for Web Archive, is not part of the
certification and is beyond the scope of these tutorials. JAR is an acronym for Java Archive and is part of the certification and will be discussed here.
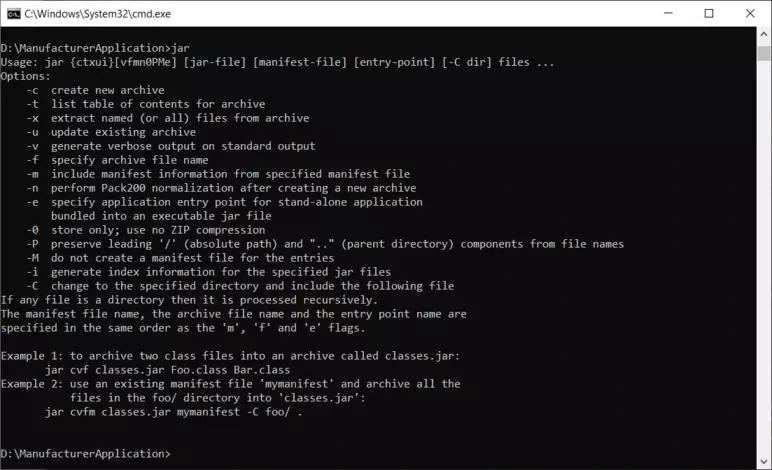
As you can see from the screenshot the jar command gives us quite a few options for archiving our applications and classes into a JAR file.
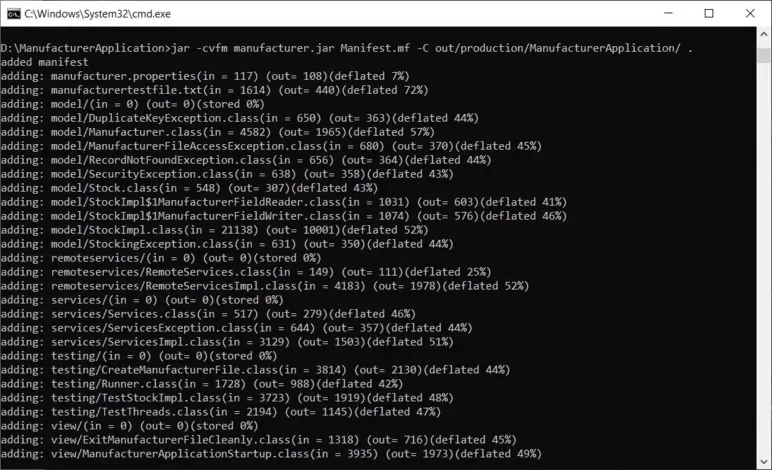
In the screenshot above we create a JAR named Testjar.jar using some of the JAR creation options available.
Pass-By-ValueTop
When we pass an argument to a method we are actually passing a copy of that argument and this is known as pass-by-value. To explore what this means lets look at some code:
/*
  A Dog Class
*/
public class Dog {
    String name, colour;

    void dogLooks(String name, String colour) {
        System.out.println("Our dog " + name + " is " + colour + "(input arguments)");
        name = "zzz";
        colour = "zzz";
        System.out.println("Our dog " + name + " is " + colour + "(changed arguments)");
    }
}
Lets write a test class for our Dog class.
/*
  Test Class for Dog
*/
public class TestDog {

    public static void main (String[] args) {
        Dog doggy = new Dog();  // Create a Dog instance
        String name = "rover";
        String colour = "black";
        doggy.dogLooks(name, colour);
        System.out.println("Our dog " + name + " is " + colour + "(after call to dogLooks() )");
    }
}
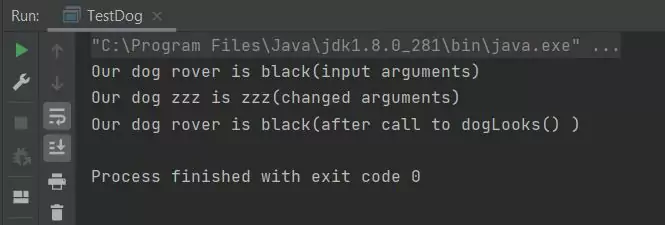
The above screenshot shows the output of running our TestDog class. As you can see even though we change the parameters in the dogLooks method, when we return and print the passed arguments they are
the same as before the call to dogLooks. This is because Java made a copy of the variables and passed them into our method. Therefore any changes to the variables were made to the copies and not to the originating
argument list.
Pass-By-Value Using Reference Variables
So what if we pass a reference variable to a method? If you recall our objects live on The Heap and we access them through their reference variable. Lets look into this:
/*
  Another Dog Class
*/
public class Dog2 {
    String name, colour;

    void dogLooks(Dog2 dog) {
        System.out.println("Our dog " + dog.name + " is " + dog.colour + "(input arguments)");
        dog.name = "zzz";
        dog.colour = "zzz";
        System.out.println("Our dog " + dog.name + " is " + dog.colour + "(changed arguments)");
    }
}
Lets write a test class for our Dog2 class.
/*
  Test Class for Dog2
*/
public class TestDog2 {

    public static void main (String[] args) {
        Dog2 doggy = new Dog2();  // Create a Dog instance
        doggy.name = "rover";
        doggy.colour = "black";
        doggy.dogLooks(doggy);  // Pass a reference variable to a method
        System.out.println("Our dog " + doggy.name + " is " + doggy.colour
                                      + "(after call to dogLooks() )");
    }
}

The above screenshot shows the output of running our TestDog2 class. As you can see when we change the instance variables in the method the values have changed when we return. It is still passing a copy of the
reference variable to the method, but we are updating the actual instance variables on The Heap. So the changes in the method persist when the dogLooks method ends.
The HeapTop
The Heap is the area of memory that the JVM allocates to store our objects in. As long as we have a reference to an object then it exists on the Heap. Of course computer memory is finite and so the
JVM needs to discard objects on the Heap and call the finalize() method of the Object
class, when their scope ends and there are no live references to them, or they become unreachable: this is known as garbage collection (GC). Setting a reference to null will also deprogram
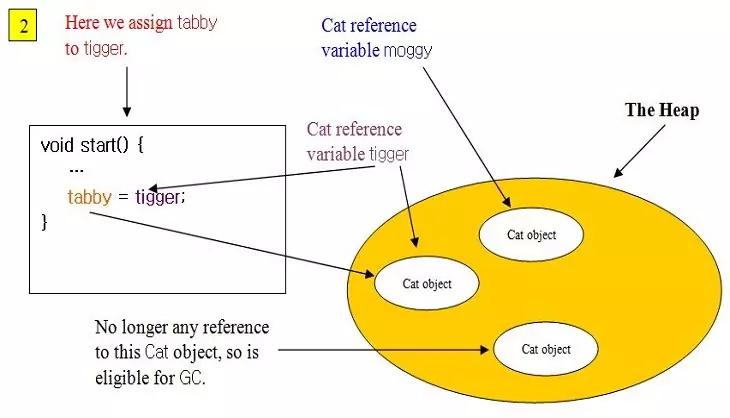
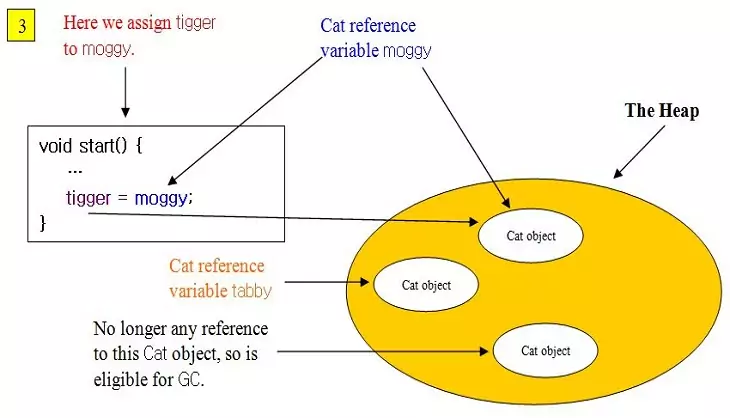
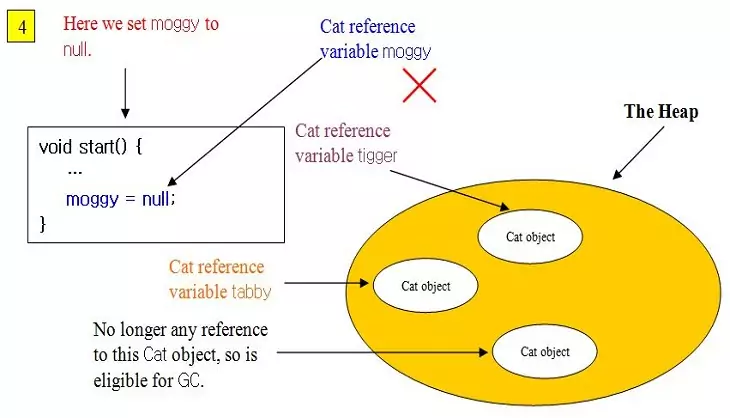
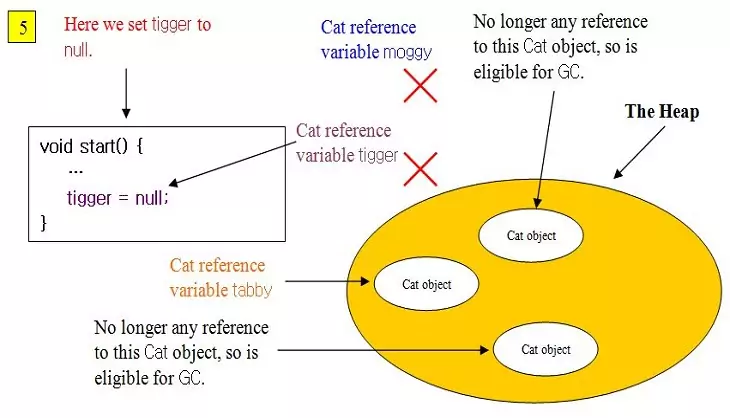
it from any object; in fact trying to access a null pointer will cause a NullPointerException runtime error. To clarify this lets go through the creation of some objects and see what happens to them on the
Heap and when they become eligible for GC. The following slide show depicts a scenario, just press the button to step through it.
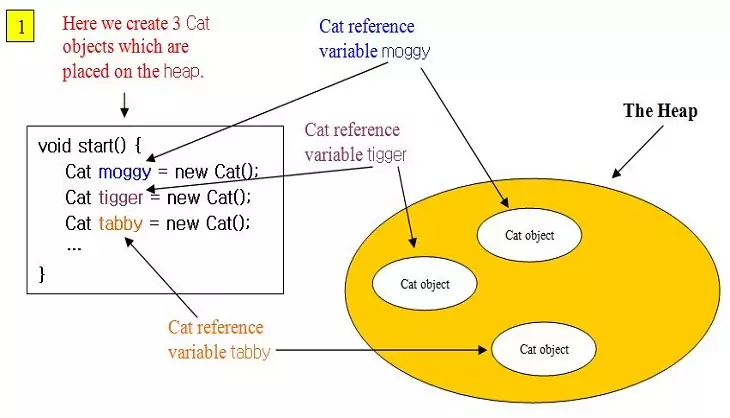
In this slide we create 3 Cat objects and these are placed on the Heap and can be accessed through their reference variables.
Lets look at some code to illustrate the above scenario:
/*
  Test Class2 for Cat
*/
public class TestCat2 {

    public static void main (String[] args) {
        Cat moggy = new Cat();    // Create a Cat instance
        Cat tigger = new Cat();   // Create a Cat instance
        Cat tabby = new Cat();    // Create a Cat instance
        tabby = tigger;
        tigger = moggy;
        moggy = null;
        tigger = null;
        tabby.talk();             // execute the talk() method
        tigger.talk();            // execute the talk() method (runtime error)
    }
}

The assignments of the reference variables happen as in the slide show. tabby can talk as his reference variable still points to a Cat object on the heap. When we try and get tigger to talk
we get a NullPointerException runtime error as this reference is now null.
The Stack RevisitedTop
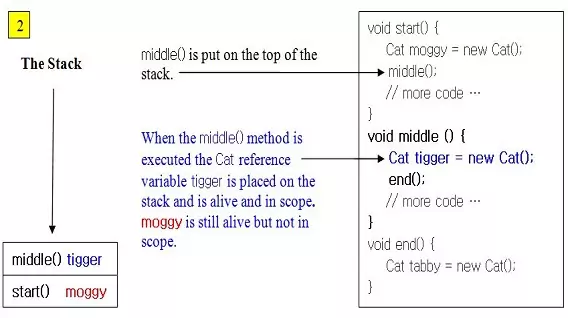
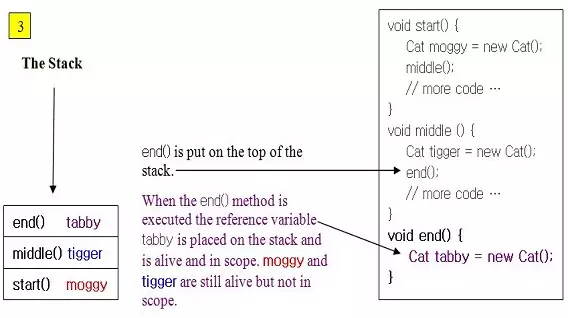
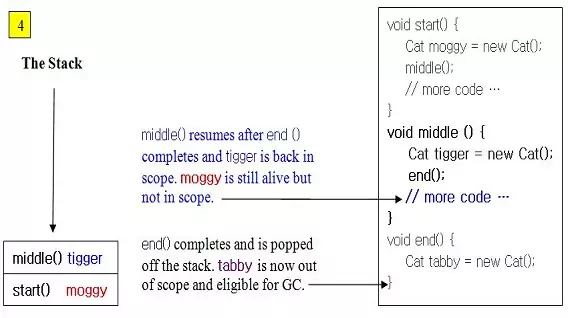
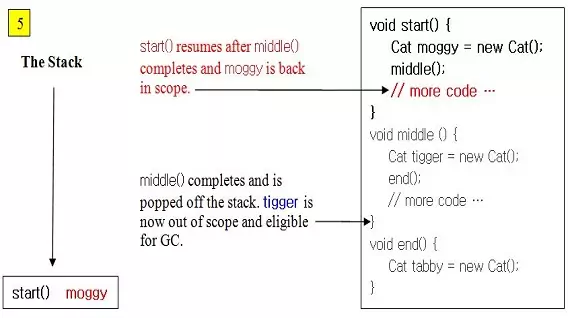
In the Beginning Java section in the Method Scope lesson we took our first look at the Stack and used primitive local variables for our examples. Here we will look at reference variables and the Stack. The rules for local variables that are reference variables are the same as local variables that are primitives. The following slide show shows this in action, just press the button to step through it.
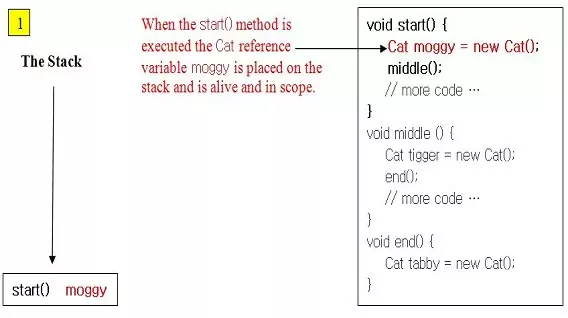
So to summarize, a local variable, whether primitive or reference, is alive as long as its method exists on the Stack. You can only use a methods local variables while the method is at the top of the stack (is executing).
The System.gc() MethodTop
The Runtime class enables us to communicate with the JVM and every Java application has a single instance of class Runtime that allows the application to interface with the
environment in which the application is running. The System.gc() method is a member of the Runtime class and by invoking the System.gc() method we force the JVM
to do garbage collection. Well this is the theory of what might happen, in reality the JVM makes no guarantees that calling the System.gc() method will do this, or even that the implementation
of the System.gc() method for a particular JVM, will in fact do anything. The botton line is that you can't with any certainty call the System.gc() method to free up memory and know if and when it will work.
The finalize() MethodTop
- The
finalize()method is only ever invoked once, for any given object, by the JVM.
The finalize() method of the Object class is called by the garbage collector on an object before that object is discarded. The finalize method in the Object
class doesn't execute any specific tasks, but gives us the opportunity to override. We may want to do this to clear up any resources held by an object such as closing a file used by it.
We have no control over when the garbage collector runs as this is in the control of the JVM. The garbage collector runs its collection efficiently and this means it usually runs when there are a lot of objects to discard.
Overriding finalize()Top
To see an overridden finalize() method in action we are going to have to instantiate a lot of objects and then make these objects eligible for garbage collection:
/*
  Class to show an overridden finalize() method in action
*/
public class Finalize {
    private int i;

    Finalize(int i) {
        this.i = i;
    }
    /*
      Instantiate a Finalize object and immediately descope it
    */
    public void CreateFinalize(int i) {
        Finalize f = new Finalize(i);
    }
    /*
      Overridden finalize() method
    */
    protected void finalize() {
        System.out.println("The finalize() method called on object: " + i);
    }
    /*
      You may need to change the iterator to get this to work!
    */
    public static void main (String[] args) {
        Finalize f = new Finalize(0);
        for (int i=1; i < 300000; i++) {
            f.CreateFinalize(i);
        }
    }
}
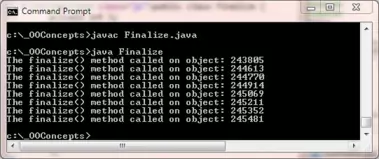
The above screenshot shows the output of running our Finalize class on my machine. You may have to increase the iterator within the for loop to get it to work.
Assignment OperatorsTop
The single equal sign = is used for assignment in Java and we have been using this throughout the lessons so far. This operator is fairly self explanatory and takes the form variable = expression;. A
point to note here is that the type of variable must be compatible with the type of expression.
Shorthand Assignment Operators
The shorthand assignment operators allow us to write compact code that is is implemented more efficiently.
| Operator | Meaning | Example | Result | Notes |
|---|---|---|---|---|
| += | Addition | int b = 5; b += 5; | 10 | |
| -= | Subtraction | int b = 5; b -= 5; | 0 | |
| /= | Division | int b = 7, b /= 22; | 3 | When used with an integer type, any remainder will be truncated. |
| *= | Multiplication | int b = 5; b *= 5; | 25 | |
| %= | Modulus | int b = 5; b %= 2; | 1 | Holds the remainder value of a division. |
| &= | AND | boolean a = false; boolean b = false;boolean a = false; boolean b = true;boolean a = true; boolean b = false;boolean a = true; boolean b = true; |
falsefalsefalsetrue | Will check both operands for true values and assign true or false to the first operand dependant upon the outcome of the expression. |
| |= | OR | boolean a = false; boolean b = false;boolean a = false; boolean b = true;boolean a = true; boolean b = false;boolean a = true; boolean b = true; |
falsetruetruetrue | Will check both operands for true values and assign true or false to the first operand dependant upon the outcome of the expression. |
| ^= | XOR | boolean a = false; boolean b = false;boolean a = false; boolean b = true;boolean a = true; boolean b = false;boolean a = true; boolean b = true; |
falsetruetruefalse | Will check both operands for different boolean values and assign true or false to the first operand dependant upon the outcome of the expression. |
Automatic Type Conversion, Assignment RulesTop
The following table shows which types can be assigned to which other types, of course we can assign to the same type so these boxes are greyed out.
When using the table use a row for the left assignment and a column for the right assignment. So in the highlighted permutations byte = int won't convert and int = byte will convert.
| Type | boolean |
char |
byte |
short |
int |
long |
float |
double |
|---|---|---|---|---|---|---|---|---|
boolean = | NO | NO | NO | NO | NO | NO | NO | |
char = | NO | NO | NO | NO | NO | NO | NO | |
byte = | NO | NO | NO | NO | NO | NO | NO | |
short = | NO | NO | YES | NO | NO | NO | NO | |
int = | NO | YES | YES | YES | NO | NO | NO | |
long = | NO | YES | YES | YES | YES | NO | NO | |
float = | NO | YES | YES | YES | YES | YES | NO | |
double = | NO | YES | YES | YES | YES | YES | YES |
Casting Incompatible TypesTop
The above table isn't the end of the story though as Java allows us to cast incompatible types. A cast instructs the compiler to convert one type to another enforcing an explicit type conversion.
A cast takes the form target = (target-type) expression.
There are a couple of things to consider when casting incompatible types:
- With narrowing conversions such as an
intto ashortthere may be a loss of precision if the range of theintexceeds the range of ashortas the high order bits will be removed. - When casting a floating-point type to an integer type the fractional component is lost through truncation.
- The target-type can be the same type as the target or a narrowing conversion type.
- The
booleantype is not only incompatible but also inconvertible with other types.
Lets look at some code to see how casting works and the affect it has on values:
/*
  Casting Incompatible Types
*/
public class Casting {

    public static void main (String[] args) {
        char a = 'D';
        short b = 129;
        int c = 4127;
        long d = 33445566L;
        float e = 12.34F;
        double f = 456.789;
        byte g = (byte) a;
        System.out.println(a + " When cast from char to byte has the value: " + g);
        g = (byte) b;
        System.out.println(b + " When cast from short to byte has the value: " + g);
        g = (byte) c;
        System.out.println(c + " When cast from int to byte has the value: " + g);
        g = (byte) d;
        System.out.println(d + " When cast from long to byte has the value: " + g);
        g = (byte) e;
        System.out.println(e + " When cast from float to byte has the value: " + g);
        g = (byte) f;
        System.out.println(e + " When cast from dobule to byte has the value: " + g);
    }

}
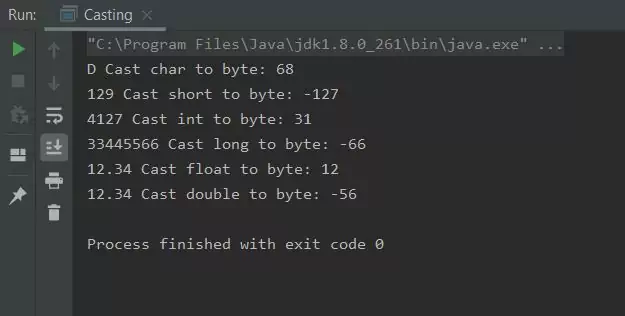
The first thing to note is we got a clean compile because of the casts, all the type conversions would fail otherwise. You might be suprised by some of the results shown in the screenshot above, for instance some of the
values have become negative. Because we are truncating everything to a byte we are losing not only any fractional components and bits outside the range of a byte, but in some cases the signed bit as well. Casting
can be very useful but just be aware of the implications to values when you enforce explicit type conversion.
Arithmetic OperatorsTop
We are familiar with most of the arithmetic operators in the table below from everyday life and they generally work in the same way in Java. The arithmetic operators work with all the Java numeric primitive
types and can also be applied to the char primitive type.
| Operator | Meaning | Example | Result | Notes |
|---|---|---|---|---|
| + | Addition | int b = 5; b = b + 5; | 10 | |
| - | Subtraction | int b = 5; b = b - 5; | 0 | |
| / | Division | int b = 7, b = b / 22; | 3 | When used with an integer type, any remainder will be truncated. |
| * | Multiplication | int b = 5; b = b * 5; | 25 | |
| % | Modulus | int b = 5; b = b % 2; | 1 | Holds the remainder value of a division. |
| ++ | Increment | int b = 5; b++; | 6 | See below. |
| -- | Decrement | int b = 5; b--; | 4 | See below. |
Increment And Decrement Operators
Both these operators can be prepended (prefix) or appended (postfix) to the operand they are used with. When applied to an operand as part of a singular expression it makes no difference whether the increment and decrement operators are applied as a prefix or postfix. With larger expressions however, when an increment or decrement operator precedes its operand, Java will perform the increment or decrement operation prior to obtaining the operand's value for use by the rest of the expression. When an increment or decrement operator follows its operand, Java will perform the increment or decrement operation after obtaining the operand's value for use by the rest of the expression. Lets look at some code to illustrate how this works:
/*
  Increment And Decrement Operators
*/
public class IncDec {

    public static void main (String[] args) {
        byte a = 5;
        byte b = 5;
        // Singular Expressions
        a++;
        ++b;
        System.out.println("a = " + a);
        System.out.println("b = " + b);
        // Larger Expressions
        a = 1;
        b = a++;
        System.out.println("b using a postfix = " + b);
        a = 1;
        b = ++a;
        System.out.println("b using a prefix = " + b);
    }

}
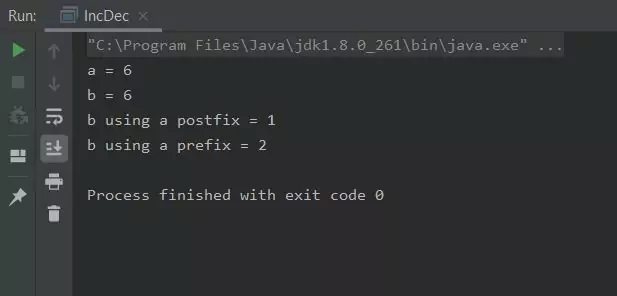
As you can see with the last two lines of output, the postfix increment is applied after the expression is evaluated, whereas the prefix increment is applied before.
Relational OperatorsTop
Relational Operators refer to the relationships that values can have to each other. Relational Operators produce a true or false result and are used with control statements such as if
and while. Any type can be compared for equality or inequality but only types that support an ordering relationship can be applied for comparison. The table below clarifies this.
| Operator | Meaning | Example | Result | Notes |
|---|---|---|---|---|
| == | Equal to | int a = 5; int b = 5; | true | All types can be compared for equality |
| != | Not Equal to | int a = 5; int b = 5; | false | All types can be compared for inequality |
| < | Less than | int a = 5; int b = 5; | false | Can be used with all numeric types and the char type. |
| <= | Less than or equal to | int a = 5; int b = 5; | true | Can be used with all numeric types and the char type. |
| > | Greater than | int a = 5; int b = 5; | false | Can be used with all numeric types and the char type. |
| >= | Greater than or equal to | int a = 5; int b = 5; | true | Can be used with all numeric types and the char type. |
Logical OperatorsTop
Logical Operands must be the boolean type and the result of a logical operation is the boolean type and are used with control statements such as if and while. The following
table shows all possible combinations and their result.
| Operator | Meaning | Example | Result | Notes |
|---|---|---|---|---|
| & | AND | boolean a = false; boolean b = false;boolean a = false; boolean b = true;boolean a = true; boolean b = false;boolean a = true; boolean b = true; |
falsefalsefalsetrue | Will check both operands for true values, even if the first operand is false. |
| && | Short-circuit AND | if (a && b) {..} | Same results as AND but if the first operand returns false, the second operand will not be checked (short-circuited) and false is returned. | |
| | | OR | boolean a = false; boolean b = false;boolean a = false; boolean b = true;boolean a = true; boolean b = false;boolean a = true; boolean b = true; |
falsetruetruetrue | Will check both operands for true values, even if the first operand is true. |
| || | Short-circuit OR | if (a || b) {..} | Same results as OR but if the first operand returns true, the second operand will not be checked (short-circuited) and true is returned. | |
| ^ | XOR (exclusive OR) | boolean a = false; boolean b = false;boolean a = false; boolean b = true;boolean a = true; boolean b = false;boolean a = true; boolean b = true; |
falsetruetruefalse | Will check both operands and return true if they have different boolean values. |
| ! | NOT | boolean a = false;boolean a = true; |
truefalse | Will check if operand is not true. |
The short-circuit operators && and || can be more efficient to use; if you want both operands to be evaluated use the & and | operators.
The ? : OperatorTop
The ? : tenary (takes three operands) operator can be used to replace an if....else construct of the following form:
| Construct | Description |
|---|---|
if....else | |
if (condition) { | Assign result of expression1 to
var if condition evaluates to true,otherwise assign result of expression2 to var. |
? : Operator | |
expression1 ? expression2 : expression3 |
If expression1 returns true evaluate expression2,
otherwise evaluate expression3, |
Lets examine some code to see how the ? : operator works:
/*
  The ? : Operator
*/
public class QuestionMarkOperator {

    public static void main (String[] args) {
	int int1 = 1234, int2 = 5678, maxInt;
	if (int1 > int2) {
	    maxInt = int1;
	}
	else {
  	    maxInt = int2;
	}
        System.out.println("Using an if...else construct maxInt holds a value of: " + maxInt);

	maxInt = (int1 > int2) ? int1 : int2;
        System.out.println("Using the ? : operator maxInt holds a value of: " + maxInt);
    }
}
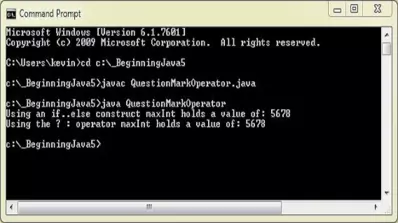
You should see 2 lines of output with the same values showing how we can replace this form of the if....else construct with the ? : operator.
The instanceof OperatorTop
We use the instanceof operator to find out whether an object is of a particular type. Because Java is a strongly typed language, it cares about the type of the variables we declare and try to use.
So just be aware when using the instanceof operator to check for a String object, when you have an instance of Monkey that knows nothing about String, you will get a compiler error.
/*
  Test Class for instanceof Operator
*/
public class Testinstanceof {

    public static void main (String[] args) {
        Cat moggy = new Cat();
        if (moggy instanceof Cat) {;   // Check for Cat instance
            System.out.println("moggy is a Cat.");
        }
    }
}

The screenshot shows the output from the Testinstanceof test class, showing that moggy is indeed a Cat.
We can also use the instanceof operator with polymorphic types and this is discussed next.
Using instanceof With InterfacesTop
The following program uses the Vehicle hierarchy and the PublicTransport interface as shown in the OO Concepts - Interfaces lesson
to show some instanceof usages:
/*
  A Minibus Class
*/
public class Minibus extends Bus {
    public static void main(String[] args) {
        Vehicle bus = new Bus();
        checkType(bus);
        Vehicle car = new Car();
        checkType(car);
        Vehicle minibus = new Minibus();
        checkType(minibus);
        PassengerPlane  pp = new PassengerPlane();
        checkType(pp);
        Vehicle taxi = new Taxi();
        checkType(taxi);
    }
    public static void checkType(Object o) {
        if (o instanceof Minibus) {
            ((Minibus)o).MinibusClassOnlyMethod(); // Downcast to minibus
        }
        if (o instanceof PublicTransport ) {
            /*
              Downcast argument to PublicTransport interface type
            */
            PublicTransportOnlyMethod(((PublicTransport)o));
        }
    }
    private static void MinibusClassOnlyMethod() {
        System.out.println("We are in the MinibusClassOnlyMethod().");
        System.out.println("We have safely downcast to the Minibus class to get here.");
    }
    private static void PublicTransportOnlyMethod(PublicTransport pt) {
        pt.queue(10);
        pt.payFare(2);
    }
}
In the code above we are instantiating objects from two different hierachies. We call the checkType(Object o) which uses The Object Superclass as a parameter. This enables us to
pass any argument to the method. Within the method we firstly use the instanceof operator to test for a Minubus type and if so we print some messages for that type. We then check to see if
this type is an instance of the PublicTransport interface. If it is we cast the object argument to the PublicTransport interface type and pass this to the PublicTransportOnlyMethod(PublicTransport pt)
method. Within this method the overridden methods for the appropriate class are called.
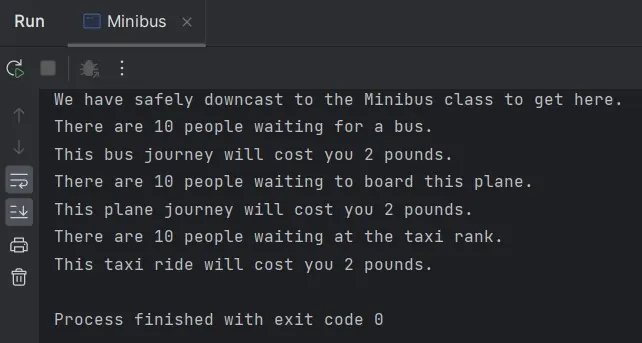
The above screenshot shows the output of running our Minibus test class. If you look closely at the output you will see that the queue() and payFare() methods are output twice
for the Bus class and yet we only made one occurrence of Bus. The second lot of output is actually for the Minibus class. The reason for this is inheritance; if a superclass
implements an interface, then a subclass will have an implicit implementation through the superclass.
Related java Tutorials
Beginning Java - Getting Started
Beginning Java - Primitive Variables
Objects & Classes - Reference Variables
Objects & Classes - Methods
Objects & Classes - Enumerations
API Contents - Packages
API Contents - Packages - Imports
API Contents - Packages - Static Imports
Beginning Java - Operators
Beginning Java - Conditional statements
OO Concepts - Interfaces - Using instanceof With Interfaces
