Advanced FormsS2C Home « Advanced Forms
In the HTML5 Intermediate Tutorials - Lesson 10 - Getting To Grips With Forms lesson we took a look at basic form creation and some of the tags and attributes available.
In this lesson we take a final look at forms with the remaining HTML tags we haven't used for form entry so far, these being the <datalist>, <fieldset>, <legend>, <optgroup>, <option>, <output> and <select> tags.
The Data List Element
The <datalist> tag and its' closing <datalist> tag specifies a list of pre-defined <option> elements for an <input> tag allowing an autocomplete feature for the <input> tag.
The Form Control Group (fieldset) Element
The <fieldset> tag and its' closing </fieldset> tag are used within the <form> </form> element to define a form control group.
The <fieldset> tag is often used together with the<legend> tag to give meaningful content information about the <form> control content.
The Form Control Group (fieldset) Legend Element
The <legend> tag and its' closing </legend> tag is used for representing the result of a calculation.
The Option Group Element
The <optgroup> tag and its' closing </optgroup> tag are used within the <select> </select> element to group related options together.
The Selectable Option Element
The <option> tag and its' closing </option> tag are used within the <optgroup> </optgroup> or <select> </select> element to define a selectable option.
The Output Element
The <output> tag and its' closing </output> is used for representing the result of a calculation.
The Option Selector Element
The <select> tag and its' closing </select> tag are used to create a drop down list of selectable options.
Datalist Example
<label for="pies">Choose your pie shape from the list:</label>
<input list="pie" name="pies" id="pies">
<datalist id="pie">
  <option value="Round">
  <option value="Square">
  <option value="Hexagon">
  <option value="Star">
  <option value="Triangle">
</datalist>
The <datalist id=""> attribute must be the same value as the <input list=""> attribute to bind them together.
When you enter any letter that appears in one of the options above, that option is made available in a drop down list, so for instance entering 'o' would bring up a list with 'Round' and 'Hexagon'.
After this the letters entered have to be in a sequence from the list, so entering 'ou' will reduce the list to 'Round' whereas entering 'od' will remove the list.
Output Example
<form onsubmit="return false"
      oninput="volume.value = (length.valueAsNumber * width.valueAsNumber * height.valueAsNumber)">
  <fieldset>
    <legend>Volume of a rectangle Calculator</legend>
    <p><label for="length">Volume</label>
    <input type="number" id="length" name="length" min="0" max="100" value="0"></p>
    <p><label for="width">Volume</label>
    <input type="number" id="width" name="width" min="0" max="100" value="0"></p>
    <p><label for="height">Volume</label>
    <input type="number" id="height" name="height" min="0" max="100" value="0"></p>
    <p>Volume of rectangle: <output name="volume" for="length width height">0</output> m<sup>3</sup></p>
  </fieldset>
</form>
In the above example, the values of the inputs are bound to the output and calculated on entry.
Fieldset, Legend, Select, Optgroup and Option Example
<form action="simpleform.html" method="get">
  <fieldset>
    <legend>Pie Survey</legend>
    <p>Name:<input type="text" name="name" /></p>
    <p>Which pie do you prefer?:</p>
    <p><input type="radio" name="pie" checked="checked" value="chicken" /> Chicken</p>
    <p><input type="radio" name="pie" value="fish" /> Fish</p>
    <p><input type="radio" name="pie" value="shepherds" /> Shepherds</p>
    <p>Select a pie shape:</p>
    <p><select name="mySelection">
      <optgroup label="Normal">
        <option value="round">round</option>
        <option value="square">square</option>
      </optgroup>
      <optgroup label="Custom">
        <option value="hexagon">hexagon</option>
        <option value="star">star</option>
        <option value="triangle">triangle</option>
      </optgroup>
    </select></p>
    <p>Submit your information:</p>
    <p><button type="submit" value="Submit">Submit</button></p>
  </fieldset>
</form>
Reviewing Our Changes
The Form
The <form> </form> element encloses the other tags we wish to use in our forms and we used this tag with its' action and method attributes. The action attribute tells the browser which URL to invoke when the user submits the form. The method attribute tells the browser how to submit the form data.
Fieldset
We have used the <fieldset> </fieldset> element to group the elements within the form together.
Legend
We have used the <legend> </legend> element to give a caption to the elements grouped within the <fieldset> </fieldset> element. We called the caption 'Pie Survey'.
Text Input
We have used the <input> tag along with its type attribute to allow the user to enter their name. We did this by setting the value of the type attribute to text. The name attribute was used to pass the value of the text entered to the server.
Radio Button Input
We also used the <input> tag along with its type attribute to allow the user to select a radio button. We did this by setting the value of the type attribute to radio. The checked attribute was used to set an initial value for the radio buttons. The name attribute was used to pass the value attribute of the radio button selected to the server.
Label Input
We used the <label> tag to give each radio button a name. We also used the for attribute to allow the user to select a radio button by using the mouse to click on the text. The for attribute of the <label> tag must match the id attribute of the <input> tag to bind the two together and allow this usability with the mouse.
Selection (drop-down menu) Input
We used the <select> </select> element to create a drop-down selectable menu. We used the <colgroup> </colgroup> element within the <select> </select> element to group together selectable <option> </option> elements. The name attribute of the <select> </select> element was used to pass the value attribute of the selection to the server.
Entering Data
Use the mouse to click in the name field and enter some input. Also maybe click a different radio button and select something from the drop-down list. Following is an example:
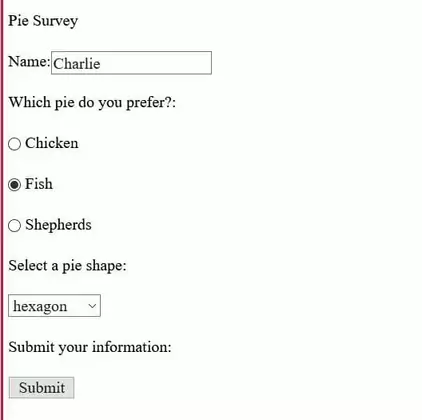
Submit the data
Use the mouse to click the submit button and a screen similar to the following will appear:
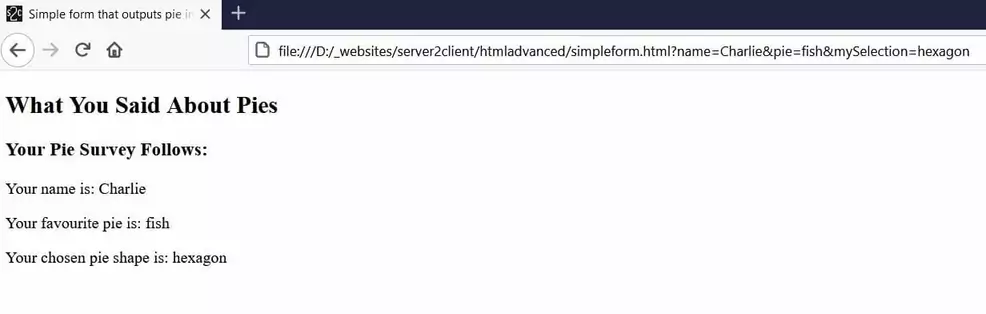
Reviewing Our Changes
As you can see the information we entered has been passed across in the url via a chain of key/value pairs sent via the get method.
These have been appended to the URL address starting from the ? symbol and are delimited with the & symbol.
The following code was used to do this:

How the above code works is beyond the scope of this tutorial but if your interested in how this can be achieved and for an explanation of HTTP methods I suggest taking a look at my Servlets & JSP Tutor site and in particular the lesson on What is HTTP?.
How we extract the information passed in the URL by the GET command is discussed on my Learn JavaScript & jQuery site.
Modify the HTML to create your own forms until you're confident with all aspects of form creation.
Related Tutorials/Quizzes
HTML5 Intermediate Tutorials - Lesson 10 - Getting To Grips With Forms
HTML5 Advanced Quizzes - Advanced Forms Quiz
What's Next?
HTML is all about the structure of web pages, we continue our lessons by introducing Cascading Style Sheets (CSS) which is all about the presentation.
HTML5 Reference
The <datalist> data list tag
The <fieldset> form control group tag
The <legend> form control group (fieldset) legend tag
The <optgroup> option group tag
The <output> output tag
The <option> selectable option tag
The <select> option selector tag