Quiz FeedbackS2C Home « Quiz Feedback
In this lesson we finish off our action points by giving the user feedback on how they did in the quiz.
Action List Revisited
The action points we will address in this lesson are highlighted in red, those already processed are greyed out.
- A container to hold the questions and multiple choice answers.
- A way to present the questions and possible answers to a question one at a time.
- A way to allow the user to select only one of multiple answers to a question.
- Visible markers for navigating the quiz questions.
- A way to navigate backwards and forwards through each question using the visible markers.
- A container to hold the progress bar.
- A way to update the progress bar as we work through the quiz.
- We have to store the user's answers somewhere for checking when the quiz is completed.
- A list of correct answers to check the user's answers against.
- A results container for user feedback.
- A summary of right and wrong answers to display within the results container when the quiz has completed.
- A score to show the user when the quiz has completed.
Deciphering Our Highlighted Action Points
Ok, let's go through action points 8, 11 and 12 and give the user feedback on how they did in the quiz.
8) We have to store the user's answers somewhere for checking when the quiz is completed.
We already make sure that the user enters an answer for each question so when the user presses the .btnShowResult link we can use jQuery to select all the checked answers and store these
in an array. We can then loop through this array extracting the id attribute of each checked answer into another array.
11) A summary of right and wrong answers to display within the results container when the quiz has completed.
Using our extracted array we can check these against our hardcoded answers array and output 'right' or 'wrong' to another array.
12) A score to show the user when the quiz has completed.
We can loop through the 'right' or 'wrong' array extracting the results for each question whilst keeping a count of 'right' answers. When the loop has ended we can use jQuery to show the results.
Updating Quiz JavaScript File
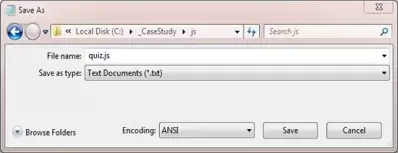
Using Notepad make sure you are pointing to the C:\_CaseStudy\js folder and reopen the quiz.js file we created in Lesson 4: Quiz Navigation.
Copy and paste the following code into the reopened file overwriting the contents. The JavaScript and jQuery we have added for this lessons action points is shown in blue:
// JavaScript and jQuery for interactive quiz follows
$(function(){
  $('.answers label').css({display:'block',width:'712'});
  $('.answers label').mouseover(function(){$(this).css({backgroundColor:'yellow'});});
  $('.answers label').mouseleave(function(){$(this).css({backgroundColor:'#fff'});});

  var S2CQuiz = {
    init: function(){
        $('.btnNext').on('click', function(){
            if ($('input[type=radio]:checked:visible').length == 0) {
                $('.errMsg').show().fadeOut(1200);
                return false;
            }
            $(this).parents('.questionContainer').fadeOut(500, function(){
                $(this).next().fadeIn(500);
            });
            var progBar = $('#progress');
            progBar.width(progBar.width() + 240 + 'px');
        });
        $('.btnPrev').on('click', function(){
            $(this).parents('.questionContainer').fadeOut(500, function(){
                $(this).prev().fadeIn(500);
            });
            var progBar = $('#progress');
            progBar.width(progBar.width() - 240 + 'px');
        });
        $('.btnShowResult').on('click', function(){
            if ($('input[type=radio]:checked:visible').length == 0) {
                $('.errMsg').show().fadeOut(1200);
                return false;
            }
            $('#progress').width(0);
            $('#progressContainer').hide();
            $('.txtStatusBar').text('Quiz Result');
            // Extract users answers to an array and call a function to check them
            var arr = $('input[type=radio]:checked');
            var ans = S2CQuiz.userAnswers = [];
            for (var i = 0; i < arr.length; i++) {
                ans.push(arr[i].getAttribute('id'));
            }
            var results = S2CQuiz.checkAnswers();
            // Loop through the 'right' or 'wrong' array extracting the results
            var resultSet = '';
            var rightCount = 0;
            for (var i = 0; i < results.length; i++){
               if (results[i] == "right") {
                  rightCount++;
               }
               resultSet += '<div> Question ' + (i + 1) + ' is ' + results[i] + '</div>';
            }
            // Show results
            resultSet += '<div class="totalScore">You scored ' + rightCount + '/' +  3 + '</div>';
            $('#resultContainer').html(resultSet).show();
        });
    },
    answers: { q1: 'c', q2: 'b', q3: 'b' },
    // Check answers and output 'right' or 'wrong' to another array
    checkAnswers: function() {
      	var arr = this.answers;
       	var ans = this.userAnswers;
       	var resultArr = [];
       	for (var p in ans) {
            var x = parseInt(p) + 1;
            var key = 'q' + x;
            var flag = "wrong";
            if (ans[p] == 'q' + x + '-' + arr[key]) {
               flag = "right";
            }
            else {
               flag = "wrong";
            }
            resultArr.push(flag);
       	}
       	return resultArr;
    }
  };
  S2CQuiz.init();

  $('.answers label').css({display:'block',width:'100%'});
  $('.answers label').mouseover(function(){$(this).css({backgroundColor:'#36648B'});});
  $('.answers label').mouseover(function(){$(this).css({color:'white'});});
  $('.answers label').mouseleave(function(){$(this).css({backgroundColor:'#fff'});});
  $('.answers label').mouseleave(function(){$(this).css({color:'#000'});});
});
Save the file in the C:\_CaseStudy\js folder and close the Notepad.

Reviewing The JavaScript and jQuery
We used the jQuery $('input[type=radio]:checked'); selector to extract all the checked answers and store these in an array when the user presses the .btnShowResult link. We then
loop through this array extracting the id attribute of each checked answer into another array. Using our extracted array we check the user answers against our hardcoded answers array and output
'right' or 'wrong' to another array. We then loop through the 'right' or 'wrong' array extracting the results for each question whilst keeping a count of 'right' answers. When the loop has ended we use the
jQuery .html() method to retrieve the HTML contents and the .show() effects method to display the results.
Viewing Our Changes
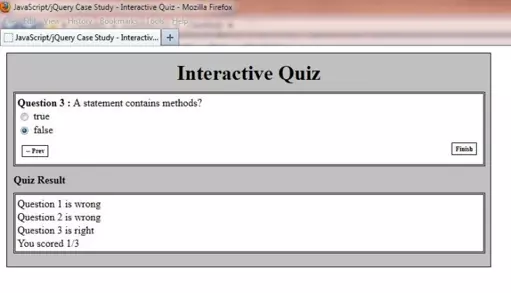
From the C:\_CaseStudy folder, double click on the index.html saved file and the quiz will appear in your default web browser. Navigate through the quiz answering the questions.
Press the .btnShowResult link and you will see a screenshot similar to the following showing the results of the quiz:

Lesson 5 Complete
In this lesson we finished off our action points by giving the user feedback on how they did in the quiz.
Related Tutorials
JavaScript Basic Tutorials - Lesson 5 - Variables
JavaScript Intermediate Tutorials - Lesson 1 - Arrays
JavaScript Intermediate Tutorials - Lesson 3 - Conditional Statements
jQuery Basic Tutorials - Lesson 6 - Tree Traversal
jQuery Basic Tutorials - Lesson 9 - Working With CSS Attributes
jQuery Basic Tutorials - Lesson 11 - Working With Dimension & Position CSS Properties
jQuery Intermediate Tutorials - Lesson 6 - Basic & Custom Effects
jQuery Intermediate Tutorials - Lesson 7 - Fading & Sliding Effects
jQuery Advanced Tutorials - Lesson 1 - Browser & Loading Events
jQuery Advanced Tutorials - Lesson 4 - Event Handler Attachments
What's Next?
In the next lesson we enhance our quiz to dynamically size the progress bar and to give the users more feedback by showing the correct answers to any wrong questions.