Interactive Quiz ProposalS2C Home « Interactive Quiz Proposal
An idea for an interactive quiz for the JavaScript and jQuery case study. The original idea for the quiz came from looking at Stack Overflow - Creating a Quiz with jQuery, second entry on page. So thanks to Fatih at fatihacet.com for the original code which I have used as a starting point for this project.
Basic Proposal
To make the site more enjoyable and to get a measure of the learning achieved we are going to make an interactive quiz for each section. Users of the site can use the quizzes to test the knowledge gained in a section they have worked through.
The first thing we need to decide upon is the sort of quiz required and how many answers are required per question. Parsing answers from users could be an extremely difficult process and having to deal with multiple correct answers to questions can also lead to complications. We want the quizzes to be easily understood by our users and also easy to code. This also helps with writing the case study itself as the main purpose of the case study and indeed the site in general is to learn client and server side disciplines. So to make the quiz as easy as possible we will choose a multiple choice quiz with one correct answer per question.
We will use HTML5 for the structure, CSS3 for the presentation and JavaScript/jQuery 3.5 for the behaviour. These versions of the aforementioned disciplines work in all modern browsers so we don't have to worry about things not working in certain browsers.
We will start with a simple three question quiz where feedback of 'right' or 'wrong' is given for each answer at the end of the quiz. We will use a basic progress bar so the user can see visible feedback of how much of the quiz has been completed thus far.
We don't just want a top down list of questions and answers so we need a way to display one question and the possible answers for the question one at a time.
Because we are only showing one question at a time there will need to be some sort of navigation to allow the user to move backwards and forwards between the questions.
Action List
So lets make a list of things we require to achieve this aim:
- A container to hold the questions and multiple choice answers.
- A way to present the questions and possible answers to a question one at a time.
- A way to allow the user to select only one of multiple answers to a question.
- Visible markers for navigating the quiz questions.
- A way to navigate backwards and forwards through each question using the visible markers.
- A container to hold the progress bar.
- A way to update the progress bar as we work through the quiz.
- We have to store the user's answers somewhere for checking when the quiz is completed.
- A list of correct answers to check the user's answers against.
- A results container for user feedback.
- A summary of right and wrong answers to display within the results container when the quiz has completed.
- A score to show the user when the quiz has completed.
The Basic Tools
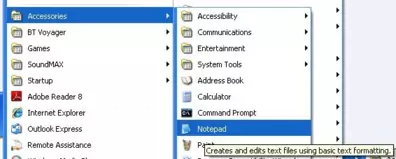
Before we start with the case study lets set up a few things. All we need to get going is a basic text editor such as Notepad for windows. So for instance using Windows XP:
click Start>>All Programs>>Accessories>>Notepad

Creating A Folder For Our Case Study Files
Let's create a folder for our case study lessons
double click My Computer icon
double click C:\ drive (or whatever your local drive is)
right click the mouse in the window
from the drop down menu select New
click the Folder option and call the folder _CaseStudy and press enter.
Setting Up Our Environment
Lets conclude this opening lesson by setting up a file for our homepage along with some external CSS and javaScript files we will create in future lessons.
Ok, with Notepad or a similar text editor open, copy and paste the following code into the editor.
<!DOCTYPE html>
<!-- Our HTML/CSS for the HTML skeleton follows -->
<html  lang="en">
<head>
<title>JavaScript/jQuery Case Study - Interactive Quiz</title>
<meta name="Description" content="Creating an interactive quiz at https://server2client.com/">
<meta http-equiv="Content-Type" content="text/html; charset=UTF-8">
<link href="global.css" rel="stylesheet" type="text/css">
<script src="js/jquery-3.5.1.min.js" type="text/javascript"></script>
<script src="js/quiz.js" type="text/javascript"></script>
</head>

<body>
</body>
</html>
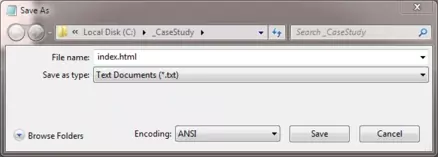
Click file from the toolbar and then click the save option.
In the Save in: tab at the top make sure you are pointing to the _CaseStudy folder we created above.
In the File name: text area type index.html and then click the Save button and close the Notepad.

The .html file extension lets the system know that this is a hypertext document, you must save the file with this extension to view the document in your default web browser. If you do not save the file with the .html file extension Notepad and other text editors save the file with the .txt file extension. This will stop you viewing the file in a web browser.
Website home pages are by convention called 'default.htm', 'default.html', 'home.htm', 'home.html', 'index.htm', or 'index.html'.
When you type in a URL for a website such as 'https://server2client.com/' there is no need to type the home page as the browser will look for one of the above home page names and render it automatically. I always use 'index.html' as this home page is accepted by all browsers.
Lesson 1 Complete
In this lesson we have written down ideas from an interactive quiz proposal and raised some action points for future lessons from this.
Related Tutorials
HTML Basic Tutorials - Lesson 2 - Basic HTML Structure
HTML Intermediate Tutorials - Lesson 1 - Metadata
HTML Advanced Tutorials - Lesson 1 - Scripting
What's Next?
In the next lesson we extract the information from the interactive quiz proposal that is relevant to the creation of the quiz layout.