JavaBean Standard ActionsS2C Home « JavaBean Standard Actions
In this lesson we look at jsp standard actions that relate to JavaBeans and how to use them within our JSP pages.
For more information on JavaBeans look at Java - OO Concepts - Encapsulation - Getters & Setters.
Standard actions are used for performing an operation or invoking a Java method and the same results can be achieved using the other types of syntactic elements we have already discussed. The difference with standard actions is that they are written using conventional XML syntax and achieve the same results more elegantly whilst attempting to separate the presentation logic from the business logic.
Using standard actions also reduces the amount of Java that is scripted within a JSP page making these pages more friendly to non-Java page developers. Using standard actions along with EL and JSTL we can completely remove Java scripting from the vast majority of JSP pages making these pages also accessible to web designers.
Variants of the standard actions syntax follows:
<%-- Start and end tag, no body --%>
<prefix:tagname attrib1="value1"  attrib2="value2" attribn="valuen"></prefix:tagname>

<%-- Start and end tag, with body (represented by ellipsis) --%>
<prefix:tagname attrib1="value1"  attrib2="value2" attribn="valuen">
    ...
</prefix:tagname>

<%-- Self closing tag, no body --%>
<prefix:tagname attrib1="value1"  attrib2="value2" attribn="valuen">
There are three standard actions that relate to JavaBeans as listed below:
jsp:useBeanjsp:getPropertyjsp:setProperty
We will look at the three standard actions above as we work through the rest of the lesson.
jsp:useBeanTop
The jsp:useBean standard action declares an instance of a JavaBean object and associates this with a scripting variable assigned within the jsp:useBean standard action. The following
diagram shows the most basic form of the jsp:useBean standard action.

In the above diagram we are just giving the id attribute a value we can use within an expression to print the date as shown in the following code:
<!DOCTYPE html>
<html>
<head><title>Simple jsp:useBean</title></head>
<body>
<h1>JSP Page Using A Simple jsp:useBean</p>
<jsp:useBean id="date" class="java.util.Date">
<%= date %>
</body>
</html>
The following screenshot shows the results of deploying and running the above JSP page:
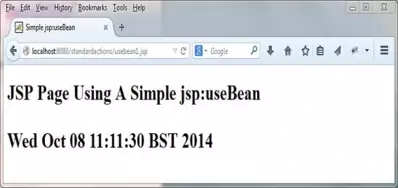
The above example still uses an expression so the JSP page is not scriptless and of course we could have just written the expression as:
<%= new java.util.Date() %>
In the above example we were just showing the syntax of the jsp:useBean standard action but we can do more. Lets take a look at a few more of the attributes that are available with this standard action.
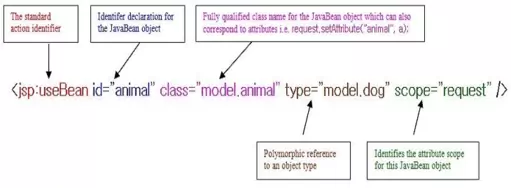
The type attribute allows us to use polymorphism, an example of which we will look at later in the lesson. The scope attribute identifies the scope for the JavaBean object in question and
if not present defaults to page scope.
In the above diagram if the attribute object animal doesn't exist in request scope then one will be created. If the attribute object animal does exist it will be used instead.
Let's look at an example where the object is created, but first lets set up our development environment for the rest of the lesson.
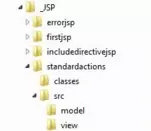
Within the _JSP folder create a folder for our web application which we will call standardactions
Within the standardactions folder we will create separate folders to hold our source files and our compiled byte code and these will be called src and classes.
Within the src folder we will create a model folder to hold some classes and a view folder to hold our JSPs.
So after creating these folders your directory structure should look something like the following screenshot:
Ok, with our folders set up lets code and compile a simple class and then write a JSP page so we can see how the jsp:useBean standard action creates an attribute object in the requested scope when none exists.
Coding Animal.javaTop
First we will create a simple Animal class that holds some generic information about animals and is a JavaBean.
package model;

public class Animal {

    private String name;
    // Getters and setters
    public String getName() {
        return name;
    }
    public void setName(String name) {
        this.name = name;
    }
}
Compiling The Animal Class
Open your command line editor:
Change to directory c:\_JSP\standardactions\src\model
Compile Animal.java using the java compiler with the -cp and -d options as below, making sure you change apache-tomcat-6.0.37 to wherever you downloaded Tomcat to.
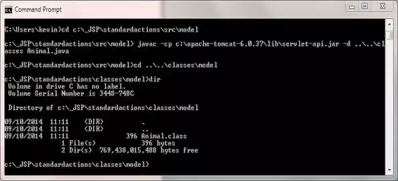
javac -cp c:\apache-tomcat-6.0.37\lib\servlet-api.jar -d ..\..\classes Animal.java
The following screenshot shows that we get a clean compile and also the Animal class now compiled into the classes\model directory.
JavaBean CreationTop
Ok, here's a simple JSP page that tries to access an Animal object in request scope and when it can't find one creates it.
<!DOCTYPE html>
<html>
<head><title>JavaBean Creation</title></head>
<body>
<h1>JavaBean Creation</p>
<jsp:useBean id="animal" class="model.Animal" scope="request">
<%= animal %>
</body>
</html>
Saving useanimal.jsp
Ok, with Notepad or a similar text editor cut and paste the above code.
Click file from the toolbar and then click the save option.
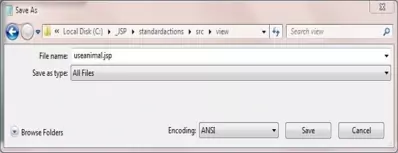
In the Save in: tab at the top make sure you are pointing to the C:\_JSP\standardactions\src\view folder.
In the File name: text area type useanimal.jsp.
Change the Save as type: option to All Files as we don't want to end up with a .txt extension and then click the Save button and close the Notepad.
Tomcat DeploymentTop
Go to your Tomcat installation which in my case is:
C:\apache-tomcat-6.0.37\webapps\
Within the webapps folder create a folder for our web application called standardactions
Copy the useanimal.jsp file from your development environment into the standardactions folder.
Create an empty WEB-INF folder within the standardactions folder.
Copy the classes folder from your development environment into the WEB-INF folder.
After creating the empty WEB-INF folder and copying the useanimal.jsp file from development your Tomcat directory structure within the webapps\standardactions folder should look something like the following screenshot:

Testing Our JSPTop
Open a command prompt and change the directory to the location of our Tomcat bin directory and then type in startup (Windows 7) or startup.sh (Linux/Unix/OSX).
Press Enter and the Tomcat server should open up in a new window.
You can also start up Tomcat by double-clicking the startup batch file within your Tomcat /bin folder.
With Tomcat up and running type the following into your web browser address bar and press enter:
http://localhost:8080/standardactions/useanimal.jsp
The web browser should be directed to the useanimal.jsp JSP within Tomcat, execute and produce a screen that looks like the following:
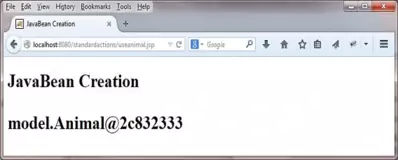
As you can see the expression produces a reference value as opposed to null so we can see that a JavaBean has been created.
JavaBean TranslationTop
Before we we move on lets take a look at what the translator did to our jsp:useBean code for the JSP page above, which I called useanimal.jsp and that got renamed to useanimal_jsp.java
and is done using the Tomcat container and will differ for other containers. The translated code for Tomcat can be found within a subdirectory of the work directory within your Tomcat installation. On my machine the full path is:
C:\apache-tomcat-6.0.37\work\Catalina\localhost\standardactions\org\apache\jsp\
package org.apache.jsp;

import javax.servlet.*;
import javax.servlet.http.*;
import javax.servlet.jsp.*;

public final class useanimal_jsp extends org.apache.jasper.runtime.HttpJspBase
    implements org.apache.jasper.runtime.JspSourceDependent {

    ...

  public void _jspService(HttpServletRequest request, HttpServletResponse response)
        throws java.io.IOException, ServletException {

    ...

      model.Animal animal = null;
      synchronized (request) {
        animal = (model.Animal) _jspx_page_context.getAttribute("animal",
                PageContext.REQUEST_SCOPE);
        if (animal == null){
          animal = new model.Animal();
          _jspx_page_context.setAttribute("animal", animal, PageContext.REQUEST_SCOPE);
        }
      }

    ...
As you can see from the translated code above the container tries to get the attribute animal from request scope and if it can't find it, which in our case it won't, creates it.
jsp:setPropertyTop
The jsp:setProperty standard action sets none or more property values of a JavaBean object previously declared with the jsp:useBean standard action. The following
diagram shows the syntax of the jsp:setProperty standard action.

Here's a simple JSP page that creates an Animal object in request scope if it doesn't exist and sets the name property.
<!DOCTYPE html>
<html>
<head><title>JavaBean Property Setting</title></head>
<body>
<h1>JavaBean Property Setting</p>
<jsp:useBean id="animal" class="model.Animal" scope="request">
<jsp:setProperty name="animal" property="name" value="cat">
</body>
</html>
Using the above code we will always set the name property to "cat" regardless of whether the JavaBean already exists and has a value. We can also embed the jsp:setProperty standard action
within the jsp:useBean standard action which makes the property setting conditional. When the jsp:useBean standard action has a body the contents of the body will only run if the JavaBean
isn't found and a new one is created, otherwise the body is ignored.
Here's a simple JSP page that creates an Animal object in request scope if it doesn't exist and sets the name property only if the JavaBean is created. In this example we are
embedding the jsp:setProperty standard action within jsp:useBean standard action to make property setting conditional.
<!DOCTYPE html>
<html>
<head><title>JavaBean Conditional Property Setting</title></head>
<body>
<h1>JavaBean Conditional Property Setting</p>
<jsp:useBean id="animal" class="model.Animal" scope="request" >
    <jsp:setProperty name="animal" property="name" value="cat">
</jsp:useBean >
</body>
</html>
jsp:getPropertyTop
The jsp:getProperty standard action gets the property value of a JavaBean object previously declared with the jsp:useBean standard action. The following
diagram shows the syntax of the jsp:getProperty standard action.

Here's a simple JSP page that creates an Animal object in request scope if it doesn't exist and sets the name property and then gets that property and outputs it.
<!DOCTYPE html>
<html>
<head><title>JavaBean Property Setting and Getting</title></head>
<body>
<h1>JavaBean Property Setting and Getting</p>
<jsp:useBean id="animal" class="model.Animal" scope="request" >
    <jsp:setProperty name="animal" property="name" value="cat">
</jsp:useBean >
Animal name: <jsp:getProperty name="animal" property="name">
</body>
</html>
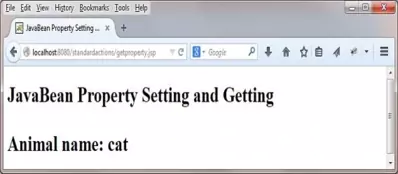
The following screenshot shows the results of deploying and running the above JSP page:
Polymorphic Standard ActionsTop
We will finish the lesson by looking at how we can use JavaBean standard actions polymorphically using the type attribute of the jsp:useBean standard action. The type attribute is used
with or without the class attribute and enables us to code a reference type and/or an object type for polymorphic referencing of objects. There are a couple of rules to remember when using the type attribute.
- If the
typeattribute is used without theclassattribute then the JavaBean in question must already exist. - if the
classattribute is used with/without thetypeattribute the class must not be abstract and must have a public no arguments constructor.
To see these rules in action we will need to amend the Animal class, write another simple subclass and add a JSP page.
Updating Animal.javaTop
To see the polymorphic standard actions rules in action lets amend the Animal class to make it abstract.
package model;

public abstract class Animal {

    private String name;
    // Getters and setters
    public String getName() {
        return name;
    }
    public void setName(String name) {
        this.name = name;
    }
}
Recompiling The Animal Class
Open your command line editor:
Change to directory c:\_JSP\standardactions\src\model
Compile Animal.java using the java compiler with the -cp and -d options as below, making sure you change apache-tomcat-6.0.37 to wherever you downloaded Tomcat to.
javac -cp c:\apache-tomcat-6.0.37\lib\servlet-api.jar -d ..\..\classes Animal.java
Here's the simple JSP page we used above that creates an Animal object in request scope if it doesn't exist and sets the name property and then gets that property and outputs
it. Remember that the Animal class is now abstract and so cannot be instantiated.
<!DOCTYPE html>
<html>
<head><title>JavaBean Property Setting and Getting</title></head>
<body>
<h1>JavaBean Property Setting and Getting</p>
<jsp:useBean id="animal" class="model.Animal" scope="request" >
    <jsp:setProperty name="animal" property="name" value="cat">
</jsp:useBean >
Animal name: <jsp:getProperty name="animal" property="name">
</body>
</html>
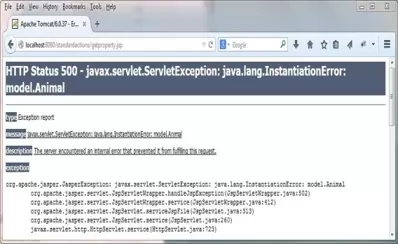
The following screenshot shows the results of deploying and running the above JSP page, as you would expect we now get an error when trying to create the JavaBean:
Coding Cat.javaTop
Ok now we can't create Animal objects as we made this class abstract we will code a subclass of Animal called Cat to see how polymorphic standard actions work .
package model;

public class Cat extends Animal {

    private String colour;
    // Getters and setters
    public String getColour() {
        return colour;
    }
    public void setColour(String colour) {
        this.colour = colour;
    }
}
Compiling The Cat Class
Open your command line editor:
Change to directory c:\_JSP\standardactions\src\model
Compile Cat.java using the java compiler with the -cp and -d options as below, making sure you change apache-tomcat-6.0.37 to wherever you downloaded Tomcat to.
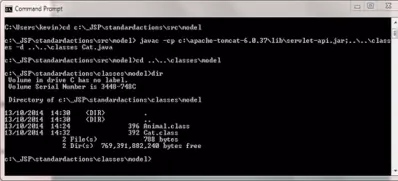
javac -cp c:\apache-tomcat-6.0.37\lib\servlet-api.jar;..\..\classes -d ..\..\classes Cat.java
The following screenshot shows that we get a clean compile and also the Cat class now compiled into the classes\model directory.
JavaBean CreationTop
Ok we will slightly change the JSP page we used above that creates an Animal object in request scope to creates a Cat object in request scope if it doesn't exist
and sets the name and colour properties. To do this we will be using the jsp:useBean standard action type attribute to set the reference type and the
class attribute to set the object type. We will then set those properties if the JavaBean is created, then get the properties and output them.
<!DOCTYPE html>
<html>
<head><title>JavaBean Polymorphic Standard Actions</title></head>
<body>
<h1>JavaBean Polymorphic Standard Actions</p>
<jsp:useBean id="cat" type="model.Animal" class="model.Cat" scope="request" >
    <jsp:setProperty name="cat" property="name" value="cat">
    <jsp:setProperty name="cat" property="colour" value="black">
</jsp:useBean >
Animal name: <jsp:getProperty name="cat" property="name">
Animal colour: <jsp:getProperty name="cat" property="colour">
</body>
</html>
Saving usecat.jsp
Ok, with Notepad or a similar text editor cut and paste the above code.
Click file from the toolbar and then click the save option.
In the Save in: tab at the top make sure you are pointing to the C:\_JSP\standardactions\src\view folder.
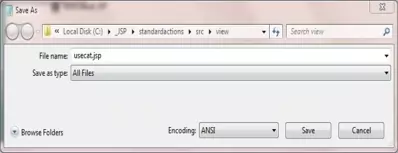
In the File name: text area type usecat.jsp.
Change the Save as type: option to All Files as we don't want to end up with a .txt extension and then click the Save button and close the Notepad.
Tomcat DeploymentTop
Go to your Tomcat installation which in my case is:
C:\apache-tomcat-6.0.37\webapps\
Copy the usecat.jsp file from your development environment into the standardactions folder.
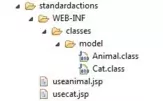
Copy the classes\model\Cat.class file from your development environment into the WEB-INF\classes\model\ folder.
After copying the usecat.jsp and Cat.classfiles from development your Tomcat directory structure within the webapps\standardactions folder should look something like the following screenshot:
Testing Our JSPTop
Open a command prompt and change the directory to the location of our Tomcat bin directory and then type in startup (Windows 7) or startup.sh (Linux/Unix/OSX).
Press Enter and the Tomcat server should open up in a new window.
You can also start up Tomcat by double-clicking the startup batch file within your Tomcat /bin folder.
With Tomcat up and running type the following into your web browser address bar and press enter:
http://localhost:8080/standardactions/usecat.jsp
The web browser should be directed to the useanimal.jsp JSP within Tomcat, execute and produce a screen that looks like the following:
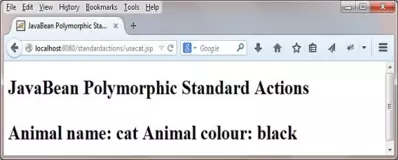
As the screenshot above shows we have set and got properties on our Cat subclass.
Lesson 7 Complete
In this lesson we looked at jsp Standard Actions that relate to JavaBeans and how to use them within our JSP pages.
What's Next?
In the next lesson we look at the jsp:include, jsp:forward and jsp:param standard actions.