JSP DirectivesS2C Home « JSP Directives
In the JSP Page Anatomy lesson we took our first brief look at page directives which are instructions sent to the translator on how a JSP page should be translated
into a servlet. In total there are six directives in the jsp specification these being page, include, taglib, tag, attribute and variable.
In this lesson we will take a much closer look at the page and include directives which along with the taglib directive are the only directives which can be included in a JSP
page. We will defer discussion of the taglib directive until we look at the JavaServer Pages Standard Tag Libraries 1.2 - Tag Files
lesson where we will also learn about the tag, attribute and variable directives.
Directives are input into a JSP page using the directive start tag <%@ followed by the directive name along with any attributes and terminated with the directive end tag
%>
The following code snippet shows different examples of the same page directive so you can see the variations in syntax directives allow:
<%-- No whitespace between directive start tag and directive name --%>
<%@page import="java.util.List" %>

<%-- Whitespace between directive start tag and directive name --%>
<%@ page import="java.util.Date" %>

<%-- Whitespace allowed before or after the equal sign --%>
<%@ page import = "java.util.Date" %>

<%-- Attribute values can also be enclosed by single quotes --%>
<%@ page import='java.util.List' %>

<%-- Attribute values can be delimited by commas --%>
<%@ page import="java.util.Date, java.util.List" %>
The page DirectiveTop
The page directive is used to instruct the translator about characteristics of the page it is contained within. The page directive syntax follows:
<%@page attribute1="value1" attribute2="value2" ... attributen="valuen" %>
There are a few basic rules and exceptions when using the page directive:
- You can place
pagedirectives anywhere in a JSP page.- The exception to this rule is when the JSP page contains either the
contentTypeorpageEncodingattributes. If these attributes are present they must precede any template data and data sent using Java code. This makes sense as we need to set a type prior to sending content to the browser.
- The exception to this rule is when the JSP page contains either the
- You can have multiple
pagedirectives in a JSP page. - Attributes that appear in multiple
pagedirectives must have the same value.- The exception to this rule is when using the
importattribute. When multipleimportattributes with different values are present the effect is cumulative.
- The exception to this rule is when using the
page Directive AttributesTop
There are fifteen page directive attributes in the jsp specification. The following table lists them all along with possible attribute values.
| Attribute Name | Attribute Value | Comments |
|---|---|---|
autoFlush | true - defaultfalse | Defaults to true specifying buffered output to be flushed automatically.
Setting this to false will raise an exception on buffer overflow. |
buffer | nkb - default >=8kbnone | Set buffer size of out
implicit object in kilobytes where kb mandatory.A value of none indicates there is no buffering and output is written directly to the responses PrintWriter stream. |
contentType | text/html | Define the content type of the response implicit object. |
deferredSyntax | false - defaulttrue | Indicates if the character sequence #{ allowed as a string literal or not.
Defaults to false as the character sequence #{ is used as a special character sequence by the Expression Language 2.1. |
errorPage | A valid URL | Define a page that will handle any errors occurring on this page. The URL path can begin with a forward slash making it relative to the context root, or not making it relative to the page. |
extends | superclass | Specifies a superclass that this page's implementation must extend. This atrribute is rarely used and as it restricts the ability of the JSP container to provide specialized superclasses. |
import | Java type(s) | Specifies the types that are available to this JSP page. To import an entire package use the '*' wildcard type. To import multiple types, delimit each with a comma. |
info | Arbitrary string | Define a return value that can be retrieved using the Servlet.getServletInfo method. |
isELIgnored | falsetrue | Indicates whether EL expressions are ignored or recognized for this JSP page. The default value varies depending on the web.xml version |
isErrorPage | false - defaulttrue | Indicates whether this JSP page is an error handler page. |
isThreadSafe | true - defaultfalse | Indicates the level of thread safety implemented in the JSP page.
Setting this to false will tell the translator to implement the SingleThreadModel mechanics within the translated servlet which is deprecated and should be avoided. |
language | Java - default | Defaults to Java which is the only valid value in the jsp specification. |
pageEncoding | ISO-8859-1 default | Specifies the character encoding for this JSP page. |
session | true - defaultfalse | Defaults to true specifying that the JSP page is translated and a
session implicit object is created for session management if one doesn't already exist.Specifying a value of false
means no session implicit object is created for session management. |
trimDirective | false - defaulttrue | Defaults to false meaning no whitespace will be trimmed.
Setting this to true will remove template text that only contains spaces from the output. |
page Directive ExamplesTop
The following code snippet shows different examples of page directive attributes and values:
<%-- Set content type --%>
<%@ page contentType="application/pdf" %>

<%-- Class import --%>
<%@ page import="java.util.List" %>

<%-- Package import --%>
<%@ page import="java.util.*" %>

<%-- Multiple imports delimited by commas --%>
<%@ page import="java.util.Date, java.util.List" %>

<%-- Multiple attributes --%>
<%@ page import="java.util.Date" contentType="application/pdf" %>

<%-- Multiple page directives --%>
<%@ page import = "java.util.Date" %>
<%@ page contentType="application/pdf" %>
The include DirectiveTop
The include directive is used to insert the contents of another file, JSP or HTML, within the JSP page. This is achieved during translation when the include directive is replaced with the
contects of the included file. This is useful when the contents of the included file are required within different programs or even different places within the same JSP page.
The include directive syntax follows:
<%@ include file="url" %>
There are a few basic rules when using the include directive:
- You can place
includedirectives anywhere in a JSP page. - You can have multiple
includedirectives in a JSP page.
include Directive AttributesTop
There is one include directive attribute in the jsp specification. The following table lists this along with possible attribute values.
| Attribute Name | Attribute Value | Comments |
|---|---|---|
file | url | The URL path can begin with a forward slash making it relative to the context root of the application, or not making it relative to the JSP page. |
include Directive ExampleTop
To see how the include directive works lets look at a very simple example where we insert a paragraph of text into several areas of a simple JSP page.
Within the _JSP folder create a folder for our web application which we will call includedirectivejsp
Within the includedirectivejsp folder we will create a view folder to hold our JSPs.
So after creating these folders your directory structure should look something like the following screenshot:

Coding included.jspfTop
First we will create a simple HTML page that displays a paragraph of text. Notice the file extension of jspf? This denotes this file as a JSP
fragment, also known as a JSP segment, so any users of the file can see this file gets included into other JSP pages.
<p>We inserted this text into our JSP page!</p>
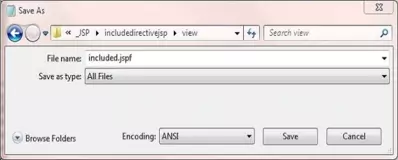
Saving included.jspf
Ok, with Notepad or a similar text editor cut and paste the above code.
Click file from the toolbar and then click the save option.
In the Save in: tab at the top make sure you are pointing to the C:\_JSP\includedirectivejsp\view folder.
In the File name: text area type included.jspf.
Change the Save as type: option to All Files as we don't want to end up with a .txt extension and then click the Save button and close the Notepad.

Coding useincluded.jspTop
Lets now code a simple JSP page that includes the included.jspf file using the include directive.
<!DOCTYPE html>
<html>
  <head><title>JSP Page Using include Directive </title></head>
  <body>
    <h1>Using the <code>include</code> Directive</p>
    <p>Some paragraph text</p>
    <%@ include file="included.jspf" %>
    <p>Some paragraph text</p>
    <%@ include file="included.jspf" %>
    <p>Some paragraph text</p>
    <%@ include file="included.jspf" %>
  </body>
</html>
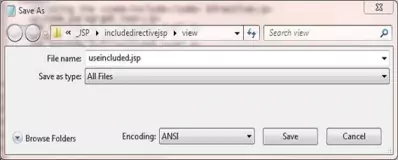
Saving useincluded.jsp
Ok, with Notepad or a similar text editor cut and paste the above code.
Click file from the toolbar and then click the save option.
In the Save in: tab at the top make sure you are pointing to the C:\_JSP\includedirectivejsp\view folder.
In the File name: text area type useincluded.jsp and then click the Save button and close the Notepad.
Change the Save as type: option to All Files as we don't want to end up with a .txt extension and then click the Save button and close the Notepad.

Tomcat DeploymentTop
Go to your Tomcat installation which in my case is:
C:\apache-tomcat-6.0.37\webapps\
Within the webapps folder create a folder for our web application called includedirectivejsp
Copy the included.jsp and useincluded.jsp files from our development environment into the includedirectivejsp folder.
Testing Our JSPsTop
Open a command prompt and change the directory to the location of our Tomcat bin directory and then type in startup (Windows 7) or startup.sh (Linux/Unix/OSX).
Press Enter and the Tomcat server should open up in a new window.
You can also start up Tomcat by double-clicking the startup batch file within your Tomcat /bin folder.
With Tomcat up and running type the following into your web browser address bar and press enter:
http://localhost:8080/includedirectivejsp/useincluded.jsp
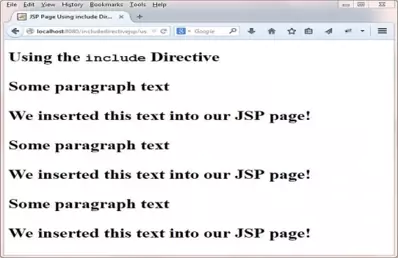
The web browser should be directed to the included.jsp JSP within Tomcat, execute and then call the useincluded.jsp page three times producing a screen that looks like the following:

Lesson 5 Complete
In this lesson we took a much closer look at the page and include directives.
What's Next?
In the next lesson we look at scripting elements which are the second type of syntatcic elments available for use within JSP pages.