CSS SyntaxS2C Home « CSS Syntax
We start this lesson by exploring the syntax behind a CSS Style, by breaking down the style into its component parts. The various components are explained and their role in the grand scheme of all things CSS is made clear. The lesson ends with a second practical where we introduce CSS Internal Style Sheets and see what their use is.
So What is the Syntax of CSS?
A style can be broken down into two main parts:
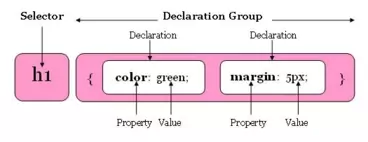
1) Selector - tells web browsers what to format.
2) Declaration Group - lists one or more Declarations to be applied to the selector.
The Declaration Group is enclosed within curly braces and will contain at least one Declaration. Declarations are basically key/value pairs to be applied to the selector. Each Declarations property (key) is terminated by a colon. The property is then followed by the property value(s) which is terminated with a semi-colon, that also terminates the Declaration.
h1 {
  color: green;
  margin: 5px;
}
So the above CSS will apply the colour green to all HTML h1 tags and set a 5 pixel margin around the heading. Don't worry too much about the properties and what they mean at the moment, all will be revealed as we move through the lessons. The CSS above has two declarations within the declaration group, but there might be many more. It is a good idea to break your CSS into multiple lines to aid readability and maintenance.
h1 {
color: green;
margin: 5px;
}
The above CSS has the selector and opening curly bracer on the first line. Each Declaration is indented on a new line and the closing curly bracer is on a line on its own. Some people prefer to format with each bracer on a new line but we will be using the above formatting style from now on.
Our First File Revisted
Open up the file with Notepad we created and tested in Lesson 1: Beginning CSS
You saved the file to your computer in the C:\_CSSBasics folder as lesson_1_csspage.html
Copy and paste the following code into the reopened file, overwriting the existing text.
<!DOCTYPE html>
<!-- Our HTML/CSS for CSS Basic Tutorials Lesson 2 follows -->
<html  lang="en">
<head>
<title>CSS Tutorials - Basic CSS Lesson 2 - CSS Syntax</title>
<style type="text/css">
h1 {
  color: red;
}

p {
  color: orange;
}

</style>

</head>
<body>
<h1 style="color: green;">CSS Basics - CSS Syntax</h1>
<p>A paragraph we have applied a CSS style to.</p>
</body>
</html>
Save the file in the C:\_CSSBasics folder as lesson_2_csspage.html and close the Notepad.

Viewing Our Saved File
From the C:\_CSSBasics folder, double click on the saved file and it will appear in your default web browser and look something like the following image.

Reviewing Our Changes
Ok what did we do? Well we added a <style></style> HTML element with a HTML attribute of type="text/css". This must be added within the <head></head> HTML element and is commonly known as an Internal Style Sheet. Within the Internal Style Sheet we created styles for the h1 and p selectors.
A point of interest here is that although we set the h1 selector colour to red in the Internal Style Sheet, we also set the h1 selector to green using the inline CSS. In the case where there are two CSS rules applied for a selector and specificity is the same then the last rule read in by the browser overrides any previous rules. So in this case the inline style, being read last, will override the colour from red to green. We will go into specificity in much greater detail in CSS Intermediate Lesson 6: Specificity (the cascade), so don't worry about what it means for now :).
Lesson 2 Complete
Play around with the CSS and see what results you get by changing the values and property settings. When you're comfortable with what we have learnt so far move on to the next lesson.
What's Next?
In the next lesson we take a look at the last way to get CSS into your HTML documents by using External Style Sheets. We then discuss the merits of internal, external and inline use of CSS and what to use and where.
Related Tutorials
NONE