The Box ModelS2C Home « The Box Model
Whenever you create a HTML element such as a paragraph using the <p> HTML tag or an image using the <img> HTML tag, the web browser treats these elements as boxes. The contents of these boxes are surrounded by different properties that make up the 'box model'. In this lesson we investigate the basic properties that make up the 'box model' to see what we can manipulate.
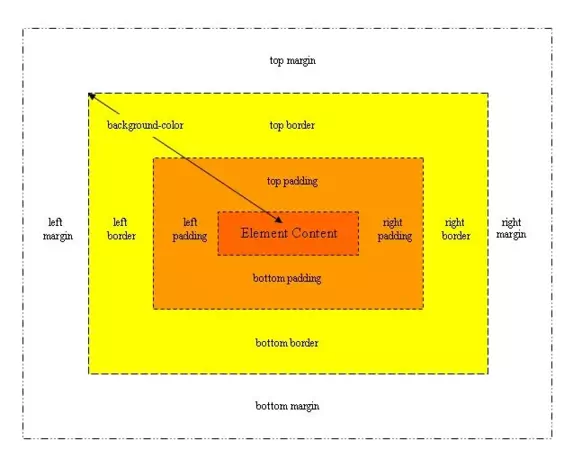
The properties of the CSS box model are best explained through a simple diagram.
Box Model Diagram

Ok, let's go through this diagram and explain the various properties.
element content - Some text or an image
padding - This is a space between the element content and the border. Think of the padding as the white part of a photo between the picture and the photo edge.
border - Is a line that can be drawn drawn around each edge, or individual edges, of the padding.
margin - A transparent area around around the border.
background-color - Fills all the space from the border inwards with the selected colour. If the border isn't solid, for example the border may be dashed, then space in between the dashes will be filled with the background colour.
Seeing the Box Model In Action
Open up the file with Notepad we created and tested in Lesson 6: Using Fonts.
You saved the file to your computer in the C:\_CSSBasics folder as lesson_6_csspage.html
Copy and paste the following code into the reopened file, overwriting the existing text.
<!DOCTYPE html>
<!-- Our HTML/CSS for Styling Text follows -->
<html  lang="en">
<head>
<title>CSS Tutorials - Basic CSS Lesson 7 - The Box Model</title>

<style type="text/css">
/* Set a margin for the document */
body {
  margin: 15px;
}

/* This paragraph will have a dashed black border and yellow background */
#paratext1 {
  border: 1px dashed black;
  background-color: yellow;
}

/* This paragraph will have  a solid red border and olive background */
#paratext2 {
  border: 3px solid black;
  background-color: olive;
}

/* This paragraph will have a solid red border and aqua background */
#paratext3 {
	padding: 15px;
  border: 3px solid red;
  background-color: aqua;
}

/* This image will have 10px padding and a thin black border */
#img1 {
	padding: 10px;
  border: 1px solid black;
}

/* This image will have 5px padding and a thick blue border and yellow background */
#img2 {
	padding: 10px;
  border: 3px solid blue;
  background-color: yellow;
}

/* This image has 10px padding and margin and a thin red border and teal background */
#img3 {
	margin: 10px;
	padding: 10px;
  border: 1px solid red;
  background-color: teal;
}

</style>

</head>
<body>
<h1>The Box Model</h1>
<h2>Looking at Text</h2>
<p id="paratext1">A paragraph with a dashed black border,
   no padding and a yellow background.</p>
<p id="paratext2">A paragraph with a thick solid black border,
   no padding and an olive background.</p>
<p>A paragraph with no CSS box properties applied.</p>
<p id="paratext3">A paragraph with a thick solid red border,
   15 pixel padding and an aqua background.</p>
<h2>Looking at Images</h2>
<img id="img1" src="https://server2client.com/images/chickenpiesmall.jpg"
    alt="Chicken Pie">
<img id="img2" src="https://server2client.com/images/chickenpiesmall.jpg"
    alt="Chicken Pie">
<img id="img3" src="https://server2client.com/images/chickenpiesmall.jpg"
    alt="Chicken Pie">
</body>
</html>
Save the file in the C:\_CSSBasics folder as lesson_7_csspage.html and close the Notepad.

Viewing Our Saved File
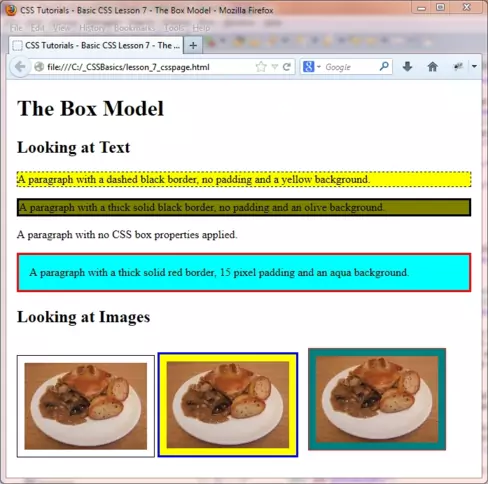
From the C:\_CSSBasics folder, double click on the saved file and it will appear in your default web browser and look something like the following image.

Reviewing Our Changes
We will be going over the CSS for the box model in the next 2 lessons for now its enough to understand the spacial impact that the box model properties have by reviewing the text and pictures. Apologies for the colours and borders, they are just there to emphasize the box model areas we are investigating and are not recommended for every day use :).
A point of interest is that the third of the three images has a margin set so this image is displayed higher than the other two because of this.
Lesson 7 Complete
Understanding the box model is fundamental to knowing how and where our text and images will be displayed. Once we have this knowledge mastered we can have confidence in knowing what things will look like on various browsers and work out correct dimensions for our web pages.
What's Next?
We delve deeper into the box model by working with paddings and margins.
Related Tutorials
CSS Basic Tutorials - Lesson 8 - Padding & Margins
CSS Basic Tutorials - Lesson 9 - Borders
CSS Intermediate Tutorials - Lesson 2 - A Final Look At The Box Model