Generated ContentS2C Home « Generated Content
In this lesson we explore generated content and how we can use this in conjunction with the :before and :after pseudo-elements to insert information into our web pages. We also learn how to generate quotes and how to add and reset counters for an element.
Generated Content CSS Properties
content
Used to generate content in a document in conjunction with the :before and :after pseudo-elements.
counter-increment
Increments one or more counters set with the content CSS property.
counter-reset
Resets one or more counters set with the content CSS property.
quotes
Specifies quotation marks for any number of embedded quotations.
The Basic Tools
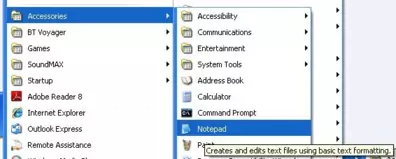
All we need to get going is a basic text editor such as Notepad for windows. So for instance using Windows XP:
click Start>>All Programs>>Accessories>>Notepad

Creating A Folder For Our CSS Advanced Files
Let's create a folder for our CSS advanced lessons
double click My Computer icon
double click C:\ drive (or whatever your local drive is)
right click the mouse in the window
from the drop down menu Select New
click the Folder option and call the folder _CSSAdvanced and press enter.
Viewing the Generated Content CSS Properties
Let's take a look at the generated content properties available to us in our first CSS advanced practical.
Ok, with Notepad or a simlilar text editor open, copy and paste the following code into the editor.
<!DOCTYPE html>
<!-- Our HTML/CSS for the Generated Content tutorial follows -->
<html  lang="en">
<head>
<title>Advanced CSS - Lesson 1 - Generated Content</title>

<style type="text/css">
/* Set section counter on initial entry */
body {
  counter-reset: section 5;
}
/* Reset lesson every time we hit a h2 tag */
h2 {
  counter-reset: lesson;
}
/* Create generated content before our h2 tags */
h2:before {
  counter-increment: section;
  content: "Section " counter(section) ". ";
}
/* Increment lesson counter and generate content before our h3 tags */
h3:before {
  counter-increment: lesson;
  content: counter(section) "." counter(lesson) " ";
}
/* content set to the value held within the href attribute */
a:after {
  content: attr(href);
}
/* content set to a string */
.para1:after {
  content: "AN INSERTED STRING ";
}
/* content will have opening quote */
.para2:before {
  content: open-quote;
}
/* Set quotes for English */
q:lang(en) {
  quotes: "«" "»" "‘" "’";
}

/* Set quotes for French */
q:lang(fr) {
  quotes: "»" "«" "“" "”";
}

</style>

</head>
<body>
<h1>Generated Content</h1>
<h2>The CSS quote Property</h2>
<h3>Using the embedded quotes we set up for English</h3>
<p lang="en"><q>I am a <q>rockstar</q>, yes</q></p>
<h3>Using the embedded quotes we set up for French</h3>
<p lang="fr"><q>Je suis un <q>rockstar</q>, oui</q></p>
<h2>The CSS content Property</h2>
<h3>Content generated after a link</h3>
<p>A link
<a href="https://server2client.com/images/beefalepiesmall.jpg"></a>
</p>
<h3>Content generated after a paragraph</h3>
<p class="para1">
Content generated after this sentence.
</p>
<h3>Opening quote generated</h3>
<p class="para2">
Notice the generated opening quote.
</p>
</body>
</html>
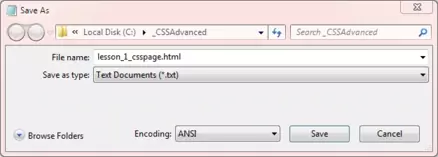
Click file from the toolbar and then click the save option.
In the Save in: tab at the top make sure you are pointing to the _CSSAdvanced folder we created above.
In the File name: text area type lesson_1_csspage.html and then click the Save button and close the Notepad.

The .html file extension lets the system know that this is a hypertext document, you must save the file with this extension to view the document in your default web browser. If you do not save the file with the .html file extension Notepad and other text editors save the file with the .txt file extension. This will stop you viewing the file in a web browser.
Viewing Our Saved File
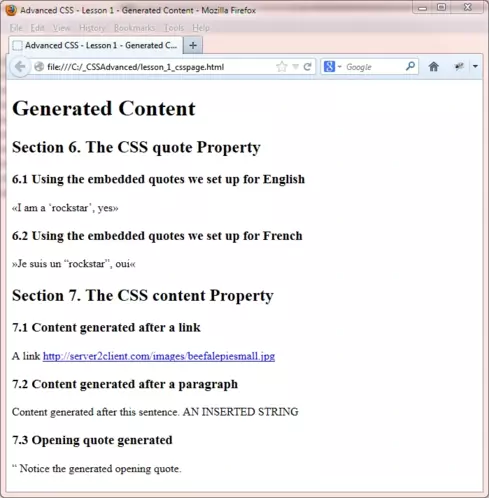
From the C:\_CSSAdvanced folder, double click on the saved file and it will appear in your default web browser and look something like the following image.

Reviewing Our Code
The first thing to notice from the screenprint, is the numbering for the <h2> and <h3> HTML tags. Two counters have been set up and the one for the <h2> HTML tag, the section counter, is initially set to 5. The <h3> counter we set up, the lesson counter, is reset each time a new <h2> HTML tag is hit.
We then set up some quotes for English and French to generate quotes when the appropriate lang attribute is encountered.
Finally we used the CSS content property with some of its values to generate some content.
Lesson 1 Complete
Play around with the code and use some of the other values available with CSS content property and check the generated content produced. Also play around with the counters till you're happy with using them.
Related Tutorials
CSS Intermediate Tutorials - Lesson 4 - Pseudo Selectors
What's Next?
In the next lesson we take a final look at CSS selectors by looking at attribute selectors.
CSS Reference
Generated Content
The content CSS Property
The counter-increment CSS Property
The counter-reset CSS Property
The quotes CSS Property