Pseudo SelectorsS2C Home « Pseudo Selectors
In lesson 3 of the CSS Intermediate Tutorials we took our final look at tag selectors. We continue our study of selectors by looking at pseudo selectors and how to use them. We will begin by looking at the pseudo-class selectors and their uses. Afterwards we will explore the different pseudo-element selectors and how they are applied.
Pseudo-Class Selectors
There are seven pseudo-class selectors, one for the first child of an element, one for language, four for links and one for user focus. The pseudo-class selectors depend on an element being the first child of another element, or having an attribute set or being in a certain state.
- First Child
- :first-child - Selects the first child of an element.
- Language
- :lang(language-code) - Selects elements matching the language-code.
- Mouse
- :active - Determines how a link looks as a visitor clicks on it.
- :hover - Determines how a link looks when a visitor hovers over it.
- :link - Determines how a link looks that a visitor hasn't clicked on yet.
- :visited - Determines how a link looks that a visitor has clicked on previously.
- User Focus
- :focus - Determines how an element looks when a user clicks on, or tabs to it.
Pseudo-Element Selectors
There are four pseudo-element selectors, two positional and two content. The positional pseudo-element selectors depend on an elements position. The content pseudo-element selectors add content, before or after, an element. The language pseudo-element selector depends on what lang attribute has been set.
- Positional
- :first-letter - Selects the first letter of an element.
- :first-line - Selects the first line of an element.
- Content
- :before -Adds content before an element.
- :after - Adds content after an element.
Viewing Pseudo Selectors
Lets see some examples of the above pseudo selectors so we can see what they do.
Open up the file with Notepad we created and tested in Lesson 3: Advanced Tag Selectors.
You saved the file to your computer in the C:\_CSSIntermediate folder as lesson_3_csspage.html
Copy and paste the following code into the reopened file, overwriting the existing text.
<!DOCTYPE html>
<!-- Our HTML/CSS for Pseudo Selectors follows -->
<html  lang="en">
<head>
<title>Intermediate CSS - Lesson 4 - Pseudo Selectors</title>

<style type="text/css">

/* Pseudo-Class Selectors */
a:active {
  background-color: orange;
}
a:visited {
  color: green;
}
a:link {
  color: blue;
}
a:hover {
  color: #CA1D07;
}
input:focus {
  background-color: yellow;
}

/* Pseudo-Element Selectors */
.para1:first-letter {
  color: red;
  font-weight: 700;
}
.para2:first-line {
  color: purple;
}
.para3:lang(fr) {
  color: fuchsia;
}
li:first-child {
  color: green;
}
ul:before {
 content: "ADDED CONTENT BEFORE LIST";
}
ul:after {
  content: "ADDED CONTENT AFTER LIST";
}

</style>

</head>
<body>
<h1>CSS Intermediate</h1>
<h2>Pseudo Classes</h2>
<p><a href="#pie">Big Pie Link</a></p>
<form action="../htmlintermediate/simpleform.html"  method="get">
  <p>First Name:<input type="text" name="firstname"></p>
  <p>Middle Name:<input type="text" name="middlename"></p>
  <p>Last Name:<input type="text" name="lastname"></p>
</form>
<h2>Pseudo Elements</h2>
<p class="para3" lang="fr">Chivaliers de la table ronde.</p>
<ul>
  <li>Tin of Tomatoes</li>
  <li>Bacon</li>
  <li>Loaf of Bread</li>
  <li>Mushrooms</li>
</ul>
<h2 id="pie">Link To same Page</h2>
<p class="para1">Big Pie Picture
<img src="https://server2client.com/images/chickenpiesmall.jpg"
     alt="Same Image But Bigger"
     width="300"
     height="200"></p>
<p class="para2">Some filler text. Some filler text. Some filler text.
Some filler text. Some filler text. Some filler text. Some filler text.
Some filler text. Some filler text. Some filler text. Some filler text.
</p>
</body>
</html>
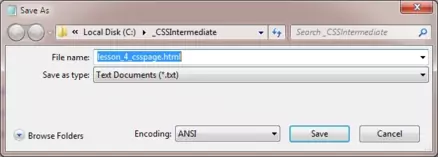
Save the file in the C:\_CSSIntermediate folder as lesson_4_csspage.html and close the Notepad.

Viewing Our Saved File
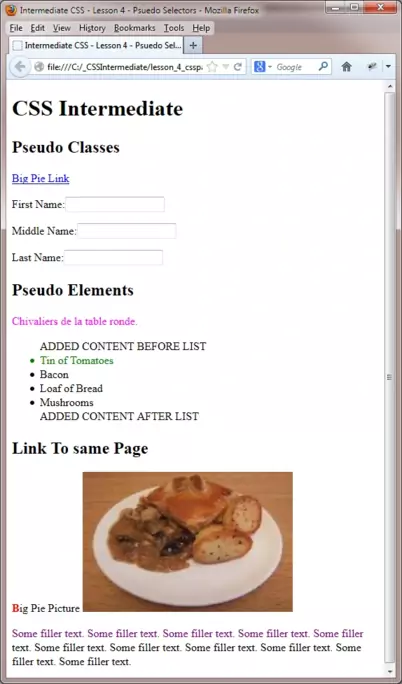
From the C:\_CSSIntermediate folder, double click on the saved file and it will appear in your default web browser and look something like the following image.

Reviewing The Code
The screenshot above shows the page as it would look when a visitor hasn't clicked a link, or tabbed to one of the three input fields. As you can see the link is coloured blue as we styled via the :link pseudo element for unvisited links.
The Chivaliers de la table ronde text has been coloured fuchsia as styled using the :lang pseudo element with a language code of fr.
Content has been added before and after the unorderlist as specified in the :before and :after pseudo elements. The first <li> element is green as styled using the :first-child pseudo element.
The first letter of the paragraph using the .para1 class has been styled red using the :first-letter pseudo element.
The first line of the paragraph using the .para2 class has been styled purple using the :first-line pseudo element. If you resize your screen this can change according to the amount of text visible per line.
Lesson 4 Complete
Try clicking the link and see how the link colour changes for visited links and when hovered over. You may also notice, in the brief second as you activate a tag, it's backgound colour changes to orange. Click on, or tab to, one of the input fields and see how the background colour changes to yellow for the <input> field in focus.
Related Tutorials
CSS Basic Tutorials - Lesson 4 - Basic Tag Selectors
CSS Intermediate Tutorials - Lesson 3 - Advanced Tag Selectors
CSS Advanced Tutorials- Lesson 2 - Attribute Selectors
What's Next?
In the next tutorial we look at style inheritance and what it means.