Styling TablesS2C Home « Styling Tables
HTML gives us a lot of tags to use when creating tabular data. CSS adds five properties to this list to give us even more control over the presentation of our tables. In this lesson we explore these properties which allow us to collapse and space our table borders and how to handle empty cells. We can decide where to put table captions and whether to use automatic or fixed table layouts.
Styling Tables CSS Properties
border-collapse
Specifies whether table borders are collapsed (collapsed border model), or separated (separated border model).
border-spacing
Specifies a distance between cells when the separated border model is used.
caption-side
Specifies a position for a table caption.
empty-cells
Specifies whether empty cells display borders and backgrounds when the separated border model is used.
table-layout
Specifies the table layout algorithm to use when laying out a table.
A Quick Word About Border Models
There are two types of border models:
- collapsed border model - Continuous borders throughout the table.
- separated border model - Borders around individual cells.
Most table styles can be achieved with either model. Be aware that some of the CSS properties, as mentioned above, are redundant when using the collapsed border model.
Lets see some examples of the CSS properties that allow us to style tables and see what they do.
Open up the file with Notepad we created and tested in Lesson 3: Styling Lists.
You saved the file to your computer in the C:\_CSSAdvanced folder as lesson_3_csspage.html
Copy and paste the following code into the reopened file, overwriting the existing text.
<!DOCTYPE html>
<!-- Our HTML/CSS for Styling Tables follows -->
<html  lang="en">
<head>
<title>Advanced CSS - Lesson 4 - Styling Tables</title>

<style type="text/css">
/* Style Tables */
table, td {
  border: 1px solid red;
}
/* Fixed Table Layout and Collapsed */
#table1 {
  border-collapse: collapse;
  table-layout: fixed;
  width: 60%;
}
/* Show Empty Cells */
#table2 {
  caption-side: bottom;
}
#table2 td {
  border: 1px solid black;
  background-color: orange;
  empty-cells: show;
}
/* Hide Empty Cells */
#table3 td {
  border: 1px solid black;
  background-color: orange;
  empty-cells: hide;
}
/* Separate the borders for this table */
#table4 {
  border-collapse: separate;
  border-spacing: 10px;
}
/* Collapse the borders for this table */
#table5 {
  border-collapse: collapse;
  border-spacing: 10px;
}</style>
</head>

<body>
<h1>Styling Tables: CSS Properties</h1>
<h2>The table-layout CSS property</h2>
<h3>With the default (auto) value</h3>
<table>
  <tr>
    <td>BananaBananaBananaBanana</td>
    <td>YellowYellow</td>
  </tr>
  <tr>
    <td>Pea</td>
    <td>Green</td>
  </tr>
</table>
<h3>With the fixed value and collapse Properties</h3>
<table id="table1">
  <tr>
    <td>BananaBananaBananaBanana</td>
    <td>YellowYellow</td>
  </tr>
  <tr>
    <td>Pea</td>
    <td>Green</td>
  </tr>
</table>
<h2>The empty-cells CSS property</h2>
<h3>Show Empty Cells Using a Bottom Caption</h3>
<table id="table2" border="1">
  <caption>Caption Name</caption>
  <tr>
    <td>Banana</td>
    <td>Yellow</td>
  </tr>
  <tr>
    <td>Pea</td>
    <td></td>
  </tr>
</table>
<h3>Hide Empty Cells and Caption Default</h3>
<table id="table3" border="1">
  <caption>Caption Name</caption>
  <tr>
    <td>Banana</td>
    <td>Yellow</td>
  </tr>
  <tr>
    <td>Pea</td>
    <td></td>
  </tr>
</table>
<h2>The border-spacing CSS property</h2>
<h3>With separated border model, border spacing will occur</h3>
<table id="table4">
  <tr>
    <td>Banana</td>
    <td>Yellow</td>
  </tr>
  <tr>
    <td>Pea</td>
    <td>Green</td>
  </tr>
</table>
<h3>With collapsed border model, border spacing IS IGNORED</h3>
<table id="table5">
  <tr>
    <td>Banana</td>
    <td>Yellow</td>
  </tr>
  <tr>
    <td>Pea</td>
    <td>Green</td>
  </tr>
</table>
</body>
</html>
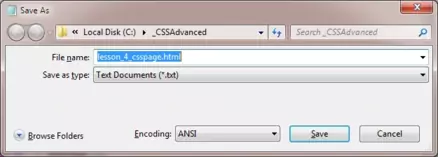
Save the file in the C:\_CSSAdvanced folder as lesson_4_csspage.html and close the Notepad.

Viewing Our Saved File
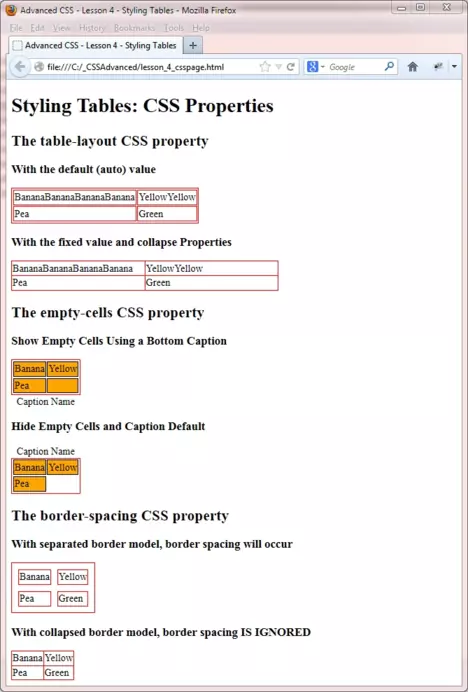
From the C:\_CSSAdvanced folder, double click on the saved file and it will appear in your default web browser and look something like the following image.
id="table1" uses percentages for row columns, so resize screen to see row overspill.

Reviewing The Code
On this occasion I think the screenshot and the style comments are enough to explain the effects of each property.
One thing that isn't apparent is load times for tables. With table-layout set to auto, which is the default, table row widths are automatically worked out from the longest unbreakable content for each cell. This of course means all rows of a table need to be read before table generation, so is the slower of the options available.
With table-layout set to fixed table row widths are those specified for the table. Therefore each row of a table can be rendered as it is read, so this is the faster of the options available. This could be a factor when displaying large tables.
Lesson 4 Complete
As you can see added to the HTML table tags already covered, these CSS properties give us real flexibility in how we create and display our tables.
Related Tutorials
HTML Intermediate Tutorials- Lesson 6 - An Introduction To Tables
HTML Advanced Tutorials - Lesson 5 - Advanced Tables
What's Next?
Navigation bars are so commonplace, that everyone recognizes them and the ease with which they allow visitors to explore a sites content. In this lesson we look at some ways to create navigation bars for easy access for our users.
CSS Reference
Styling Tables CSS Properties Content
The border-collapse CSS Property
The border-spacing CSS Property
The caption-side CSS Property
The empty-cells CSS Property
The table-layout CSS Property