SetupS2C Home « Setup
Project Setup Top
In this lesson we create our project file structure including all the Java source and class files folders required for the Case Study.
The first thing we are going to do in our setup for the Case Study is to make a base folder called _Case_Study in the root directory of our hard drive which we can put all our other folders into.
Lets create a folder for our Case Study files, in Windows this would be:
double click My Computer icon
double click C:\ drive (or whatever your local drive is)
right click the mouse in the window
from the drop down menu select New
click the Folder option and call the folder _Case_Study and press enter.
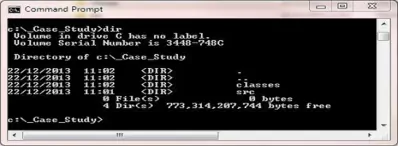
Within the _Case_Study folder we will create separate folders to hold our source files and our compiled byte code and these will be called src and classes.
So after creating these folders your directory structure should look something like the following screenshot:

Creating Our Package Folders Top
Now we need create folders for our packages within the src directory, we don't need to do this for our classes directory, as this can done during compilation of our code
using the -d option, which we will discuss when we compile.
We worked out in the last lesson after investigating the proposal that we need packages for:
- The code to process the manufacturer file and requests sent from users of the GUI, which is the model element of the MVC pattern.
- The client code, which is our GUI and is the view element of the MVC pattern.
- The services code, which incorporates our local and remore services and is the controller element of the MVC pattern.
- We will also need a package for placing our testing classes in.
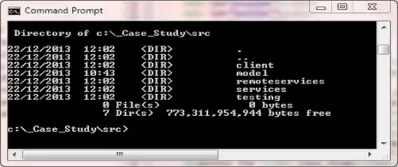
Ok, lets create these five new folders: model, view, services, remoteservices and testing within our src folder.
So after creating these folders your src folder directory structure should look something like the following screenshot:

That's all we need to do as far as setting up the folder packages for the project goes.
Create Manufacturer Test File Top
In this part of the lesson we write the code to create a Manufacturer test file to be used with the Case Study. We want the file to have a single header record with a Manufacturer file number, followed by data records that contain the record information repeated until the end of the file.
Stocking Goods Limited have provided us with the format of the Manufacturer file they want us to use, as shown in Manufacturer File Format, although there is no test file provided.
Manufacturer Test File Creation Top
Using the information, as shown in Manufacturer File Format, we can create a simple Manufacturer test file that should be fit for purpose when coding the rest of the case study.
NOTE: The pathnames used in all the examples for the case study are using a Windows operating system, so if you are using Unix or another operating system adjust them accordingly.
This also applies to code such as:
static String pathname = "C:\\_Case_Study\\src\\manufacturerTest.txt";
Which is used in the example below and you may have to adjust for your operating system.
Cut and paste the following code into your text editor and save it in the c:\_Case_Study\src\testing directory. We have covered all the code below in the other sections of the site
apart from the RandomAccessFile file which allows reading, writing and byte location via a pointer and the self documenting HTML tags we have added for the
javadoc tool, which will be run on project completion to produce system documentation.
package testing;

import java.io.IOException;
import java.io.RandomAccessFile;

public class CreateManufacturerFile {
    /**
     * The pathname for the Manufacturer file we are going to create.
     */
    static String pathname = "C:\\_Case_Study\\src\\manufacturertestfile.txt";
    /**
     * The Manufacturer file.
     */
    static RandomAccessFile manufacturerFile;
    /**
     * @param args
     */
    public static void main(String[] args) {
        try {
            // Create Manufacturer Test File and header
            manufacturerFile = new RandomAccessFile(pathname, "rw");
            int fileNumber = 1234;
            manufacturerFile.writeInt(fileNumber);
            // Create Manufacturer records
            String[] createArray = {" ", "Smart Clothes Incorporated", "Tooting",
                    "Blue Trousers", "12.99", "308", "52"};
            passManufacturerFields(createArray);
            String[] createArray1 = {" ", "Smart Clothes Incorporated", "Swindon",
                    "Red Checked Cotton Shirt", "21.99", "627", " "};
            passManufacturerFields(createArray1);
            String[] createArray2 = {" ", "Fine Fancy Foods", "Birmingham",
                    "Chrismas Pudding", "7.99", "627", "12"};
            passManufacturerFields(createArray2);
            String[] createArray3 = {" ", "Car Parts Ltd", "Swindon",
                    "Front Axle", "222.49", "5", " "};
            passManufacturerFields(createArray3);
            String[] createArray4 = {" ", "Fine Fancy Foods", "Swindon",
                    "Crispy Duck", "5.99", "72", " "};
            passManufacturerFields(createArray4);
            String[] createArray5 = {" ", "Smart Clothes Incorporated", "Birmingham",
                    "Blue Jeans", "29.99", "123", "7"};
            passManufacturerFields(createArray5);
            String[] createArray6 = {" ", "Smart Clothes Incorporated", "Chester",
                    "Pink Scarf", "2.99", "722", " "};
            passManufacturerFields(createArray6);
            String[] createArray7 = {" ", "Fine Fancy Foods", "Chester",
                    "Smoked Salmon", "9.99", "422", " "};
            passManufacturerFields(createArray7);
            String[] createArray8 = {" ", "Smart Clothes Incorporated", "Braintree",
                    "Top Hat", "79.99", "29", "2"};
            passManufacturerFields(createArray8);
            String[] createArray9 = {" ", "Car Parts Ltd", "Birmingham",
                    "Back Axle", "252.99", "8", " "};
            passManufacturerFields(createArray9);
            String[] createArray10 = {" ", "Fine Fancy Foods", "Braintree",
                    "Strawberry Cheesecake", "2.99", "999", " "};
            passManufacturerFields(createArray10);
            String[] createArray11 = {" ", "Car Parts Ltd", "Tooting",
                    "Windscreen Wipers", "12.99", "278", " "};
            passManufacturerFields(createArray11);
            String[] createArray12 = {" ", "Fine Fancy Foods", "Tooting",
                    "Quiche Lorraine", "4.99", "812", "127"};
            passManufacturerFields(createArray12);
            manufacturerFile.close();
        } catch (IOException e) {
            e.printStackTrace();
        }
    }

    /**
     * This method passes a Manufacturer data field for writing.
     *
     * @param A String array holding Manufacturer information.
     */
    private static void passManufacturerFields(String[] manufacturerArray)
            throws IOException {
        String s = "";
        // Pass string array to write out
        for (int i=0; i<7; i++) {
            s = manufacturerArray[i];
            writeBytesToFile(i, s);
        }
    }

    /**
     * This method populates the Manufacturer file and pads each field.
     *
     * @param fieldNumber A number denoting field to populate.
     * @param field The data to populate field with.
     */
    private static void writeBytesToFile(int fieldNumber, String field)
            throws IOException {
        int spaceWrite = 0;
        String s = " ";
        // Populate Manufacturer data record
        switch (fieldNumber) {
            case 0:
                manufacturerFile.writeBytes(field);
                break;
            case 1:
            case 2:
                manufacturerFile.writeBytes(field);
                spaceWrite = 30 - field.length();
                for (int i=0; i<spaceWrite; i++) {
                    manufacturerFile.writeBytes(s);
                }
                break;
            case 3:
                manufacturerFile.writeBytes(field);
                spaceWrite = 40 - field.length();
                for (int i=0; i<spaceWrite; i++) {
                    manufacturerFile.writeBytes(s);
                }
                break;
            case 4:
                manufacturerFile.writeBytes(field);
                spaceWrite = 8 - field.length();
                for (int i=0; i<spaceWrite; i++) {
                    manufacturerFile.writeBytes(s);
                }
                break;
            case 5:
            case 6:
                manufacturerFile.writeBytes(field);
                spaceWrite = 3 - field.length();
                for (int i=0; i<spaceWrite; i++) {
                    manufacturerFile.writeBytes(s);
                }
                break;
            default:
                System.out.println("Erroneous field!");
        }
    }
}
Compiling Our Source File With the -d Option
Open your command line editor:
Change to directory cd c:\_Case_Study\src\testing
Compile CreateManufacturerFile.java using the java compiler with the -d option
javac -d ..\..\classes CreateManufacturerFile.java
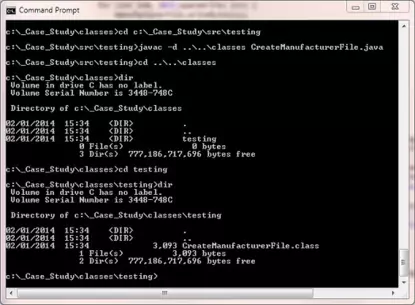
What we are saying with the -d option is that we want our compiled bytecode to go into the classes directory which is two directories above this directory. The following screenshot
shows the javac command and the contents of the classes directory after the compile. Because we have used a package (package testing;) at the top of the code the compiler has created this
directory within the classes directory. When we look in the testing directory we can see the compiled CreateManufacturerFile.class file.

Running The Packaged CreateManufacturerFile class
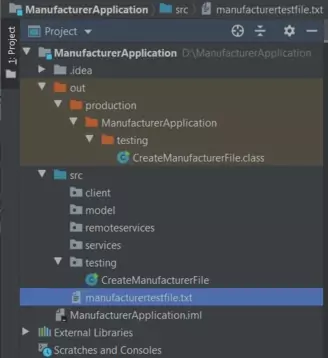
Run the CreateManufacturerFile class from the classes directory using our package as well (java testing.CreateManufacturerFile). We should now have a test Manufacturer
file ready to use within the src directory called manufacturertestfile.txt as shown in the screenshot below.

Lesson 2 Complete
That's it for the Setup lesson in which we setup up some directories for the project and created a test Manufacturer file.
Related Java Tutorials
Beginning Java - Primitive Variables
Beginning Java - Conditional Statements
Beginning Java - Loop Statements
Objects and Classes - Arrays
Objects & Classes - Class Structure and Syntax
Objects & Classes - Reference Variables
Objects & Classes - Methods
Objects & Classes - Instance Variables & Scope
Objects & Classes - Constructors
Objects & Classes - Methods
Objects & Classes - Static Members
OO Concepts - Interfaces
Exceptions - Handling Exceptions
Exceptions - Declaring Exceptions
API Contents - Inheritance - Using the package keyword
API Contents - Inheritance - Using the import keyword
Swing - Gui Concepts
Swing - RMI
What's Next?
In the next lesson we set up the first part of the model elements of the MVC pattern that can be derived from the project proposal.